Clear your space; clear your mind!
DIY This $328 Anthropologie Wall Organizer for Less Than $50

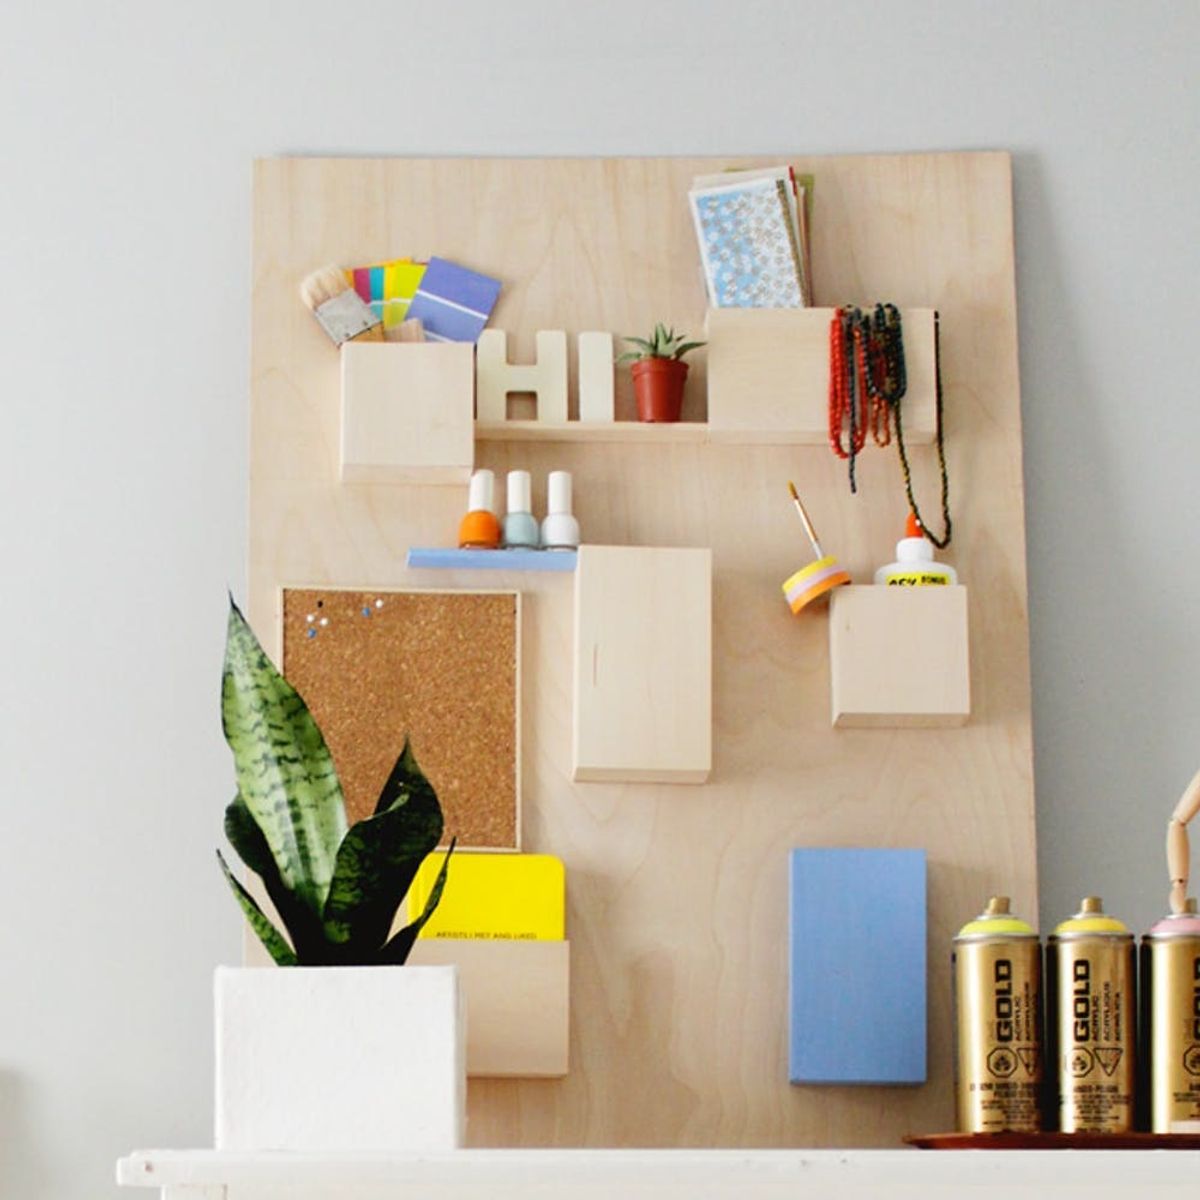
You know that moment when you have so much work to do and somehow you spend hours cleaning instead of actually working?! We’ve all been there. A messy desk can increase your stress levels and distract you from being the #girlboss that you are! That’s why this Anthropologie Hanging Desk Organizer ($328) is giving us major desk envy. It’s the perfect solution for storing your stationary, tools or craft supplies while keeping your desk clutter-free. Today we’re showing you how to make a DIY Copycat — no power tools are required!
Materials + Tools
— plywood, 24 x 32 inch
— three pieces of basswood, 1/16 x 4 x 24 inch
— pencil
— ruler
— X-Acto knife
— cutting mat
— sandpaper, medium grit
— wood glue
— super glue
— blue spray paint (optional)
Instructions
1. Ask your local hardware store to cut your plywood board to 24 x 32 inches. Optional: Roughly divide your plywood board into three sections and mark it with a pencil. Each section will have two boxes.
2. To create a box, measure and mark on one piece of basswood two 4-inches pieces and three 1.5-inches pieces.
3. With a sharp X-Acto knife and a ruler to guide it, carefully cut the wood.
4. Add superglue along one side of a 1.5-inch piece and attach it to your back piece. Let it dry.
5. Once you’ve attached all three sides of the box to your back piece, reinforce the joints with more superglue.
6. Add superglue to the edge of the three side pieces and lay your front piece on top. Once the superglue has dried, add a little superglue to the inside of the joint. Set it aside to dry.
7. With a medium grit sandpaper, gently sand any rough edges or overlap for a smooth box. Continue steps 3-7 to create several boxes in different sizes. If you want to add a cork board or shelves, measure and mark your desired size with a pencil and ruler. Then cut it with an X-Acto knife.
8. Add wood glue to your box and gently place it where you want it on your plywood board. Leave it to dry overnight.
When you buy plywood from your local hardware store, they will usually be able to cut your board to the desired size. We asked to have it cut to 24 x 32 inches to hold all of our things! To plan out a rough layout for the board, we divided our plywood board into three sections, marked it with a pencil and planned to place two boxes in each section.
To create the boxes on one piece of basswood, measure and mark two 4-inch pieces and three 1.5-inch pieces. These will make your front, back, two sides and bottom pieces for one box. Even though it won’t be visible, we want to create a back for the box so we can glue it to our board and it won’t fall off.
With a sharp X-Acto knife and a ruler to guide it, carefully cut the wood. You won’t be able to cut it straight through with the first cut. Use normal pressure to make a few cuts over the same spot and it will cut through the basswood. You can also use balsa wood for a lightweight wood.
Add superglue along one side of a 1.5-inch piece and attach it to your back piece. Hold it in place for 10 seconds to let the superglue dry. Once you’ve attached all three sides of the box to your back piece, reinforce the joints with more superglue.
Now add superglue to the edge of the three side pieces and lay your front piece on top. Once the superglue has dried, add superglue to the inside of the joint where you can reach. Set it aside to dry for about five minutes.
With a medium grit sandpaper, gently sand any rough edges or overlap for a smooth box.
Continue steps 3-7 to create several boxes in different sizes. We created six boxes that were 4 x 4 inches, 4 x 7 inches and 7 x 4 inches. If you want to add a cork board or shelves, measure and mark your desired size with a pencil and ruler. Then cut it with an X-Acto knife.
Add wood glue to the back of your box and gently place it where you want it on your plywood board. The wood glue will make it slippery, so use gentle and firm pressure to attach it to the board. Leave it to dry overnight before using it.
Now all your crafty supplies are within easy reach!
Show us how you keep your crafts organized on Instagram + use our hashtag #iamcreative!


