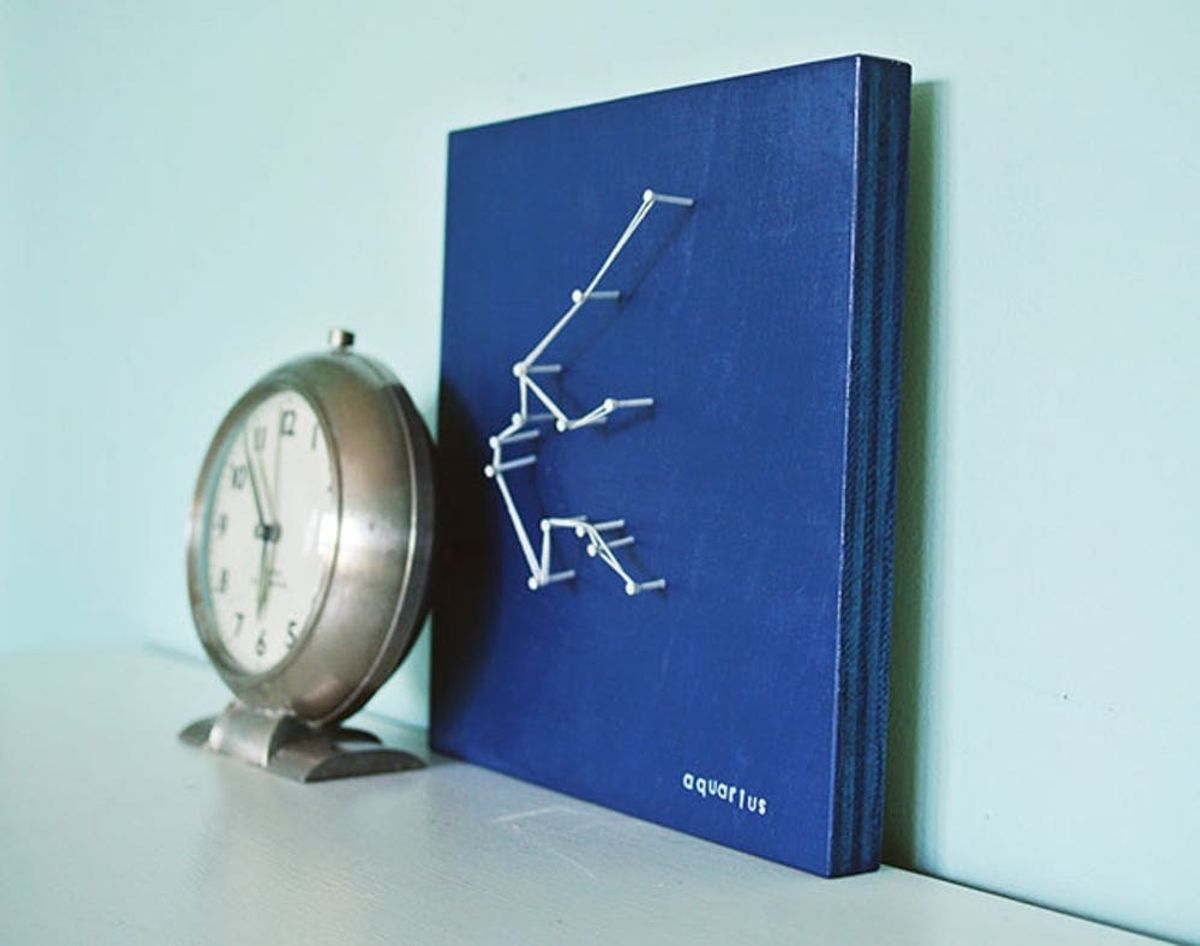
One of our favorite things about nail string art is that it’s one of the easiest projects to personalize. And while we’ve created our fair share of custom signs using just nail and string, we haven’t ever thought of tackling that other kind of sign with this DIY basic… until now! Introducing Zodiac constellation nail string art, or, the coolest customizable wall art in the entire universe :) It’s easy to show off your sign using a just a few craft supply staples—white nails serve as stars connected by white string to create the full constellation. Far out!
Show Off Your Sign With Zodiac Constellation Wall Art

One of our favorite things about nail string art is that it’s one of the easiest projects to personalize. And while we’ve created our fair share of custom signs using just nail and string, we haven’t ever thought of tackling that other kind of sign with this DIY basic… until now! Introducing Zodiac constellation nail string art, or, the coolest customizable wall art in the entire universe :) It’s easy to show off your sign (or the whole fam’s!) using a just a few craft supply staples—white nails serve as stars connected by white string to create the full constellation. Far out!
Materials:
– 9 x 9 inch plywood planks
– dark blue craft paint
– 1 1/4 inch white nails (or just spray paint standard nails white!)
– white string
– small alphabet stamp set
– white stamp pad
– constellation print out
Tools:
– hammer
– paint brush
– scissors
Instructions:
1. Find your sign’s correlating constellation and print it on paper to fit the size of your plywood.
2. Paint your plywood plank dark blue and let it dry.
3. Center your constellation print on your plank. Place nails on each star and hammer into the wood—make sure they are in far enough so they won’t fall out, but are still tall enough to wrap string around them.
4. Remove the paper to reveal your “stars.” Then connect your constellation with string.
5. Label the plank with your constellation’s name using alphabet stamps and set it on display!
Start by printing your zodiac constellation on a piece of office paper—it’s just a Google search away! Make sure it’s printed to fit the size of your plywood. Ours was a 9 by 9 inch piece, but your local hardware store should be able to cut it down to your desired size.
Then, paint your plywood dark blue to mimic the night sky. Apply a second coat if needed, and don’t forget to cover the edges! When that’s dry, center your constellation print out on your plank and hammer nails in the place of each star. When your nails are all in, remove the paper to reveal your constellation—so cool!
But wait, it gets even better when you connect each “star” with white yarn. It’s as easy as connecting the dots: choose a nail to start and knot the string, then loop around each nail until your constellation is complete. For a final touch, add the name of your constellation to the bottom of your plank so that you can identify the sign in a cinch! We love how these alphabet stamps look in matching white ink.
And that’s it! Prop it up on a shelf or hang it on the wall using a basic mounting hook on the back. As you can see, I didn’t just stop at my sign—I made a few to represent friends and family. They look quite stunning as a set. In fact, a pair would make an extra special gift for newlyweds—adorbs!
It’s obvious that the stars totally aligned for this DIY ;)
Would you turn your sign into string nail art? What other DIY basic projects have you been up to lately? Tell us in the comments below.


