After you’ve aced the dip dye, perfected the ombre and can tie dye with your eyes closed, the next step up the DIY dying ladder is a technique called batik, and it might just be the coolest one yet.
DIY Trends: Learn to Batik Your Own Custom Designs on Fabric

After you’ve aced the dip dye, perfected the ombre and can tie dye with your eyes closed, the next step up the DIY dying ladder is a technique called batik, and it might just be the coolest one yet. Batik is a traditional Indonesian method for creating designs on fabric using wax and dye. The wax prevents the dye from seeping into the parts of the fabric it’s placed on, creating two-toned (or even more!) custom patterns on pillows, clothes and much more. And the designs can be as insanely intricate as you can imagine, from tribal-inspired patterns to starry constellations!
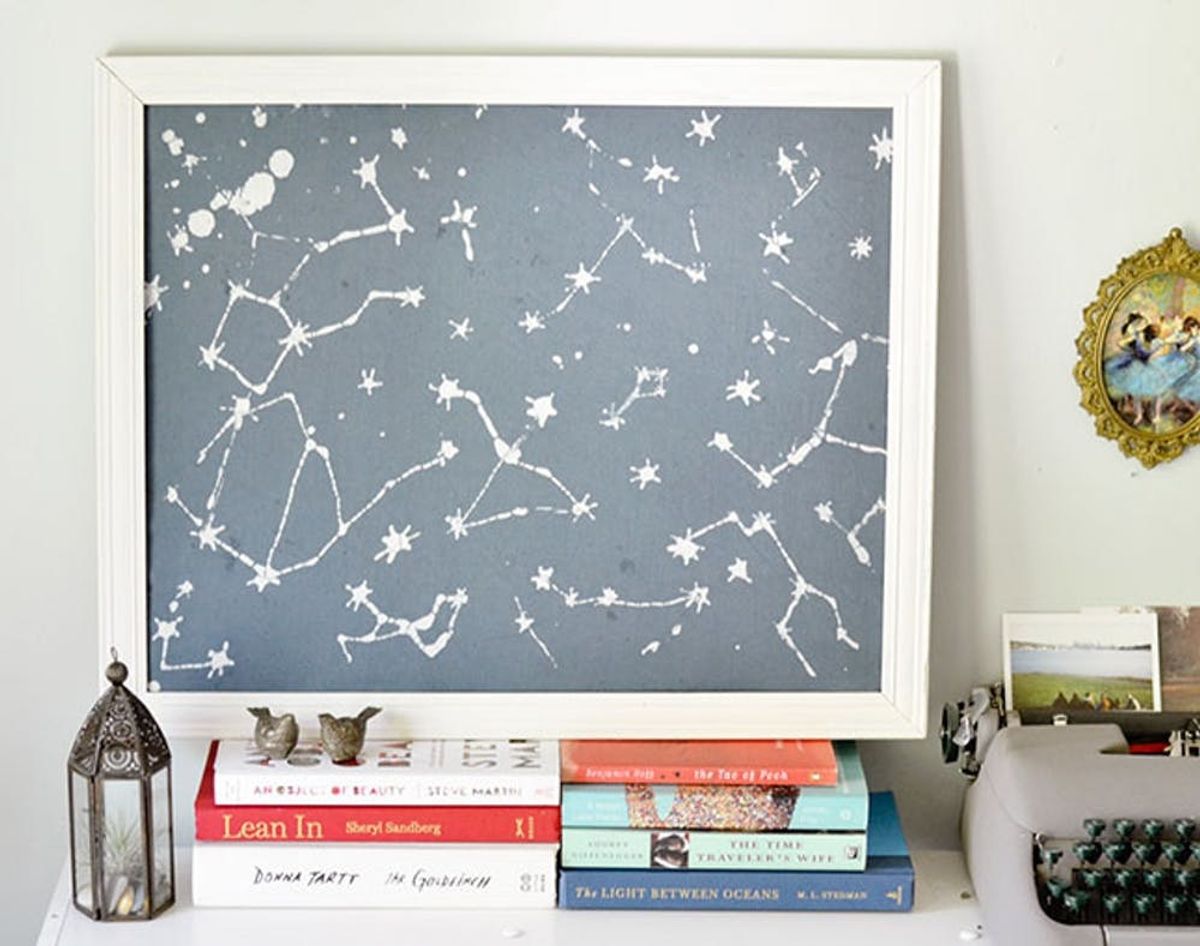
That’s how we’re introducing you to this versatile technique: by making astrological wall art with just one color and a simple pattern that makes it a perfect project for beginners. You’ll need a specific application tool to get your fabric looking pro and crackled to perfection, but don’t worry, you can always use a thin paintbrush if you can’t Add to Cart ASAP. Now onto this DIY — batik or bust!
Materials:
– white, untreated fabric
– a large frame or embroidery hoop
– beeswax + paraffin wax (or pre-mixed batik wax)
– fabric dye
– salt (for dye mixture)
– soda ash
Tools:
– scissors
– rubber gloves
– pencil
– thermometer
– Tjanting tool or thin paintbrush
– large bucket to mix dye
Instructions:
1. Wash your fabric to remove any oils and pre-shrink it.
2. Cut your washed fabric so that it’s a few inches bigger than your frame or hoop. Then, stretch your fabric over the frame or hoop so that it is taut and raised above your work surface. We used painter’s tape to secure our fabric tightly over the frame.
3. Draw your design on the fabric using a soft pencil.
4. Prepare your wax using 2 parts beeswax + 1 part paraffin (use more beeswax if you want defined lines; use more paraffin if you want an imperfect, crackled look). Or, you can use pre-mixed batik wax.
5. Melt your wax in a double boiler. Use a thermometer to keep track of the temperature of your wax. It should stay around 220-240 degrees F. It is important that you keep the wax at this temperature: If it is too hot, it could start a fire, if it’s too cool, it won’t work properly.
6. Apply the wax with your Tjanting tool. To use the Tjanting tool, either dip it into the wax to fill the tool or spoon the wax in, then immediately apply to your fabric. Work quickly to prevent the wax from hardening in your tool. Or, you can use a thin paint brush or stamping tools.
7. Once you have completed your wax design, mix your dye by following the packaging instructions.
8. Place fabric into the dye for no longer than 30 minutes. At the 20 minute mark, add a small amount of soda ash to your dye to fix the color.
9. Once you have achieved your desired color, carefully hand wash the excess dye from fabric with cold water (so you don’t melt the wax). Allow the piece to air dry.
10. To remove the wax, fill a pot with water, bring it to a boil and add your fabric. Use a spoon to mix the fabric around and keep it submerged. Once you think all of the wax has melted off, let the water cool and skim the wax off the surface.
11. Let your piece dry, and iron it if necessary. If you are going to iron it, you may want to sandwich the fabric between two pieces of newsprint, just in case there is any leftover wax.
12. Install the fabric in your frame or hoop and put your beautiful work on display!
For other batik projects that involve multiple colors and layers of wax, you should repeat steps 2-6 (if you are doing this, remember to start with the lightest color).
Tjanting tool first timers, listen up: To fill it with wax, you either want to dip your tool in the wax, or spoon it in. The wax shouldn’t run out the other end wildly, nor should it be a chore to funnel through the tool (that’s why it’s important to keep it at that temperature sweet spot). You’ll want to work closely to your pot — like stove-side — and keep a paper towel on hand as you move the tool from the wax to the fabric. As you apply the wax, the most important thing is that it completely penetrates the fabric, all the way through to the other side.
Remember, batik is an imperfect art, so embrace any imperfections or mistakes! This constellation design is perfect for trial and error — turn any splatters into extra stars or a milky way ;)
So pretty! We love the amount of control this kind of dying process gives us — SO much more than with the marbles + rubber bands of tie dye! We see LOTS of batik wall art in our future. And t-shirts, and pillows, and scarves, and shower curtains, and tote bags…
Have you ever dyed fabric using this method before? What other DIY methods have you used to dye fabric that you stand by? Tell us in the comments below.


