Trivets, sandals, camping accessories, oh my!
10 DIY Projects You Can Make With One Yard of Cotton Fabric

Sometimes the simplest materials are the most inspiring. An old t-shirt, a skein of cotton yarn, a blank pillowcase — it’s these DIY staples that we constantly find ourselves reinventing, hacking and personalizing. So, we decided to give all the gals on the DIY team the same challenge: Turn one yard of jersey-knit cotton fabric into something you’ve never made before.
Cotton
 I DIY’ed my wedding, I made 4,000 cotton pom poms and used several yards of cotton to create our photo booth backdrop. Suffice it to say, this textile and me are tight.
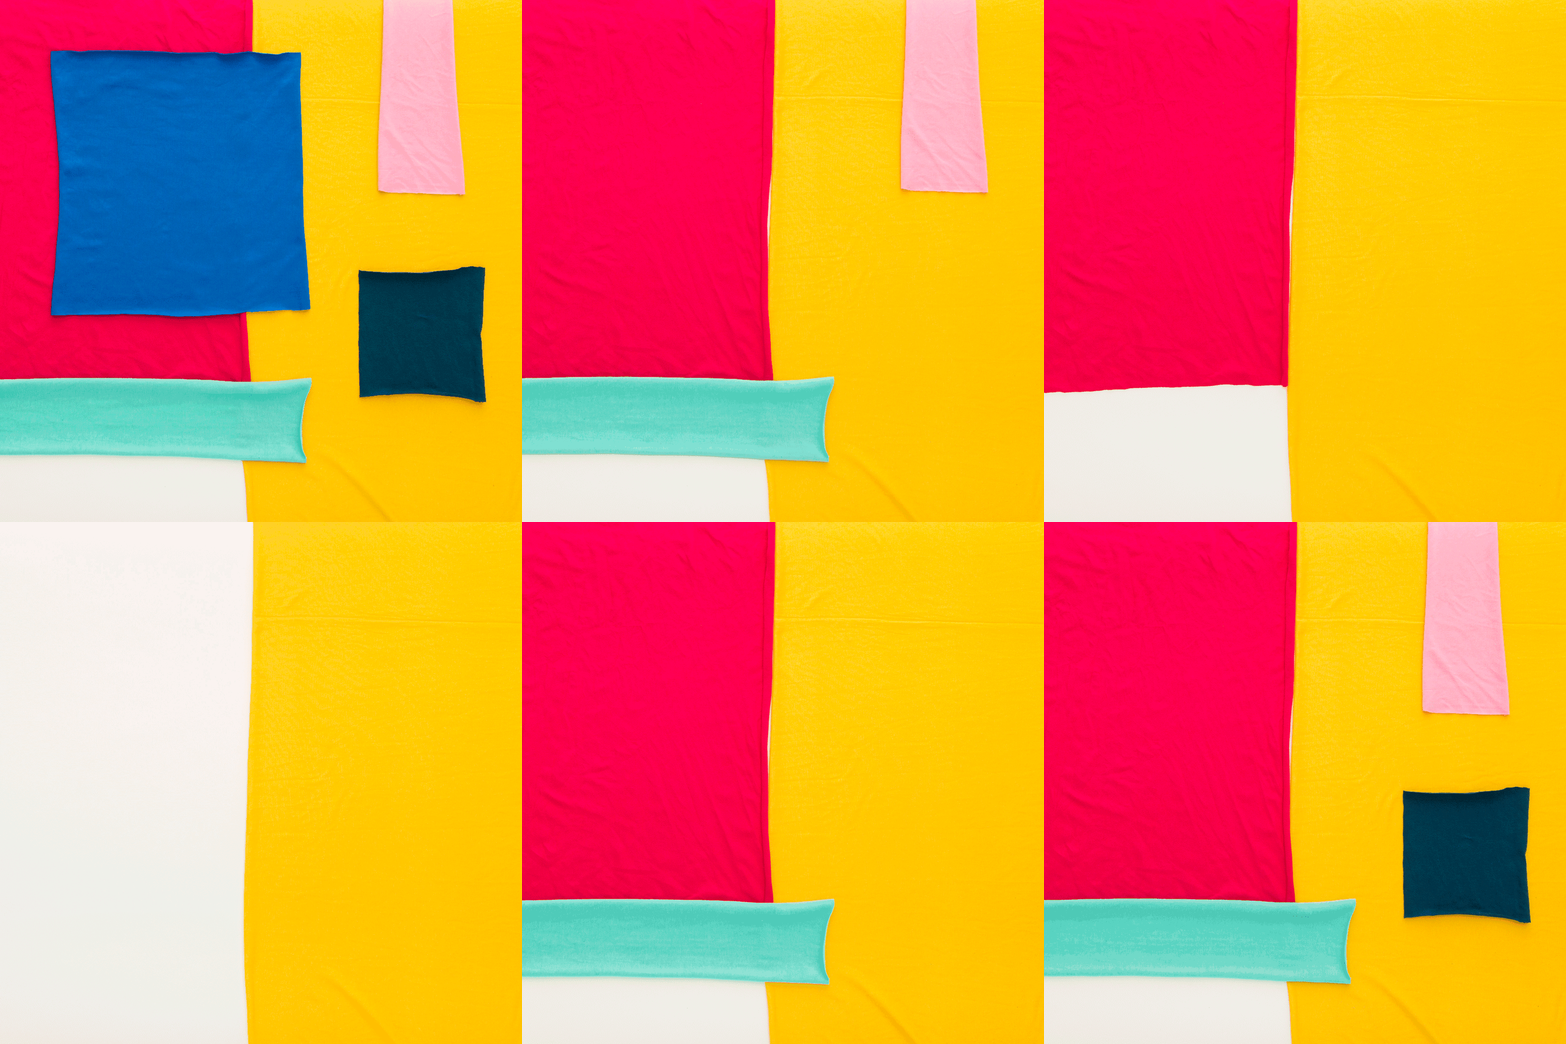
Now, back to the project at hand. We armed each of the DIY pros on staff with one yard of cotton fabric in one of six colors. The fabric itself (a jersey-knit cotton) is the same and is the base material for each of the subsequent projects. By making a few cuts here and there, adding embroidery floss, fabric paint and more, we were able to make 10 completely different projects.
Follow along to see what we made!
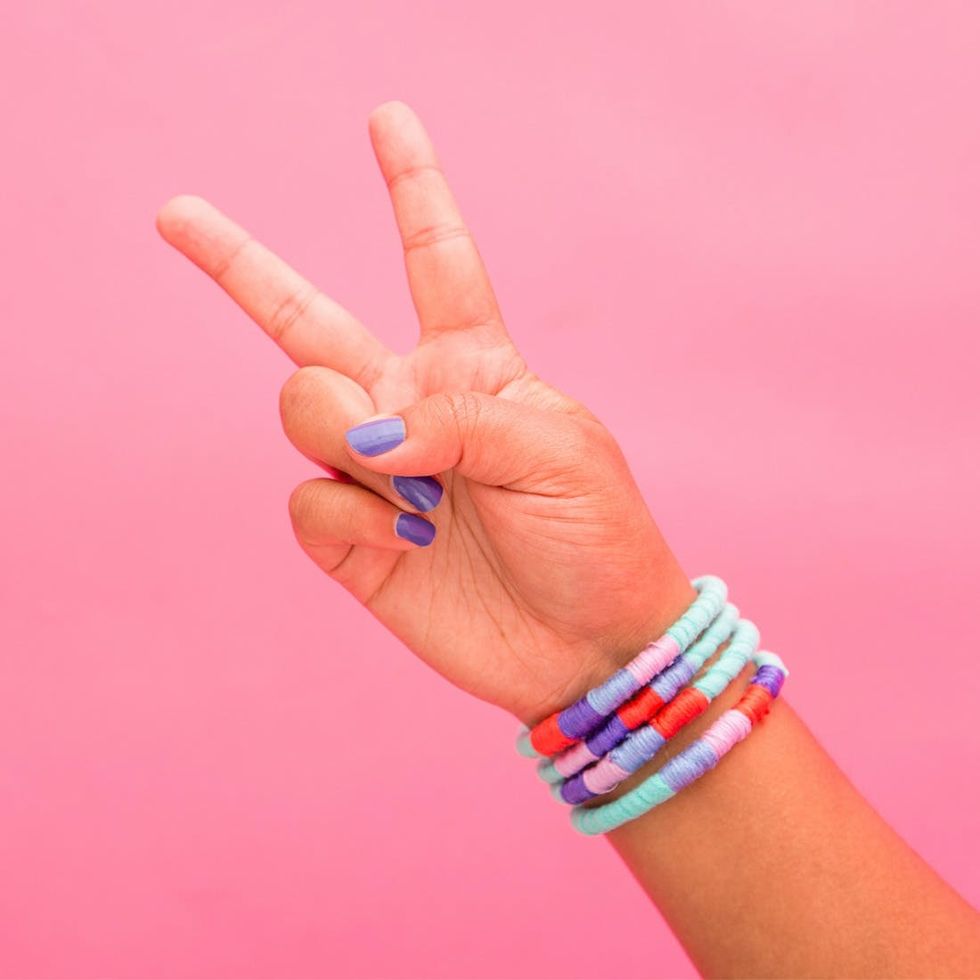
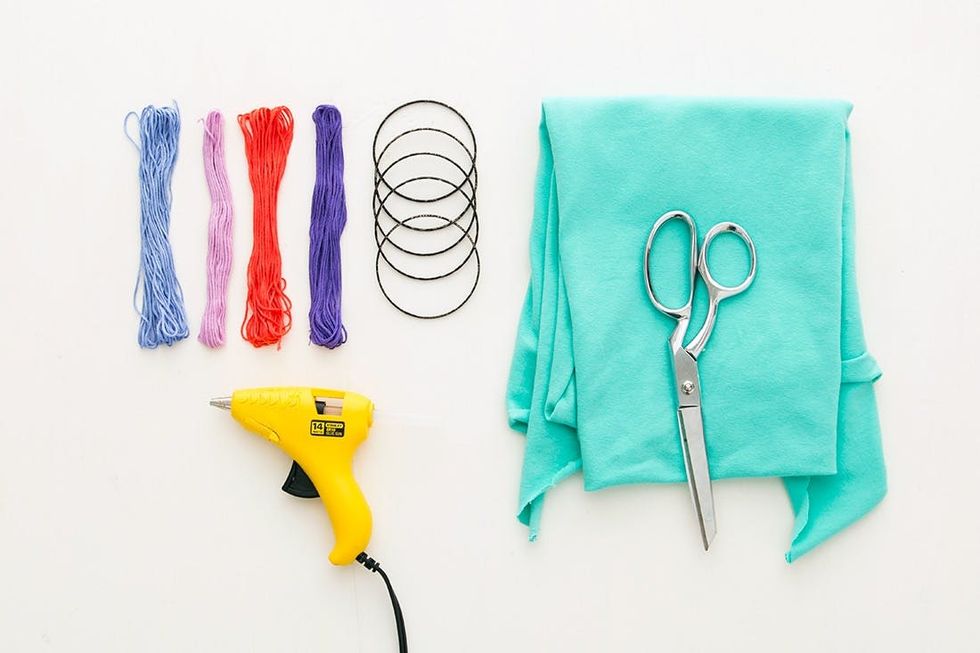
We’ll kick things off with my project! As I mentioned above, I’m Anjelika Temple, aka Anj, aka Executive Creative Director here at Brit + Co. For this project, I was inspired by all the bangles sitting at the bottom of my jewelry box. I rarely wear them because: a) They clink and clang against my desk and laptop all day long; b) Some of them are legitimately 20 years old and c) One only needs so many metal bangles. Time for a revamp. (Confession: You need way less than a yard of fabric to make this set of bangles!)
ANJ // STACKING BRACELETS
<b><br/></b>
 1. Cut jersey-knit cotton into pieces that are a ½-inch wide by a yard long.
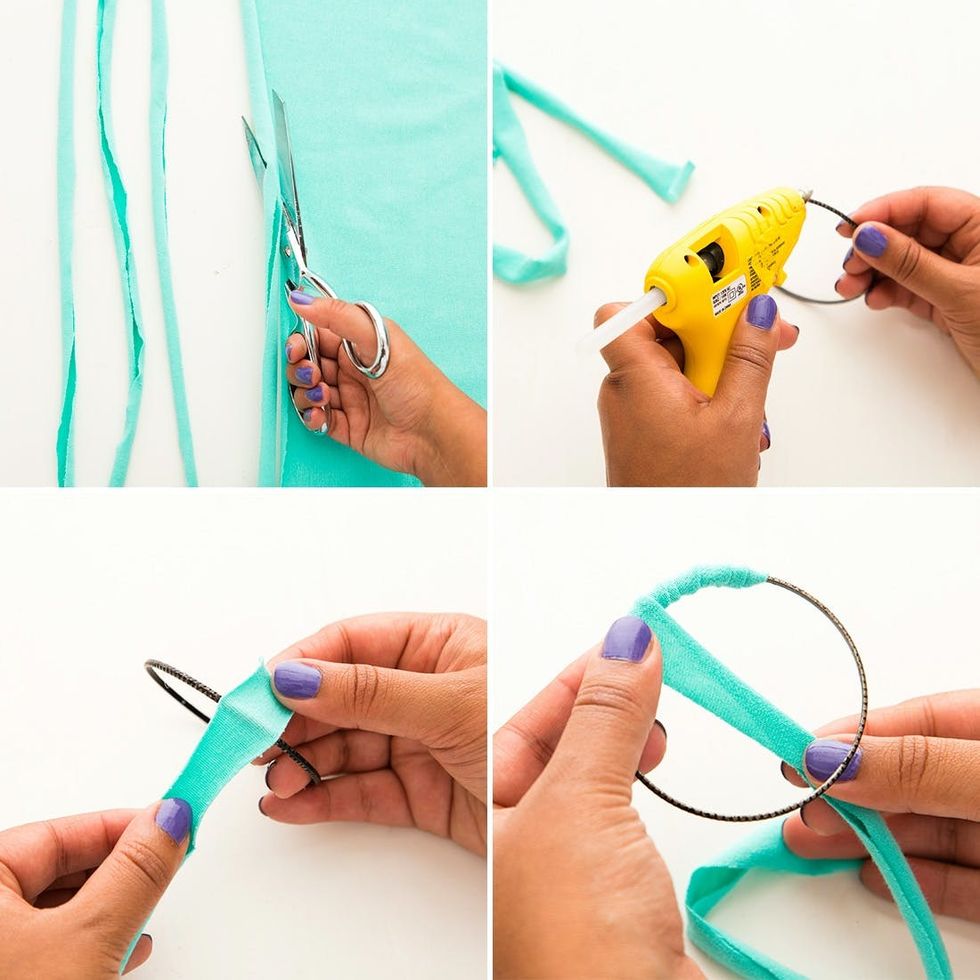
2. Dot a small amount of hot glue on the inside edge of your first bangle. Press one end of a fabric strip to attach it to the bangle.
3. Cut off any excess fabric on the tail end. Then start wrapping tightly around your bangle. Do this until you reach the end, then use hot glue to secure.
4. Tie a piece of embroidery floss around your bangle, then wrap it to create a color block. Use hot glue at the end to secure once you’ve completed each section.
Start by cutting jersey-knit cotton into pieces that are a ½-inch wide by a yard long. You’ll use one for each bangle! (A yard is definitely more than you need, but better to be safe and then snip off any excess at the end.)
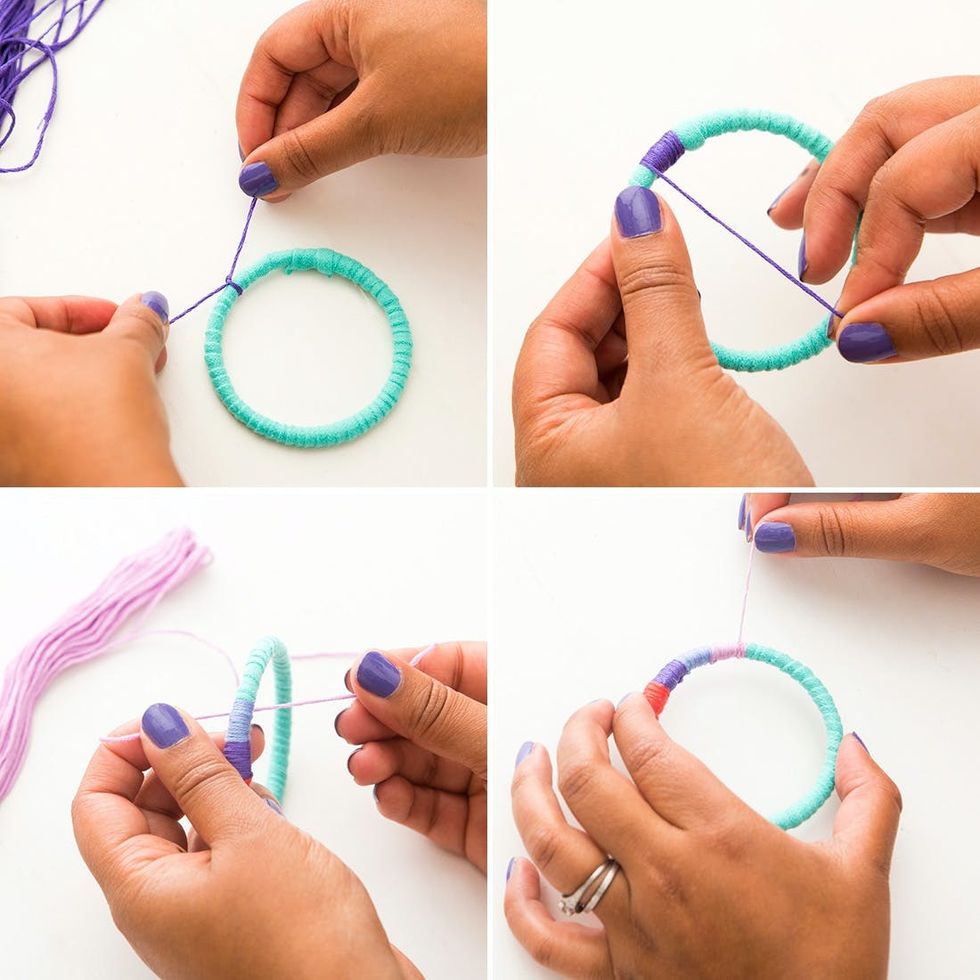
Dot a small amount of hot glue on the inside edge of your first bangle. Press one end of a fabric strip to attach it to the bangle. Cut off any excess fabric on the tail end. Then start wrapping tightly around your bangle. Do this until you reach the end, then use hot glue to secure the end.
To add some more color to your revamped arm candy, tie a piece of embroidery floss around your bangle, then wrap it to create a color block. Use hot glue at the end to secure once you’ve completed each section.
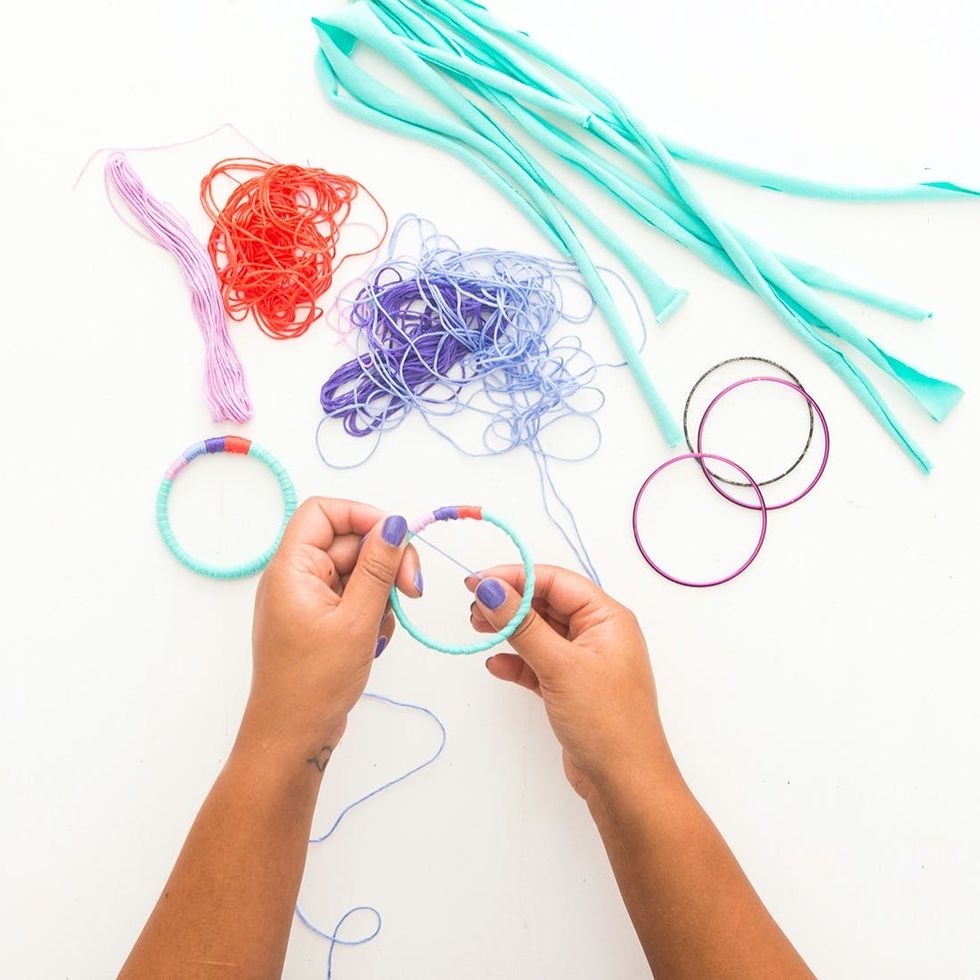
Once again, I can truly call myself a wrap star ;).

Admittedly, you would need to make about 100 bangles to truly use a yard of fabric. But, I love how easy it was to transform boring old jewelry into something new, fresh and colorful.

MADDIE // WOVEN TRIVET
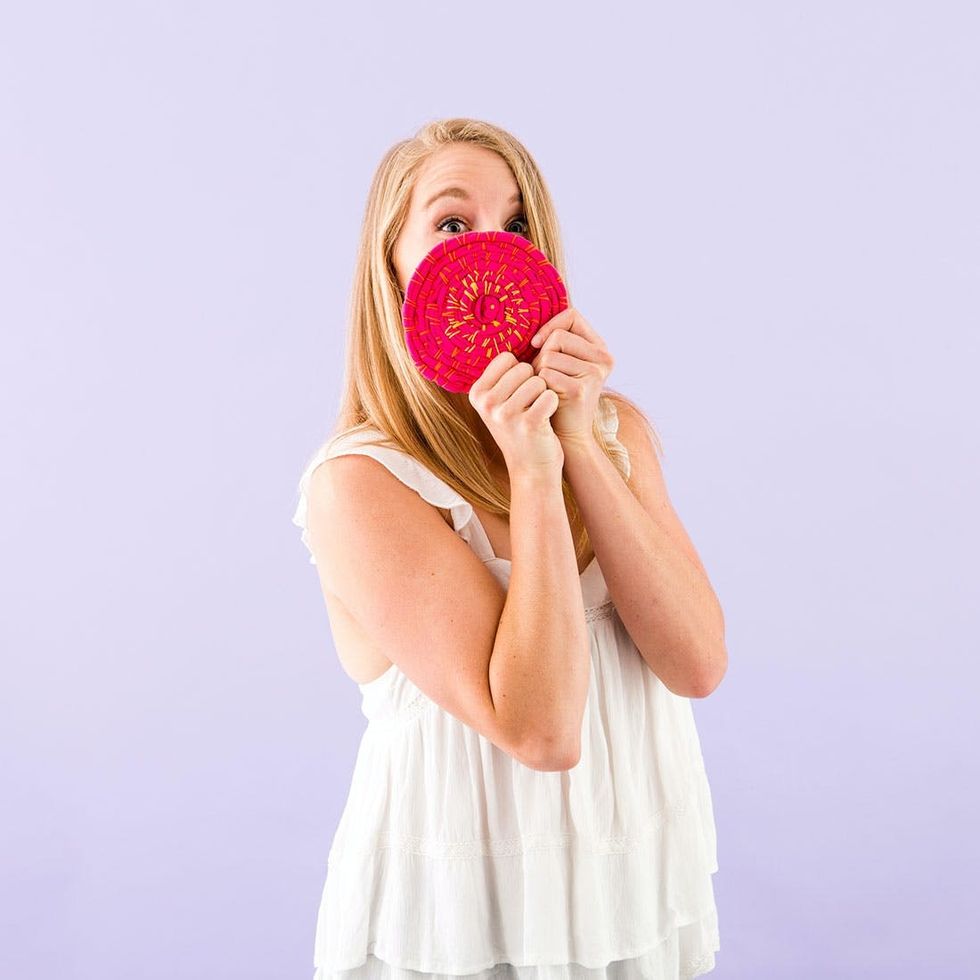
‘Sup! It’s Maddie — Creative Content Producer here at B+C! I’ve been on a kick lately with embroidery and all DIYs that involve weaving. As jersey-knit cotton is so elastic, it’s easy to transform it into a sort of “rope” by cutting it into strips and pulling the ends. So why not weave with it like I might with other types of string? This trivet DIY is a great beginner’s project for those of you who want to take a stab at stitching (pun absolutely intended) and/or weaving. Check it out!
<b><br/></b>
 1. Cut the yard of fabric into one gigantic two-inch wide strip by creating a zig-zag pattern. Then stretch the jersey so the ends roll in.
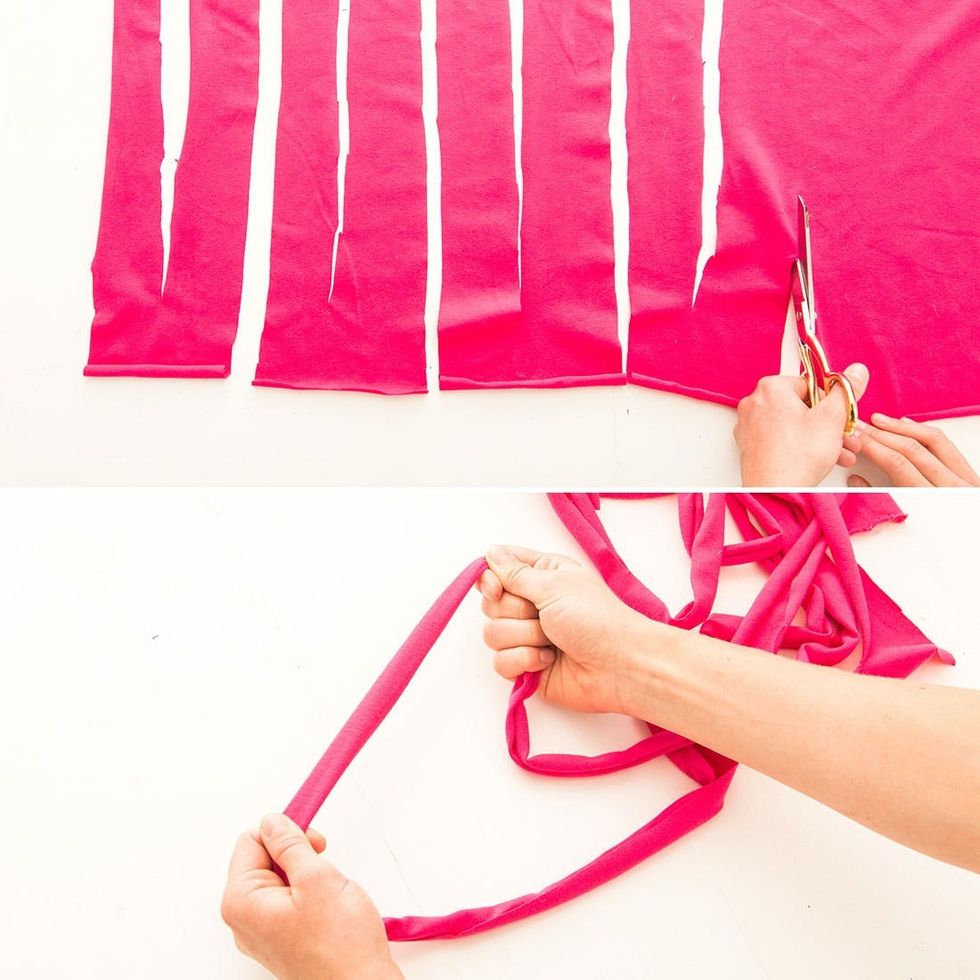
2. Tightly roll one end of the jersey strip in, then secure with two perpendicular stitches.
3. Make two more layers around this base with the jersey. Randomly stitch around these layers to fasten in place, making sure that you catch a bit of the base fabric with each one.
4. When you’ve stitched around the entire layer, add two more layers of fabric strips and repeat. If you like, switch embroidery thread colors for an ombré look.
5. To secure the end in place, make a few stitches close together at the tail of the jersey strip, then tie it off.
LET’S DO THIS.
Cut the yard of fabric into one gigantic two-inch wide strip by creating a zig-zag pattern. Then stretch the jersey so the ends roll in.
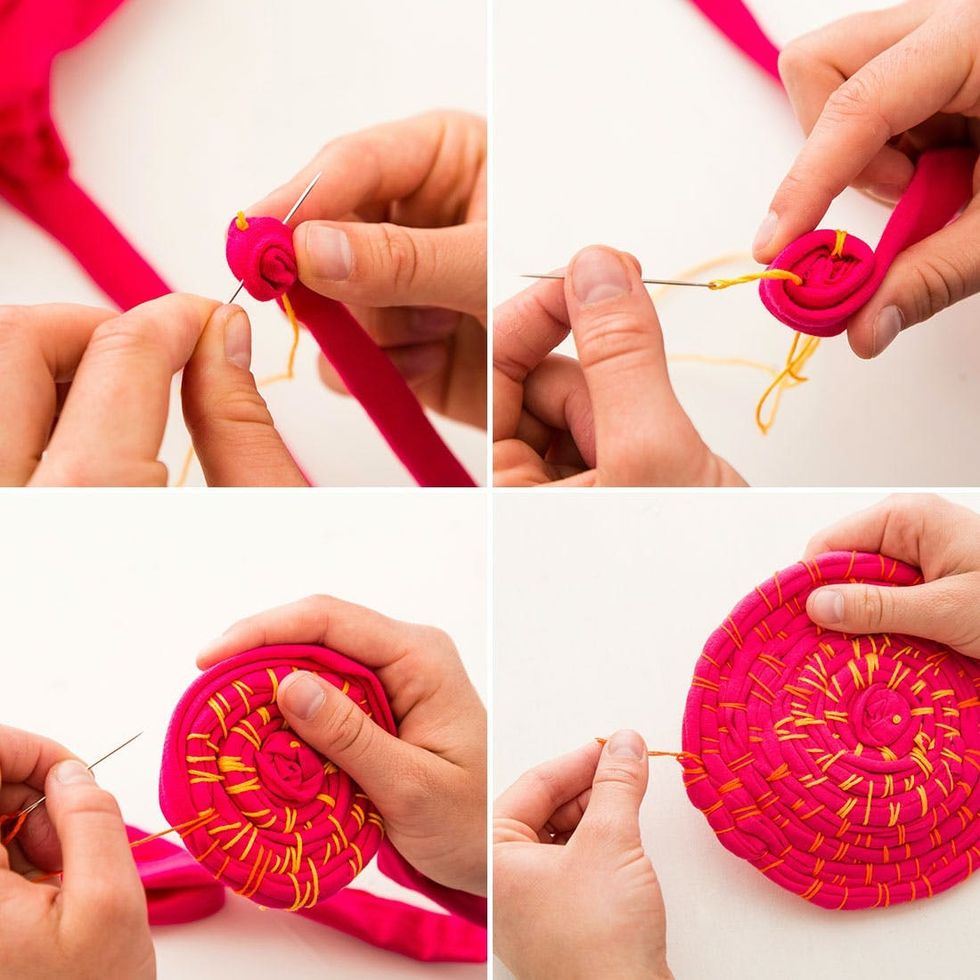
Tightly roll one end of the jersey strip in, then secure with two perpendicular stitches. Make two more layers around this base with the jersey. Randomly stitch around these layers to fasten in place, making sure that you catch a bit of the base fabric with each one. When you’ve stitched around the entire layer, add two more layers of fabric strips and repeat. If you like, switch embroidery thread colors for an ombré look.
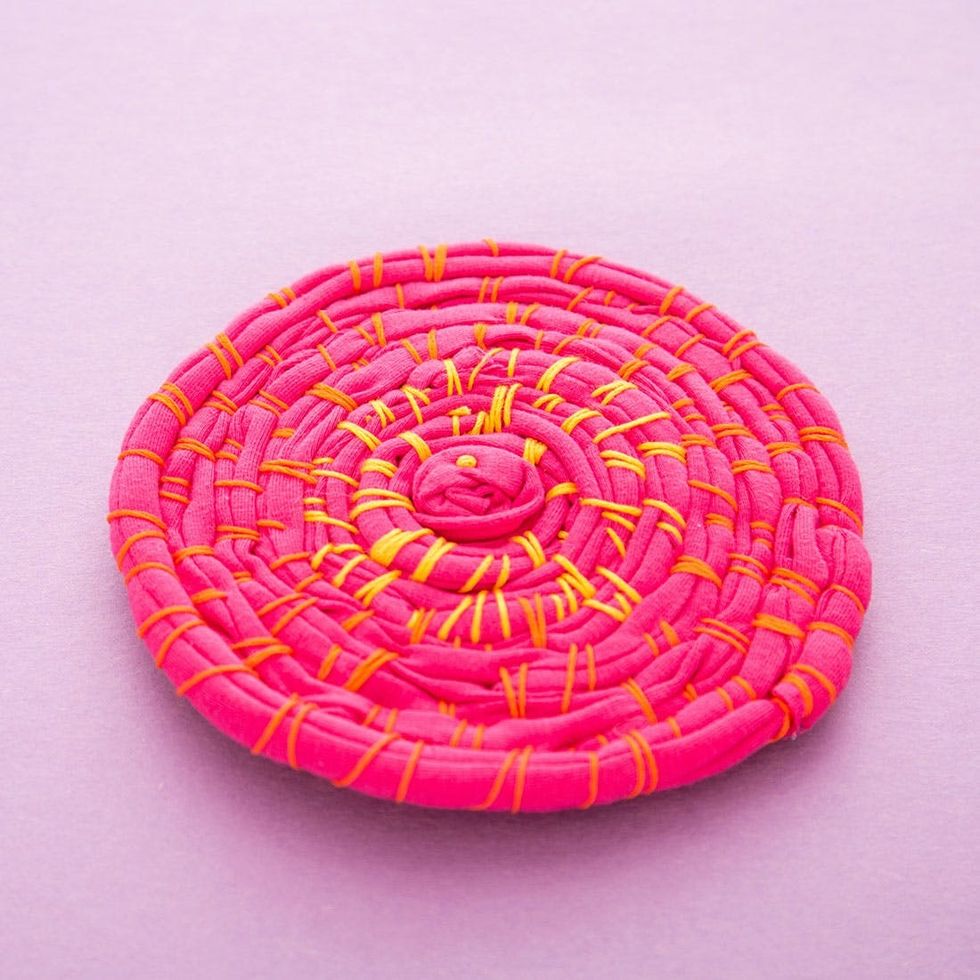
Kablam! You’ve got yourself a trivet.

Finally, a trivet as cute as the DIY teapot that rests on it :).
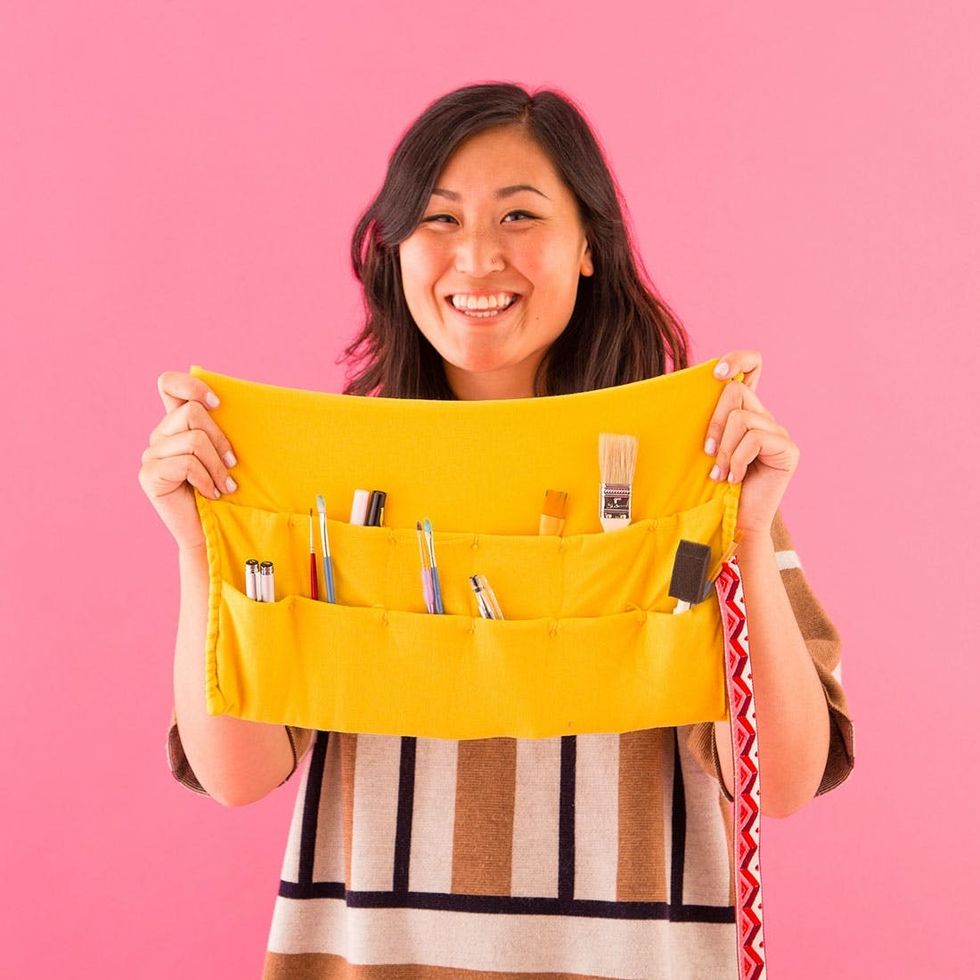
Hey there! I’m Marianne, Kit Designer here at Brit + Co. I’ve got a background in fine arts and geek out over/hoard art supplies, but hardly ever consider how to store my precious tools. A recent purge of my tool chest made me realize that I desperately need a storage solution for my paintbrushes. I knew with a few stitches here and there, I could definitely turn a yard of cotton into an awesome paint brush holder. Plus, the stretch of the jersey allows me to store a wide range of supplies in assorted sizes.
MARIANNE // PAINT BRUSH HOLDER
<b><br/></b>
 1. Fold your yard of fabric in half, then fold it in half again. You should have four layers of fabric.
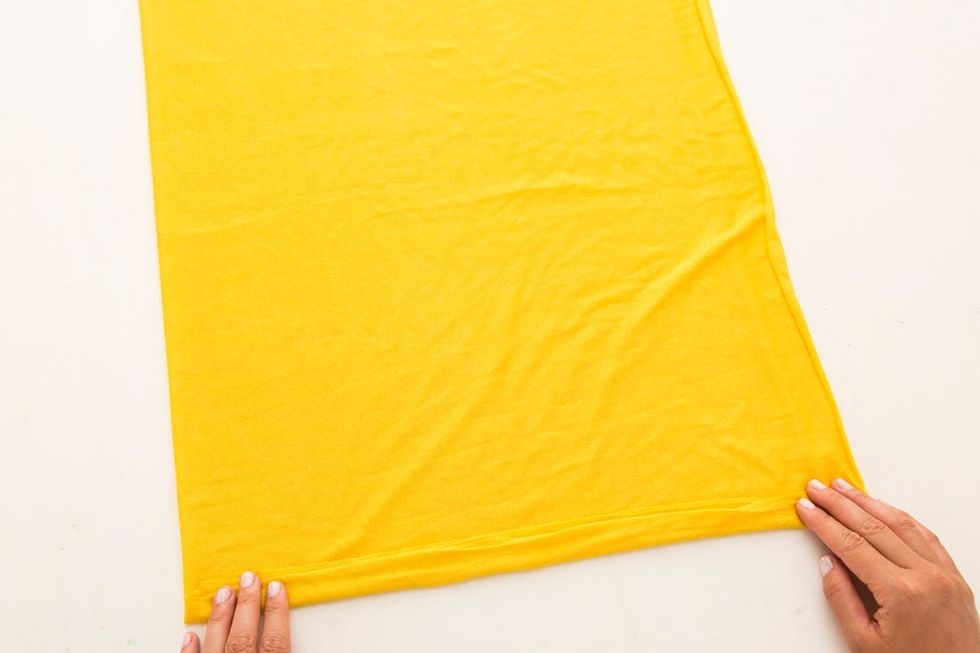
2. To create a clean edge, make a one-inch crease on the bottom edge of the fabric square.
3. Fold the bottom edge of the panel up to the top edge, leaving about two and a half inches at the top. This will be your first pocket.
4. Fold the new bottom edge of the panel up to the top edge, leaving about two and a half inches from the first fold, to create the second pocket.
5. Tightly roll the edges in to create a clean edge. I rolled mine twice to hide any raw edges. Pin the rolled fabric to secure it in place.
6. Make sure to work the ribbon into one side. The ribbon will hold your paint brush rolls shut.
7. Whipstitch around the rolled fabric to secure it.
8. Now is the fun part: Consider your paint brush carrying needs and build pockets accordingly by cross stitching at various points to create smaller compartments.
Fold your fabric in half, then fold it half once again. You should have four layers of fabric. Fold one inch of the bottom edge up.
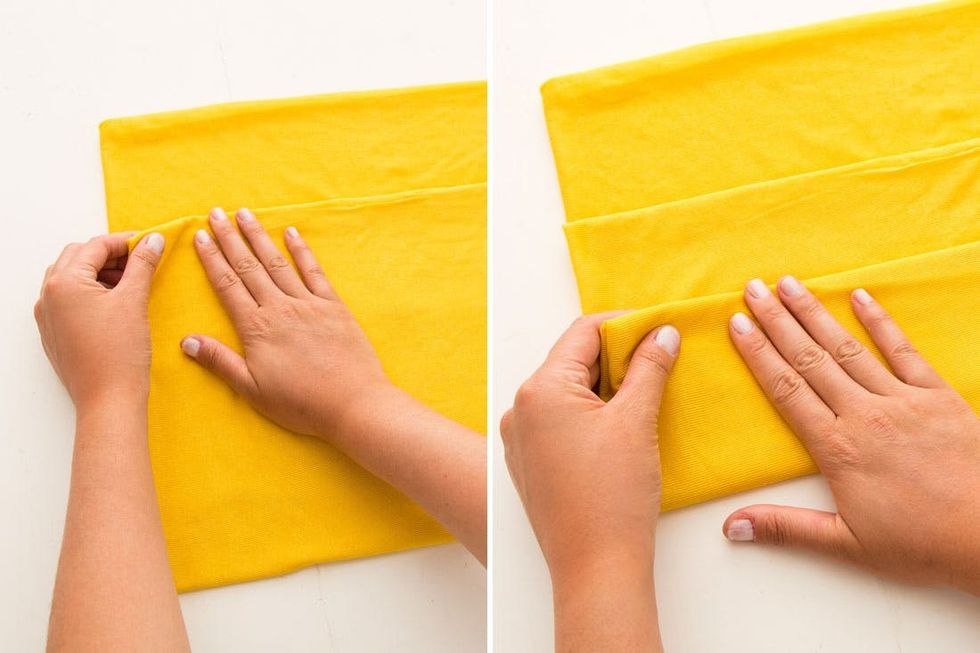
Fold the bottom edge up toward the top edge, leaving about two and a half inches of space from the top. This is your first pocket. Take the new bottom edge and fold it up toward the top edge, leaving about two and a half inches from the first pocket. This is your second pocket.
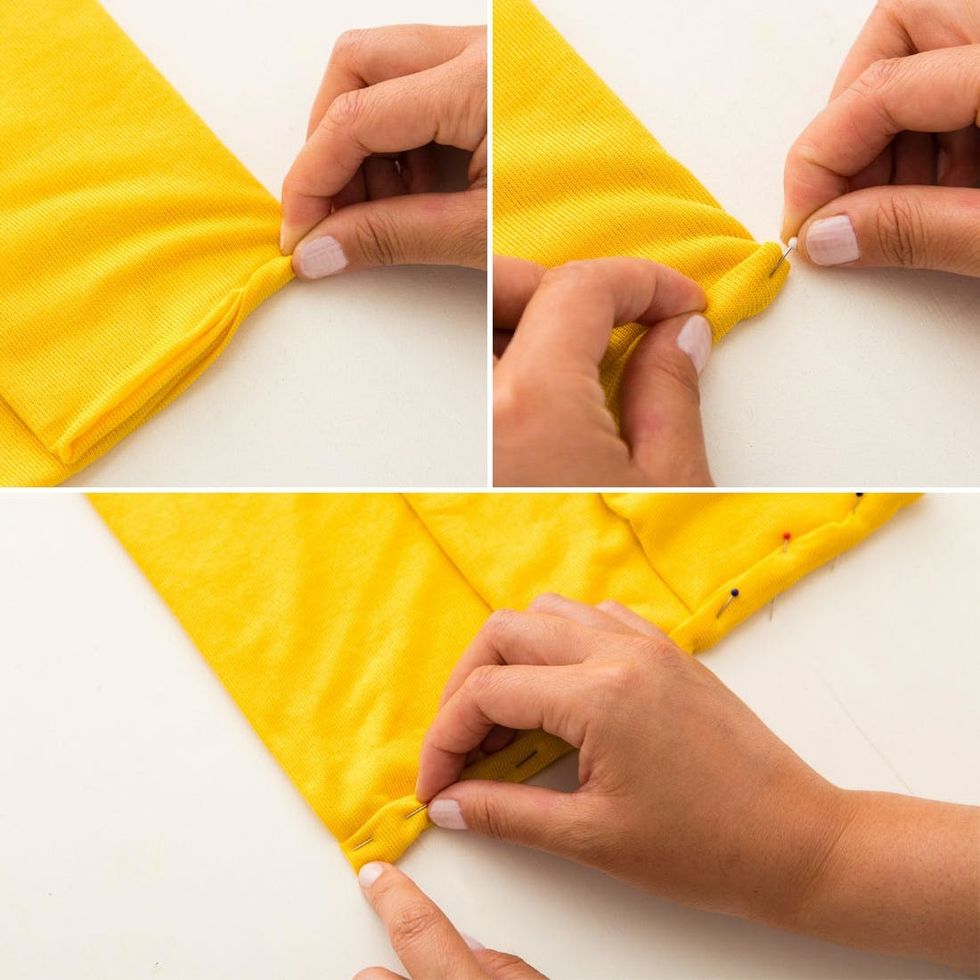
To create a clean edge on either side of your paint brush holder, roll the raw edges in and secure them in place using sewing pins. I rolled the fabric in twice before pinning.
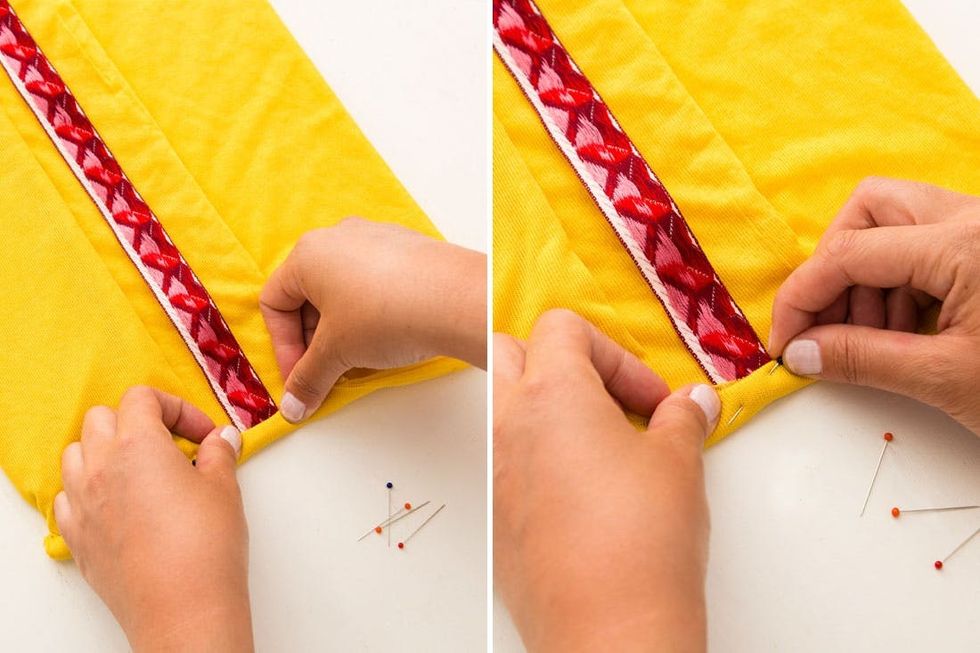
Make sure to work in the ribbon while rolling your fabric. The ribbon will keep your paint brush roll shut.
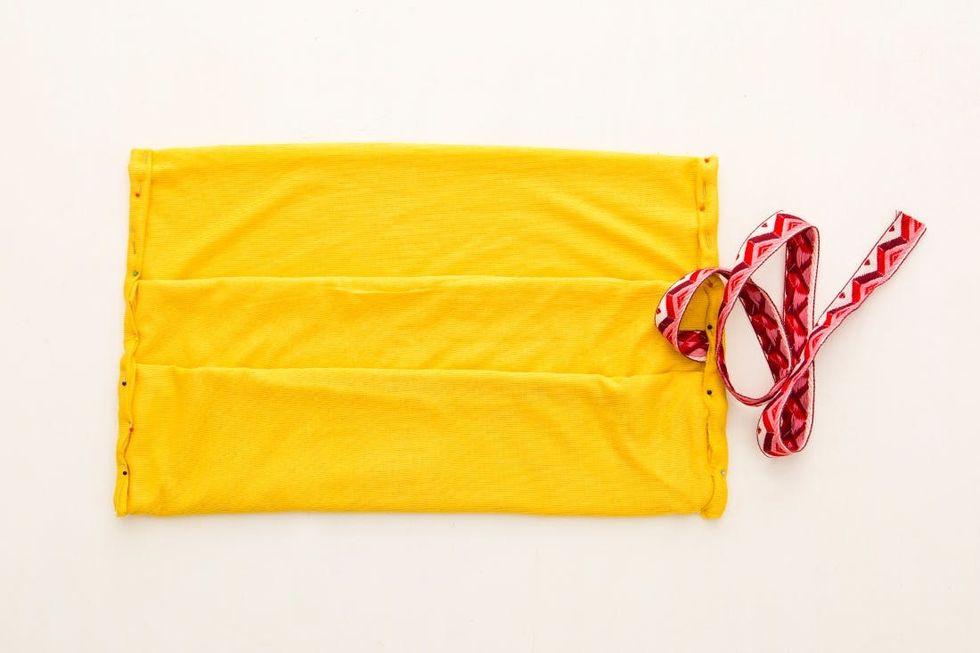
When you’re finished pinning, your paint brush holder should look like the example above.

Whipstitch around the rolled fabric to secure it into place. This is a great time to use your favorite colors of embroidery floss to add some pops of color.
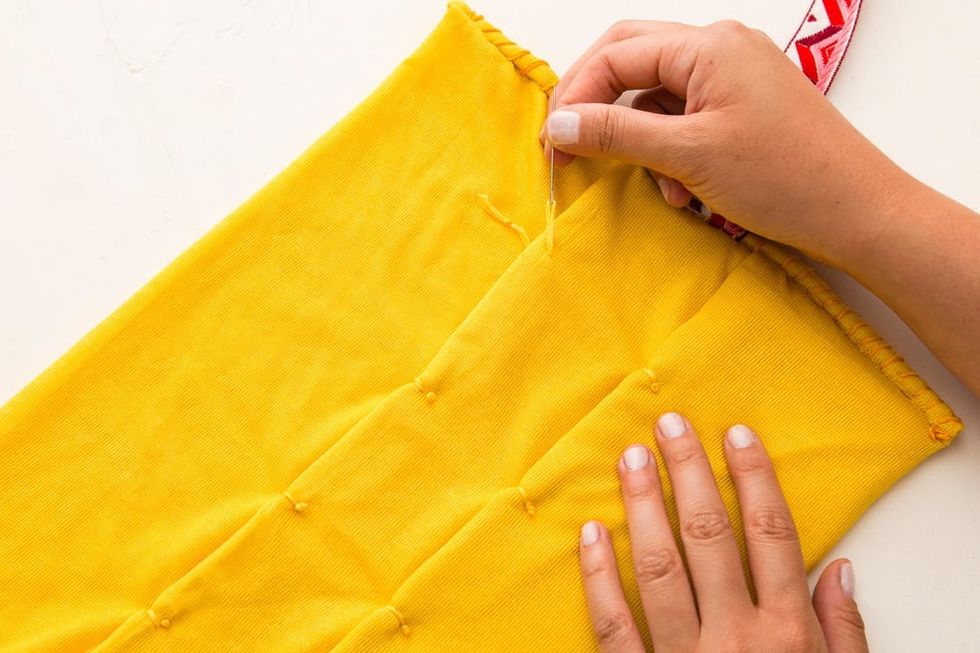
The final step is customizing to suit your own needs! Consider your brush collection and create compartments accordingly. Make cross stitches all over your pockets to create the perfect home for each of your paint brushes.
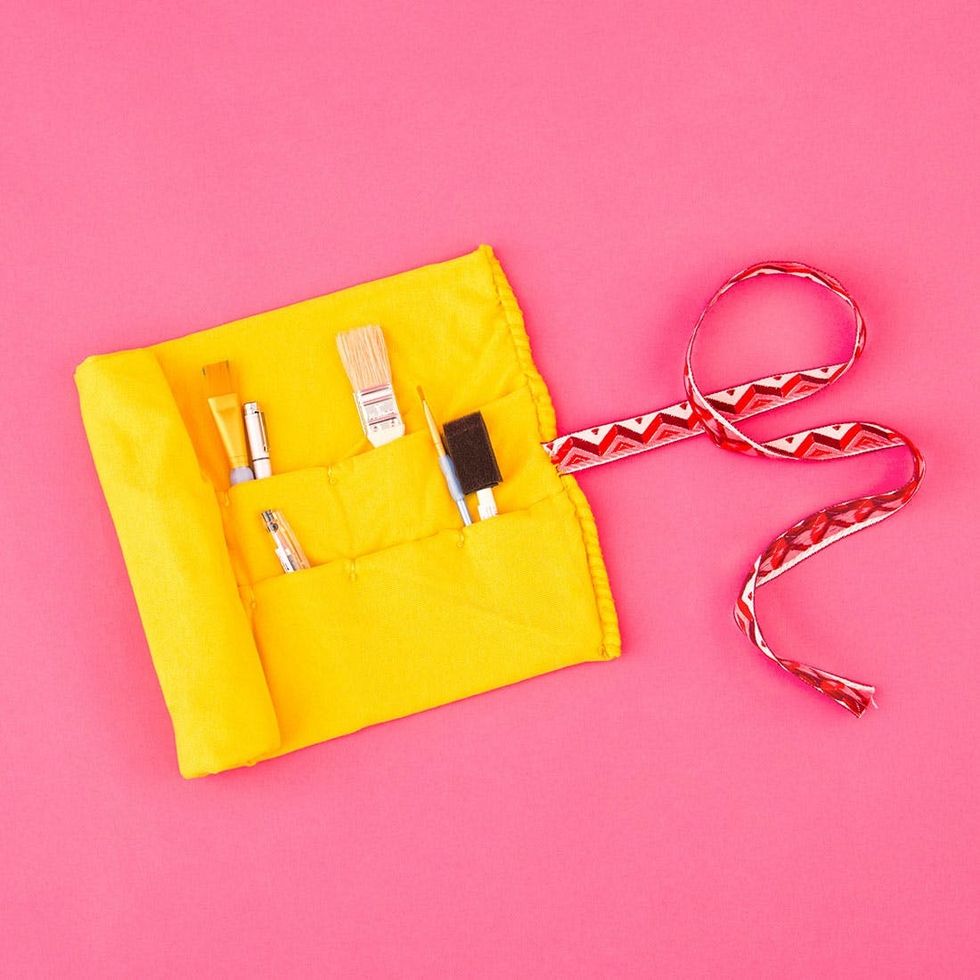
Ta-da!

Done and done.

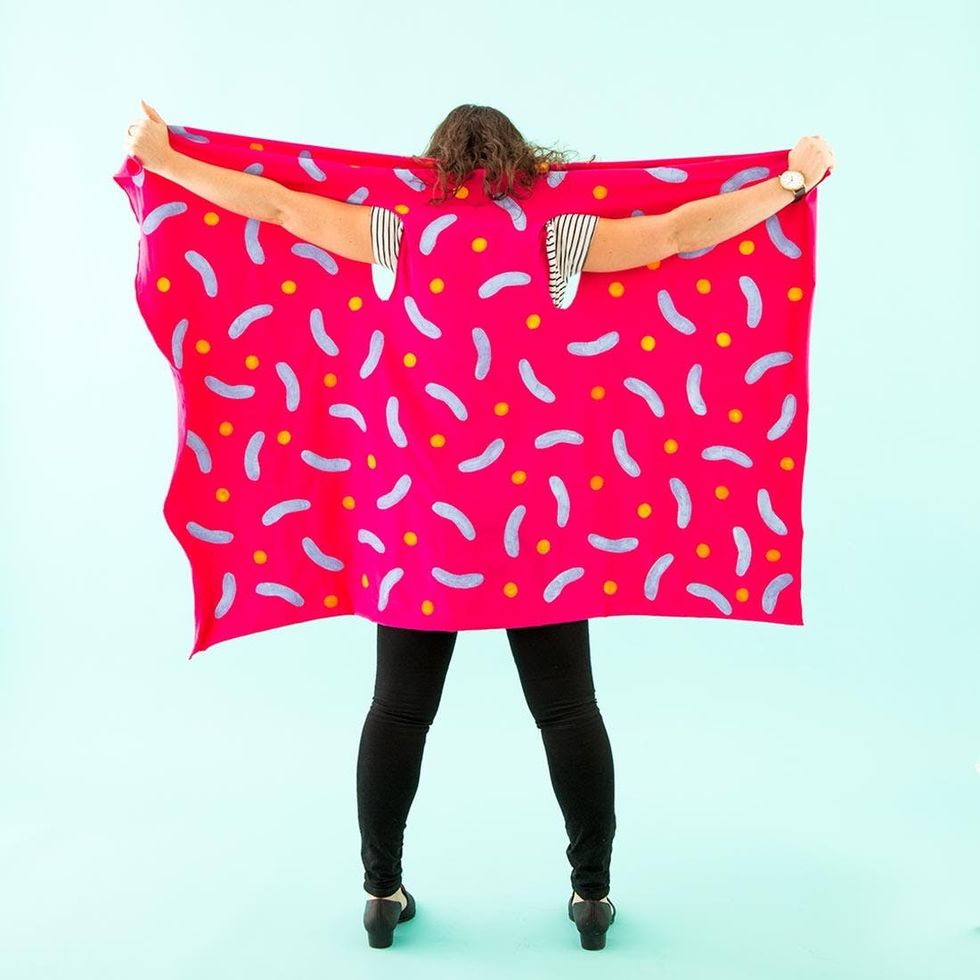
Roxy here — Senior DIY Designer + Stylist at B+C. I decided on a vest for my project because of the easy design (it’s literally one step). All you need to do is cut two slits into a rectangular piece of fabric and you’ve got yourself a garment. Pretty great hack, right? My inspiration for the pattern came from hip Australian brands (like Gorman) that are getting playful with shapes, colors and over-the-top prints. I spend half my time in Melbourne and love bringing trends I see there back home.
ROXY // VEST
<b><br/></b>
 1. Measure the distance between your armpits (along your back).
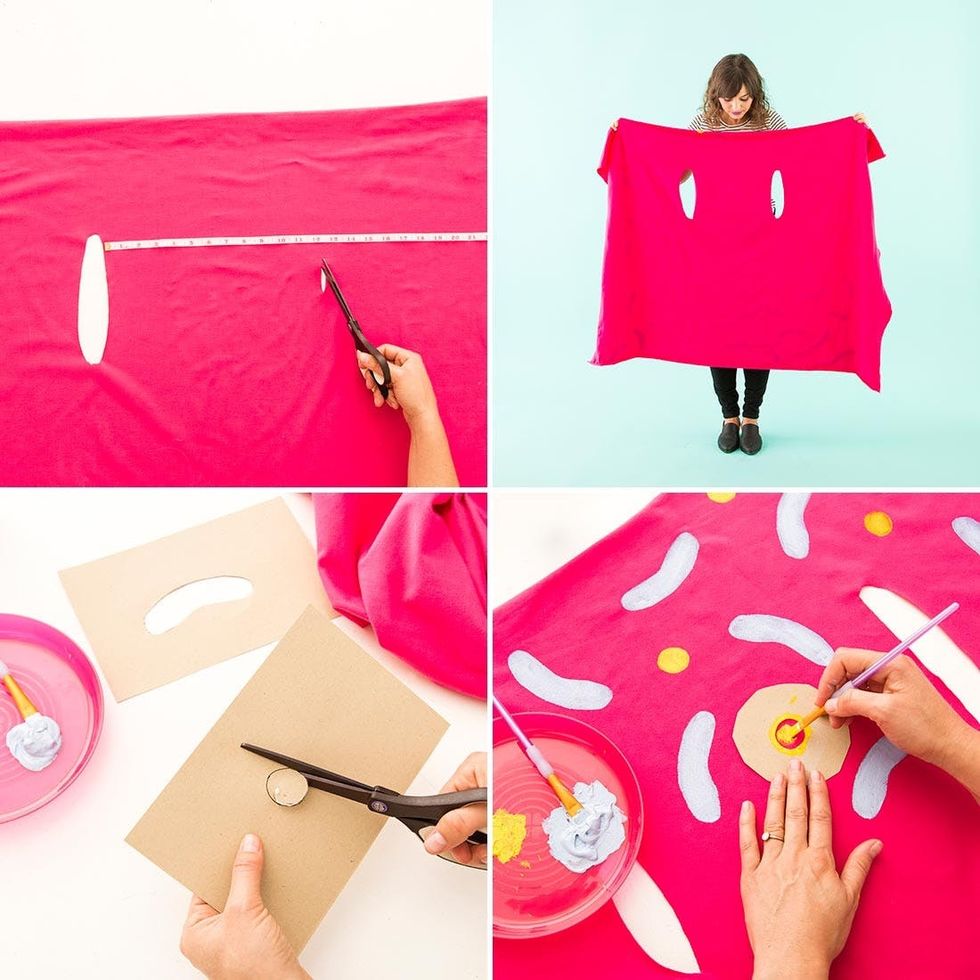
2. Open up your fabric with the long side placed horizontally. Mark the measurement from Step 1 in the middle of your fabric, about six inches from the top.
3. Cut two long ovals (large enough for your arms to fit through) at each end of the measurement (my measurement was 12 inches, so I cut a slit at one inch and 12 inches).
4. Cut out stencils in your card stock. Get creative here!
5. Paint designs onto your fabric using the stencils.
Have someone help you measure the width of your back right between your armpits. This will be the distance between your arm holes. Mark where you want your arm holes to go on your fabric. It doesn’t matter how far down the vest you put these, but the further down they go, the thicker the neck of the vest will be. Cut out the arm holes, making sure they are large enough to fit your biceps ;). Then add painted designs to your vest.
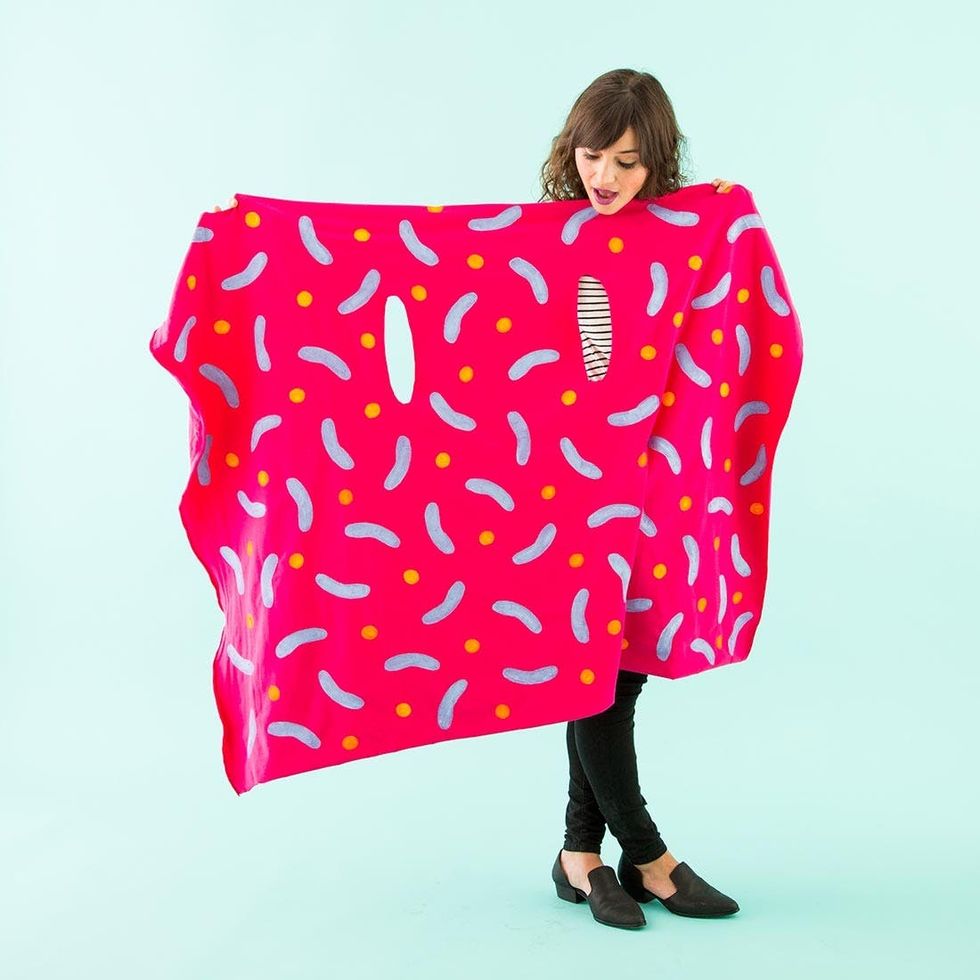
There you have it!

Style your new piece with a tee underneath, mixing patterns if the colors mesh well. I’m a sucker for a striped shirt and love how the black and white stripes look with the colorful print on top.
ALONNA // FABRIC-WRAPPED SANDALS

Hi there! Alonna here, Production Designer on the video team. I DIY on the daily and love all things paper craft! For my project, I decided to upgrade an old pair of sandals with my yard of cotton. Inspired by all of the fun, frilly styles that are popping up for summer, I used my cotton to create a playful fringe sandal.
<b><br/></b>
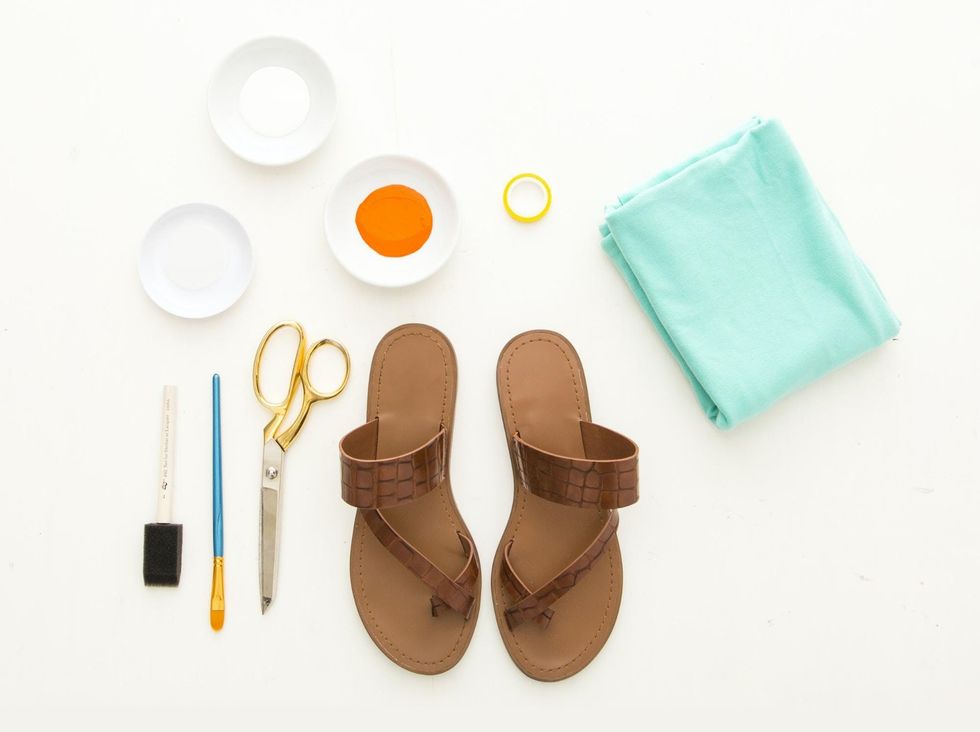 1. First, paint the toe strap with a white base layer.
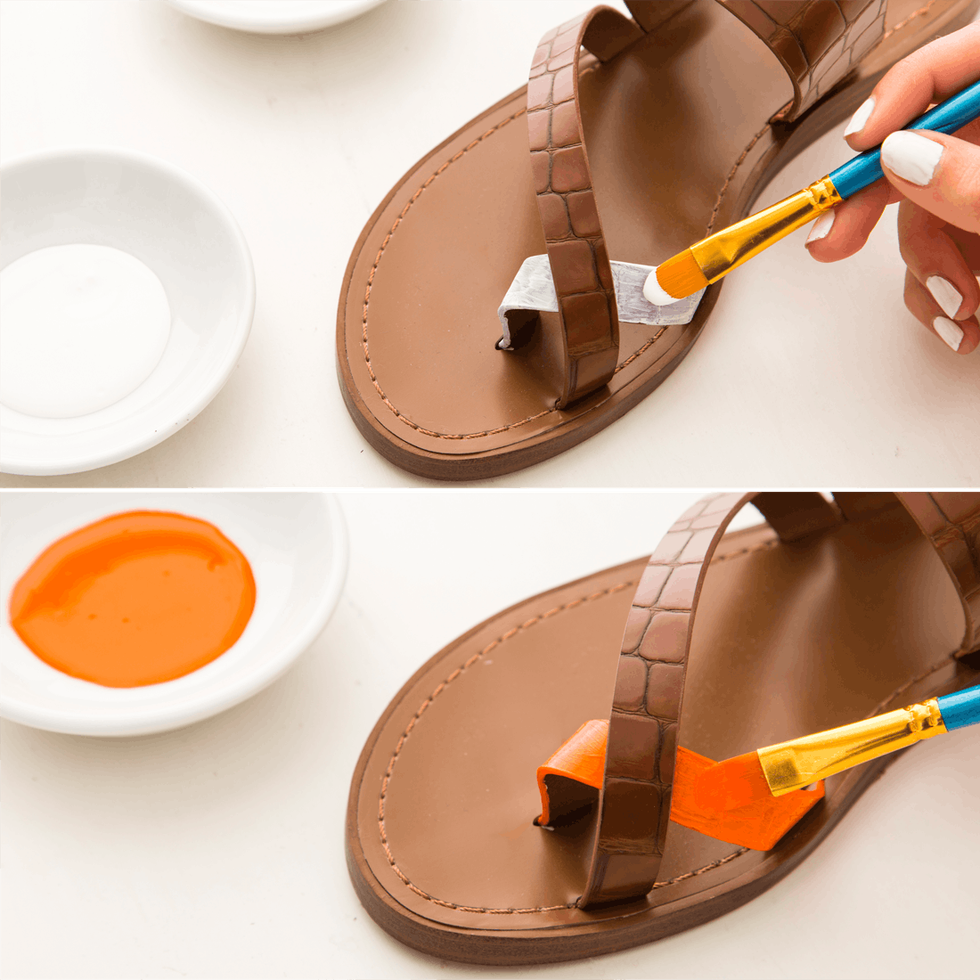
2. Let that dry, then apply your bright orange paint next.
3. Measure the different sections of your sandals using washi tape. Find the length and width of each strap by taping from end to end.
4. Once you’ve gotten all of your measurements, lay out your fabric, tape off your measured sections and cut.
5. Use the sponge brush to apply fabric glue and attach the fabric.
6. Fringe your sandals by cutting small ¼-inch strips in the overlapping fabric. You’re done!
First, paint the toe strap with a white base layer. Let that dry, then apply your bright orange paint next.
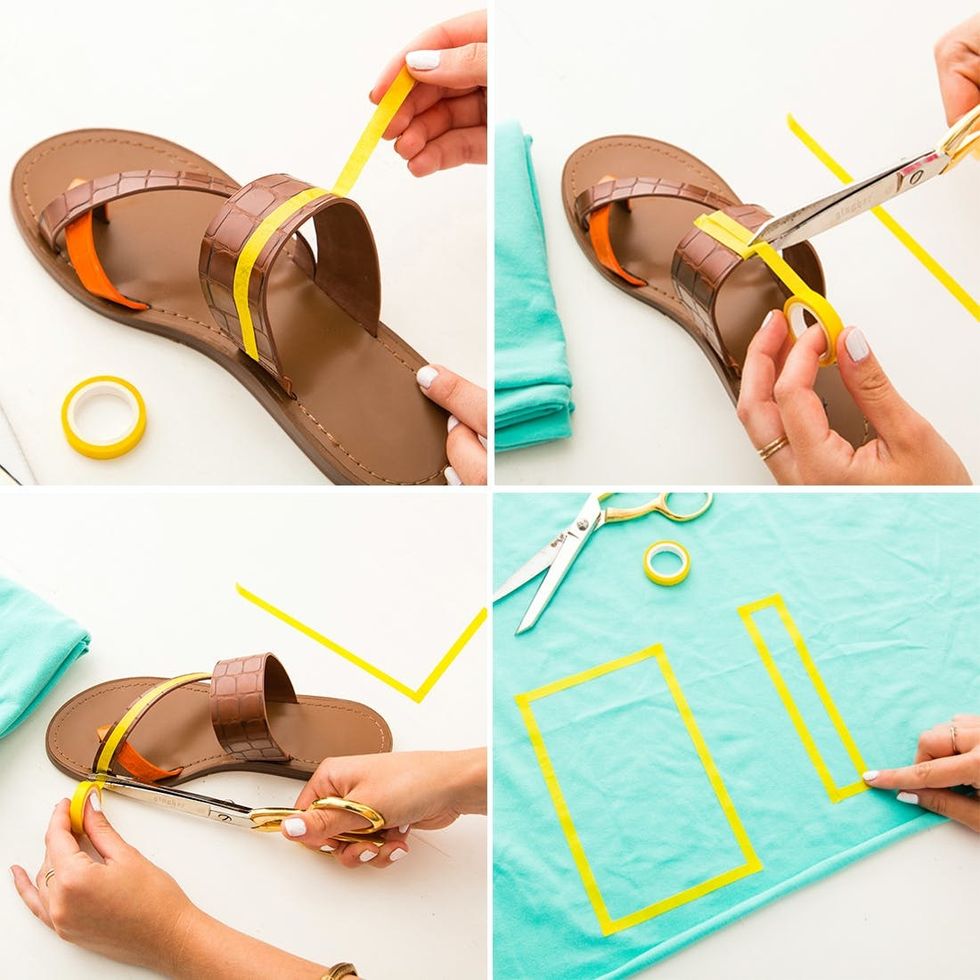
Now you’re going to measure the different sections of your sandals using washi tape. Measure the length and width of each strap by taping from end to end. Once you’ve gotten all of your measurements, lay out your fabric, tape off your measured sections and get ready to cut!
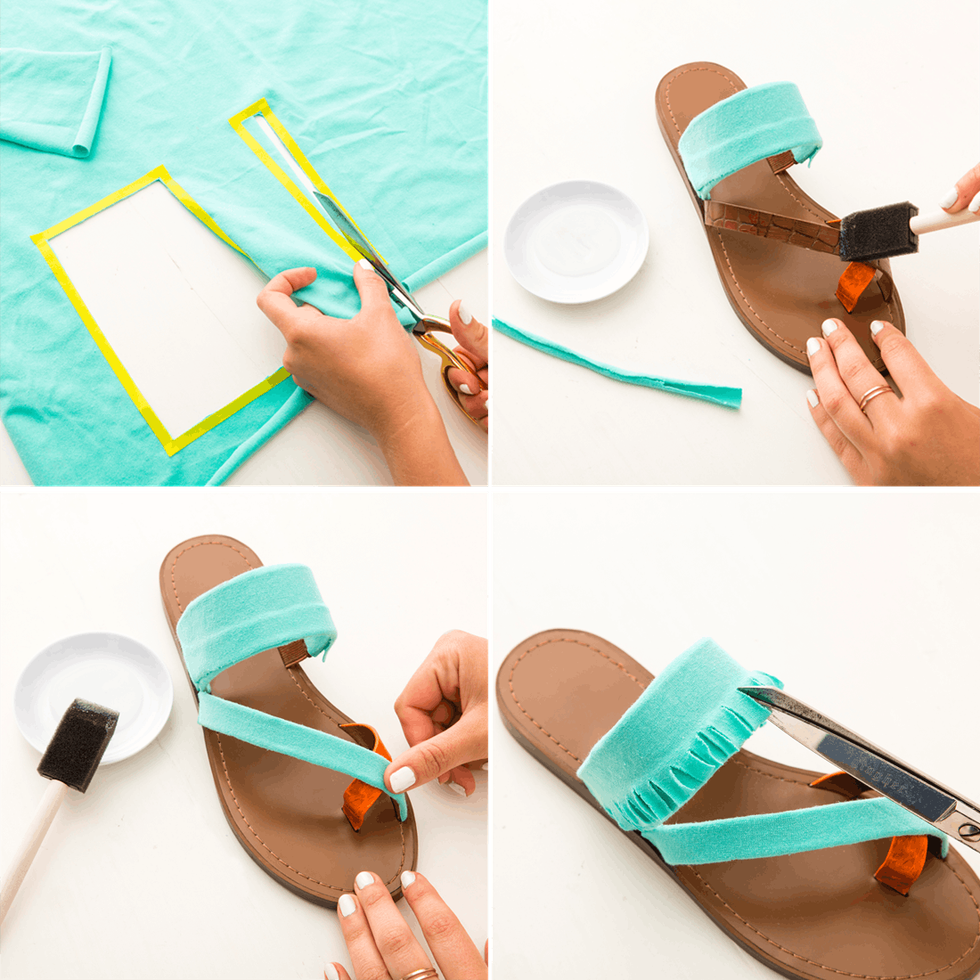
You’ve completed your measuring! Almost done. Cut out the fabric sections. Use the sponge brush to apply fabric glue and attach the fabric. Fringe your sandals by cutting small ¼-inch strips in the overlapping fabric.
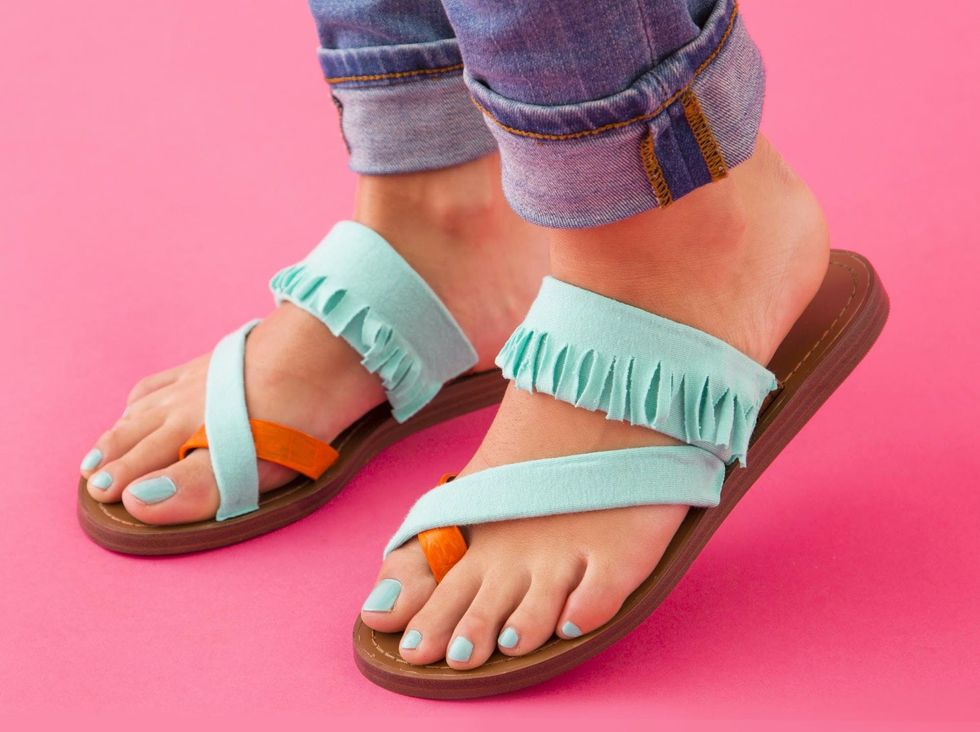
There ya have it — you’re ready for summer!

MISTY // FRINGE EARRINGS

Hello, you gorgeous humans! I’m Misty, a Beauty Editor and Stylist here at B+C. I’ve been with the company from pretty much day one, and this project brought nostalgia for the good ol’ days when I was one of our only DIYers. These days I spend most of my time here working on hair, makeup and all things beauty. When we were presented with this challenge, I was so excited. While I was doing a Facebook Live video on nailing the perfect cat eye, I was wearing a similar pair that I had made. A lot of people following the video asked if I would do a tutorial — what serendipitous timing, right?! I present to you my go-to fringe earrings that make me feel like I have long hair again :).
<br/>
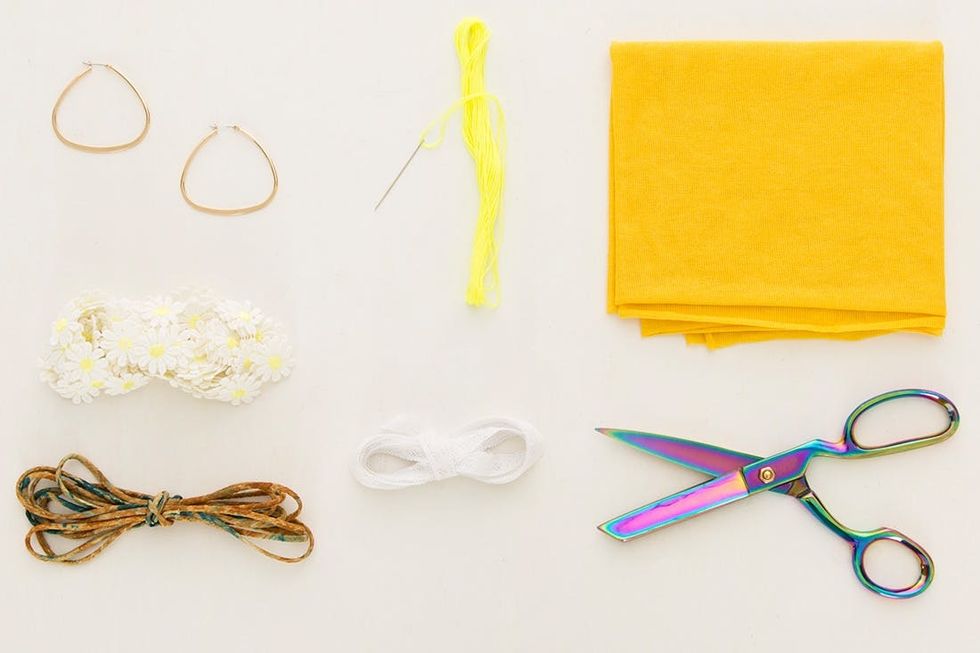 1. Fold your fabric over so that you are working *with* the stretch of the fabric, not against it, and then cut half-inch strips of jersey. I used six strips on each earring. You’ll also want to cut all the trim you’ll be adding in as well. The good thing is there aren’t really any rules here. You can add as much or little as you like. Go really colorful or keep it monochromatic and neutral.
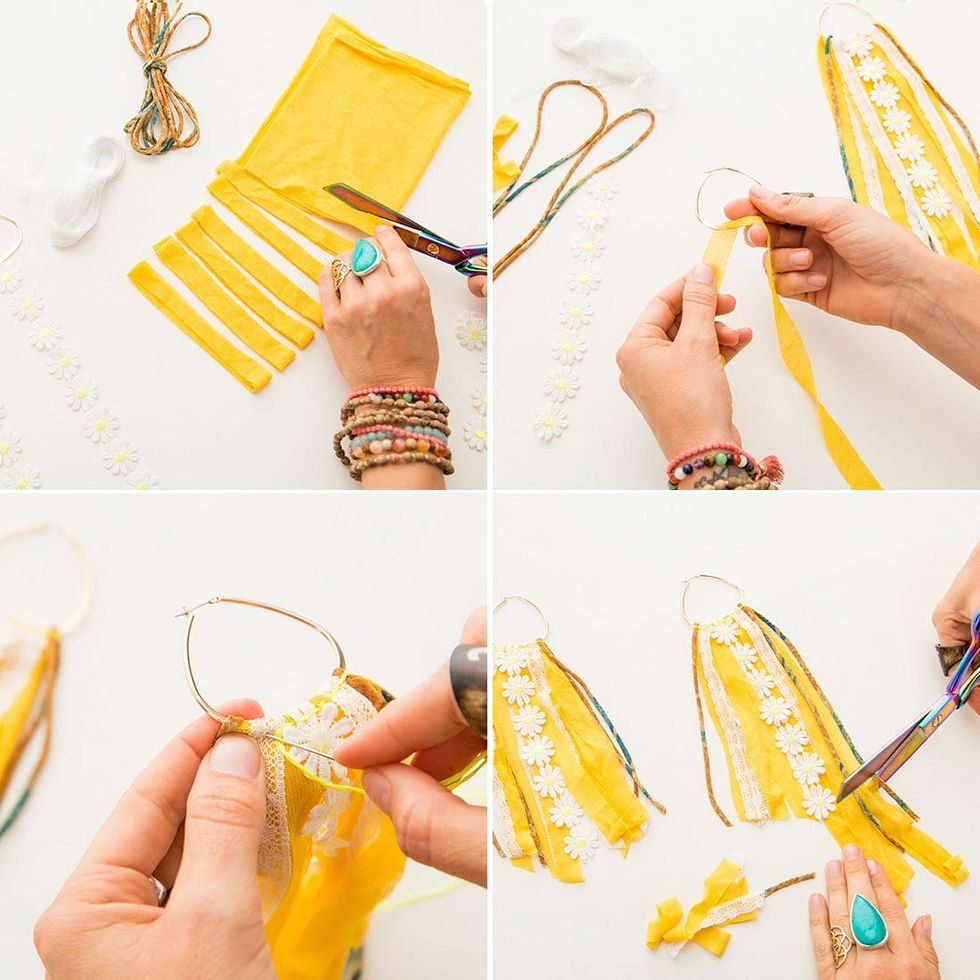
2. Once your strips are all cut, place them over the earrings.
3. When you get all your trim and jersey cotton strips positioned, thread a needle and begin to hand stitch the fabric at the base of the hoop.
4. Finally, trim your earrings to the length and shape that you want.
Fold your fabric over so that you are working *with* the stretch of the fabric, not against it, and then cut (approximately) half-inch strips of jersey. I used six strips on each earring. You’ll also want to cut all the trim you’ll be adding in as well. The good thing is, there aren’t really any rules here. You can add as much or little as you like. Go really colorful or keep it monochromatic and neutral. Once your strips are all cut, place them over the earrings. When you get all your trim and jersey cotton strips positioned, thread a needle and begin to hand-stitch the fabric at the base of the hoop. Finally, trim your earrings to the length and shape that you want.
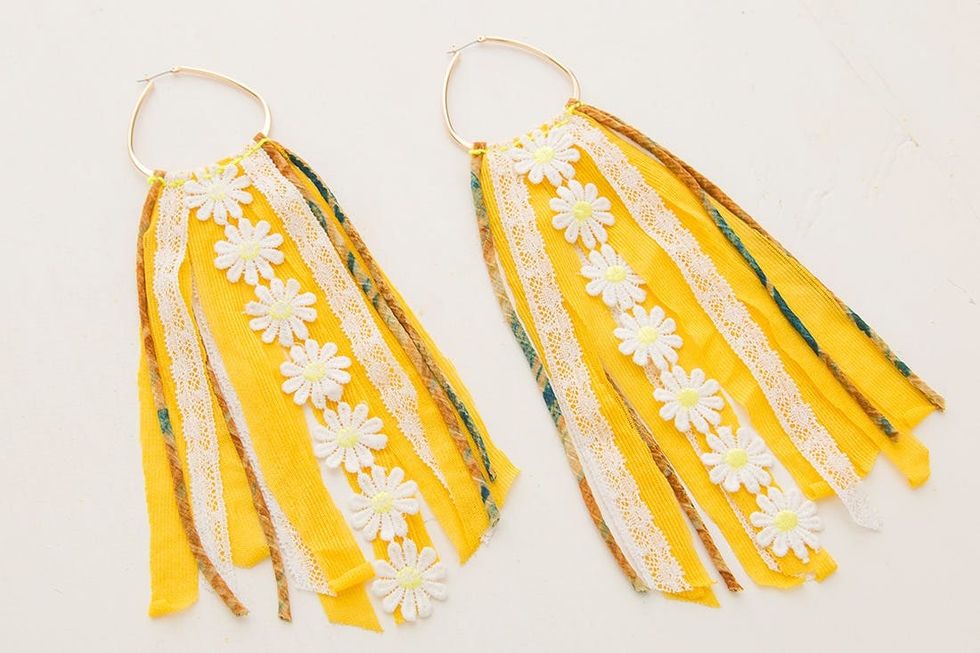
If these feel too long, you can trim yours even shorter.

Hair-shaking fun!

Hey guys! I’m Kelly, and I’m a DIY Designer here at Brit + Co. I went to school for graphic design but spent all of my childhood in the craft corner of my basement. From a young age I was playing with paint, glue, beads, wood and fabric. With the help of my grandma, I learned to sew and began making and altering all the clothes I owned. Even though I’ve been sewing for most of my life, I am by no means a professional seamstress. So I can assure you that this wrap skirt is super simple to make and only takes one yard of fabric!
KELLY // WRAP SKIRT
<b><br/></b>
 1. Fold your yard of jersey in half (long ways) and cut down the fold. Sew the two pieces together to create one long rectangle.
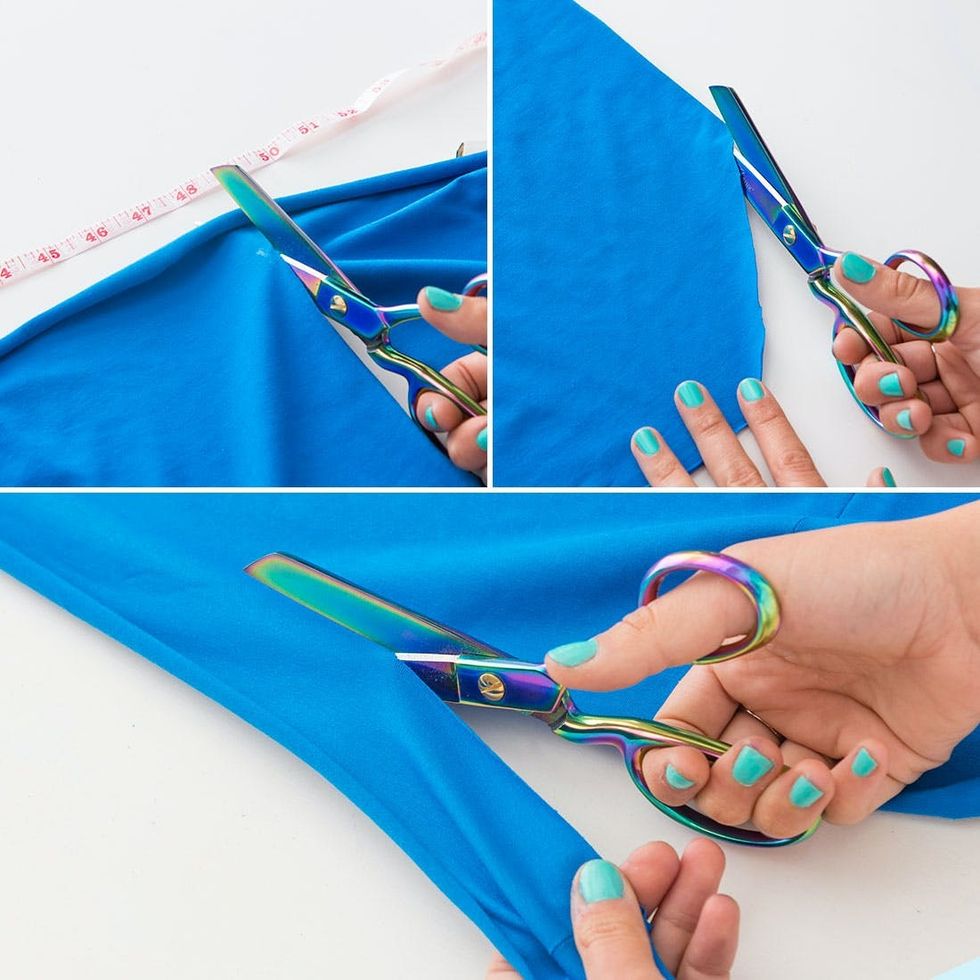
2. Cut a four-inch strip off of your long rectangle — this will be sewn back on as your waist band.
3. Measure your waist and then multiply it by one and a half. Trim your rectangle to this new length.
4. Round the bottom right edge of your rectangle to give your wrap more flair.
5. Sew your four-inch piece of jersey back onto the top edge of the skirt, leaving about eight inches to spare on the left edge and a much longer tail on the right edge.
6. Sew your fringe trim to the bottom edge and the right edge of the rectangle.
7. Using scissors, create a small button hole at the measurement of your waist. This will be where you weave your waistband through to create the wrap effect.
8. Weave the waist band strap through the hole, then wrap and tie.
Fold your yard of jersey in half (long ways) and cut down the fold. Sew the two pieces together to create one long rectangle. Cut a four-inch strip off of your long rectangle — this will be sewn back on as your waist band.
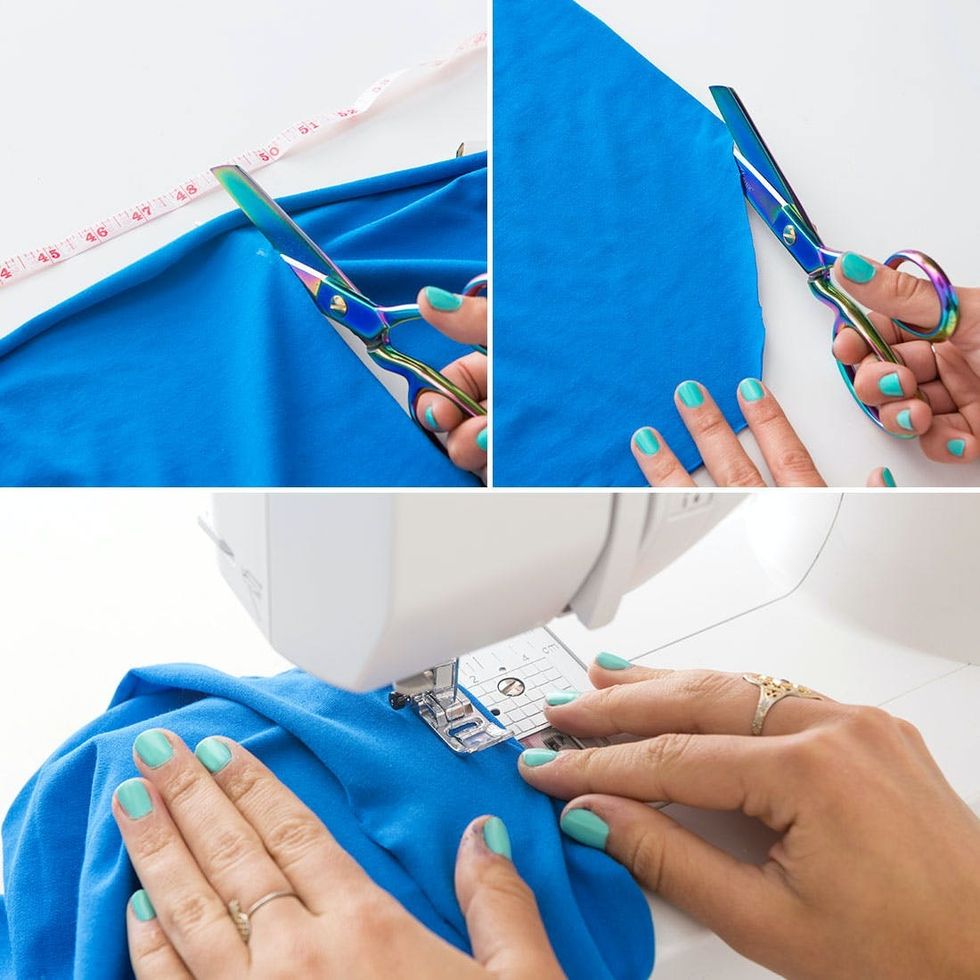
Measure your waist and then multiply it by one and a half. Trim your rectangle to this new length. Round the bottom right edge of your rectangle to give your wrap more flair. Sew your four-inch piece of jersey back onto the top edge of the skirt, leaving about eight inches to spare on the left edge and a much longer tail on the right edge.
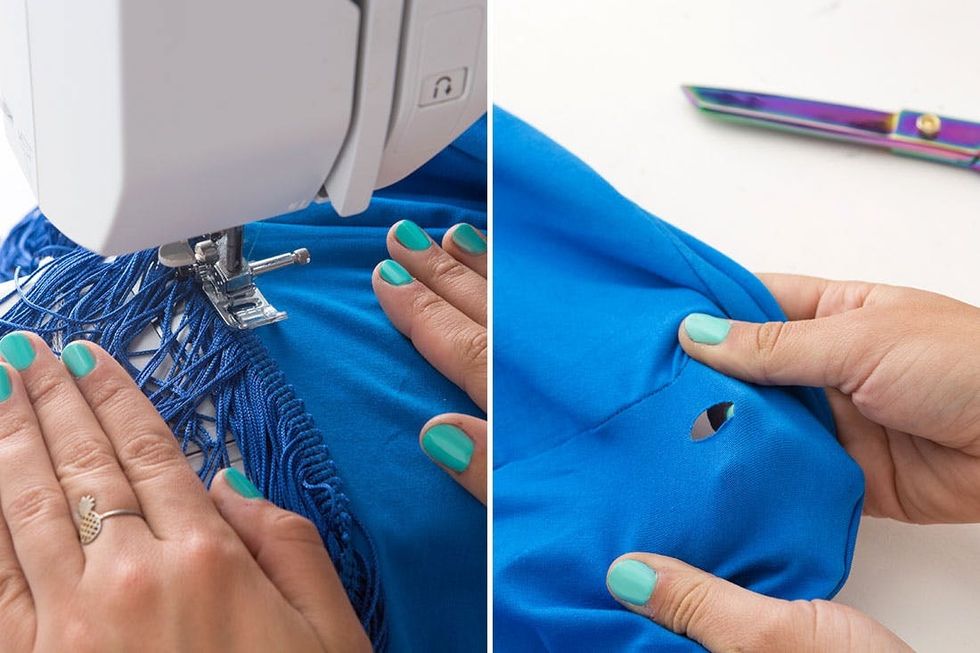
Sew your fringe trim to the bottom edge and the right edge of the rectangle. Using scissors, create a small button hole at the measurement of your waist. This will be where you weave your waistband through to create the wrap effect.
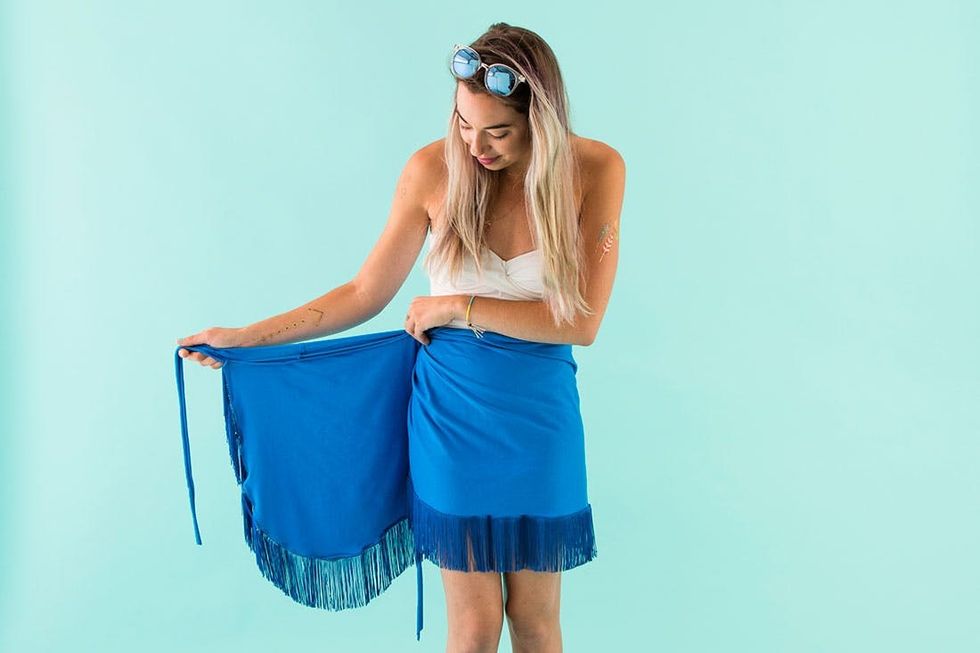
Weave the waist band strap through the hole, then wrap and tie.

All done!

Hey all! I’m Irene, Production Assistant at Brit + Co! Although I am technically an adult, I have yet to grow out of my childhood love of animal-shaped things. I am fascinated by octopi and how weird and smart they are, so I decided to make an octopus throw pillow. Don’t be intimidated by this guy’s many legs; I am an amateur sewer and this throw pillow was really simple for me to make. Plus, once you’re done, you can rest your head on it!
IRENE // PILLOW
<b><br/></b>
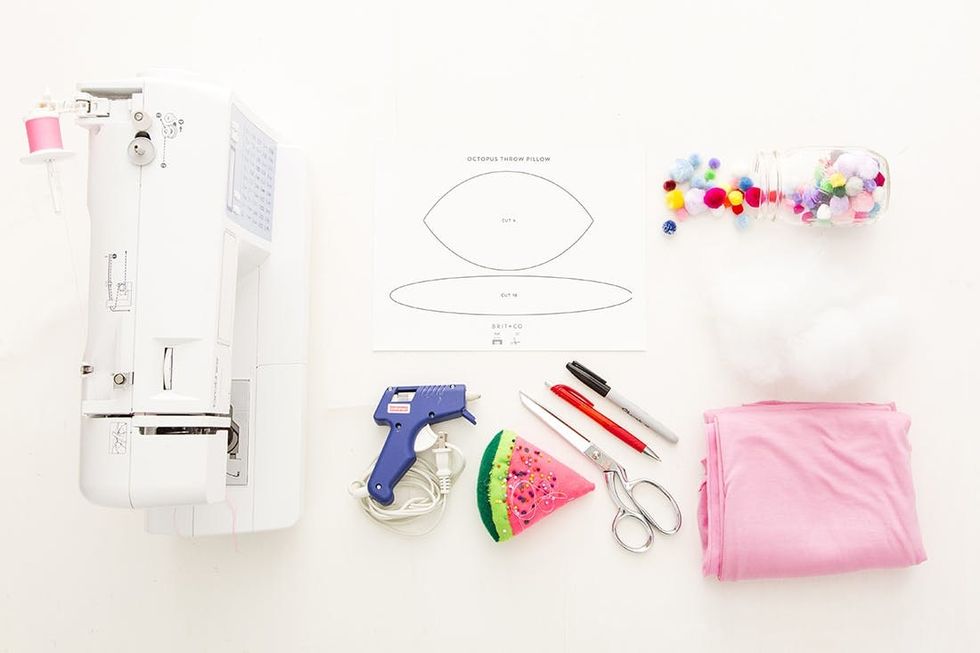 1. Cut out shapes from the printable and trace onto the fabric. Cut out 16 tentacle shapes and four head shapes.
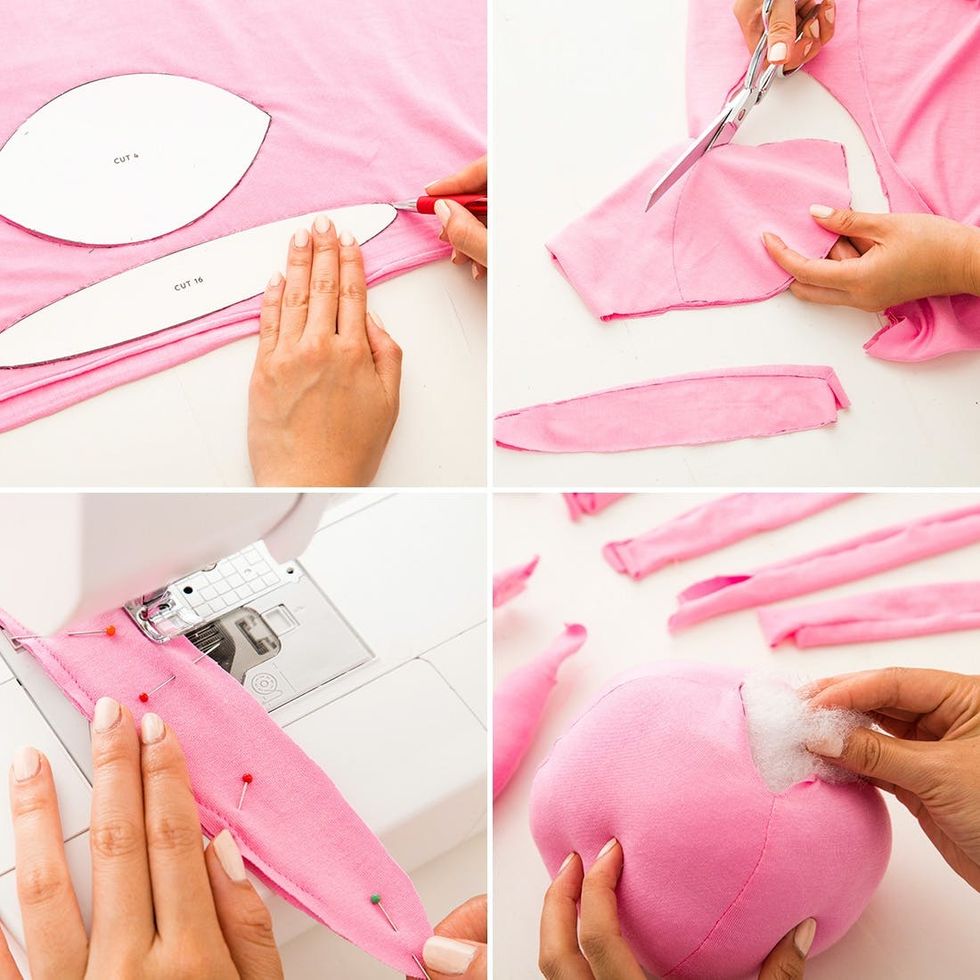
2. Take two of the tentacle shapes and sew them together, leaving an opening. Sew together seven more tentacles. Sew the sides of the head pieces together, leaving a hole at the bottom. Reverse all of the fabric and add stuffing in the head and the tentacles.
3. Hand sew the holes closed. Arrange all of the tentacles in a circle and sew them together. Sew the head to the tentacles.
4. Draw a smiley face on your little octopus. Glue pom poms on the undersides of the tentacles. Say hello to your eight-legged friend!
Cut out shapes from the printable and trace onto the fabric. Cut out 16 tentacle shapes and four head shapes. Take two of the tentacle shapes and sew them together, leaving an opening. Sew together seven more tentacles. Sew the sides of the head pieces together, leaving a hole at the bottom. Reverse all the fabric and add stuffing in the head and the tentacles.
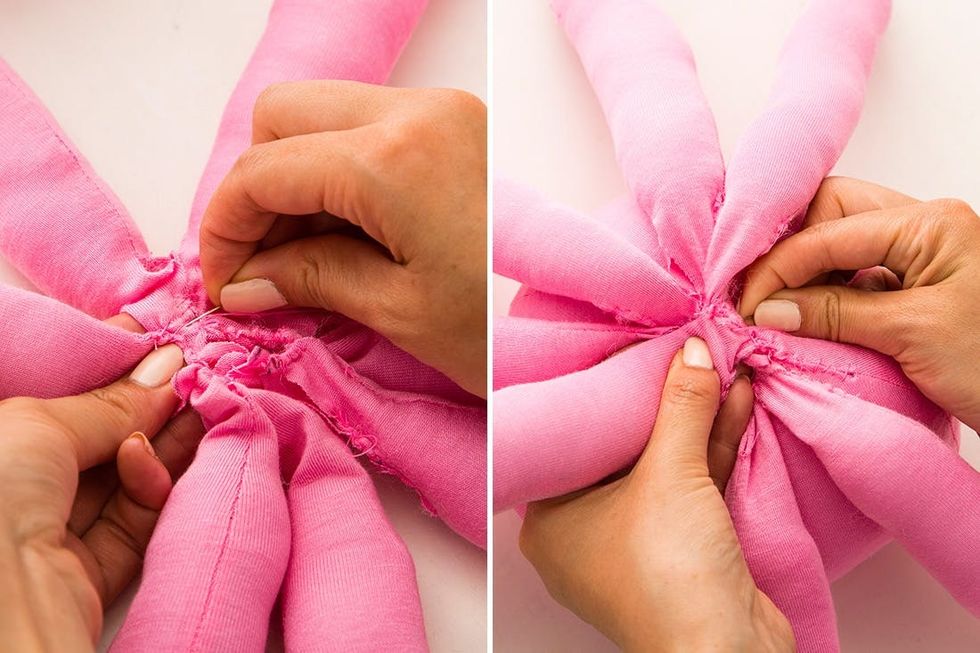
Hand sew the holes closed. Arrange all the tentacles in a circle and sew them together. Sew the head to the tentacles.
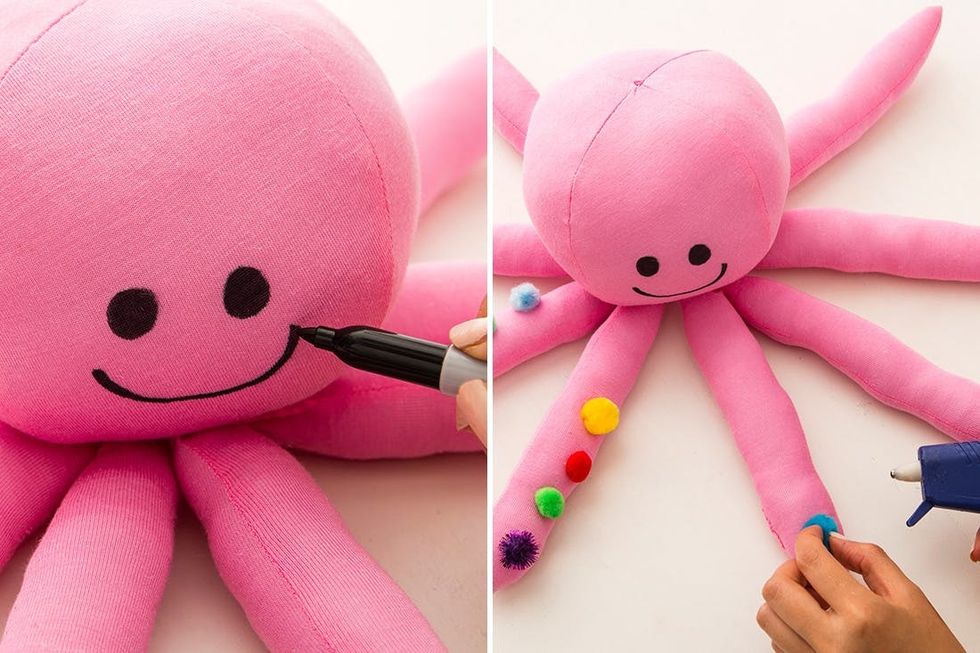
Draw a smiley face on your little octopus. Glue pom poms on the undersides of the tentacles. Say hello to your eight-legged friend!
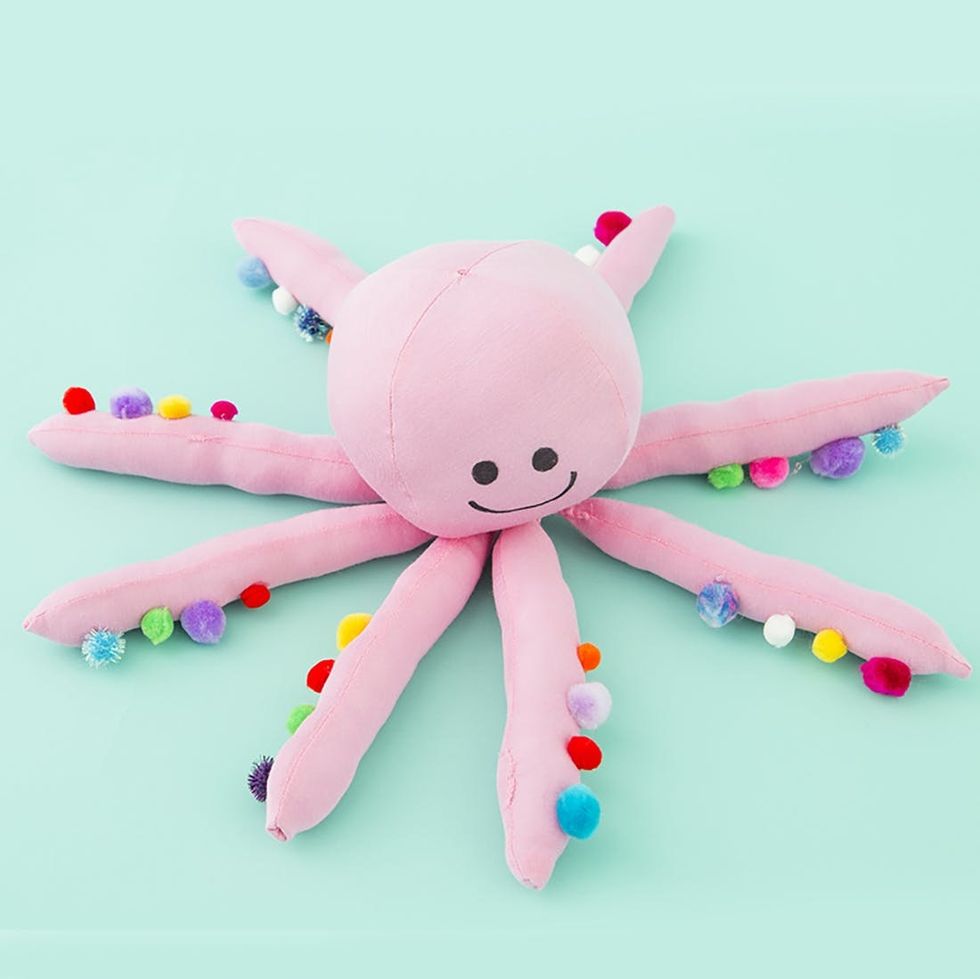
PSA: These octopus legs can pose a choking hazard to little ones, so be careful with this one around your mini-me’s.
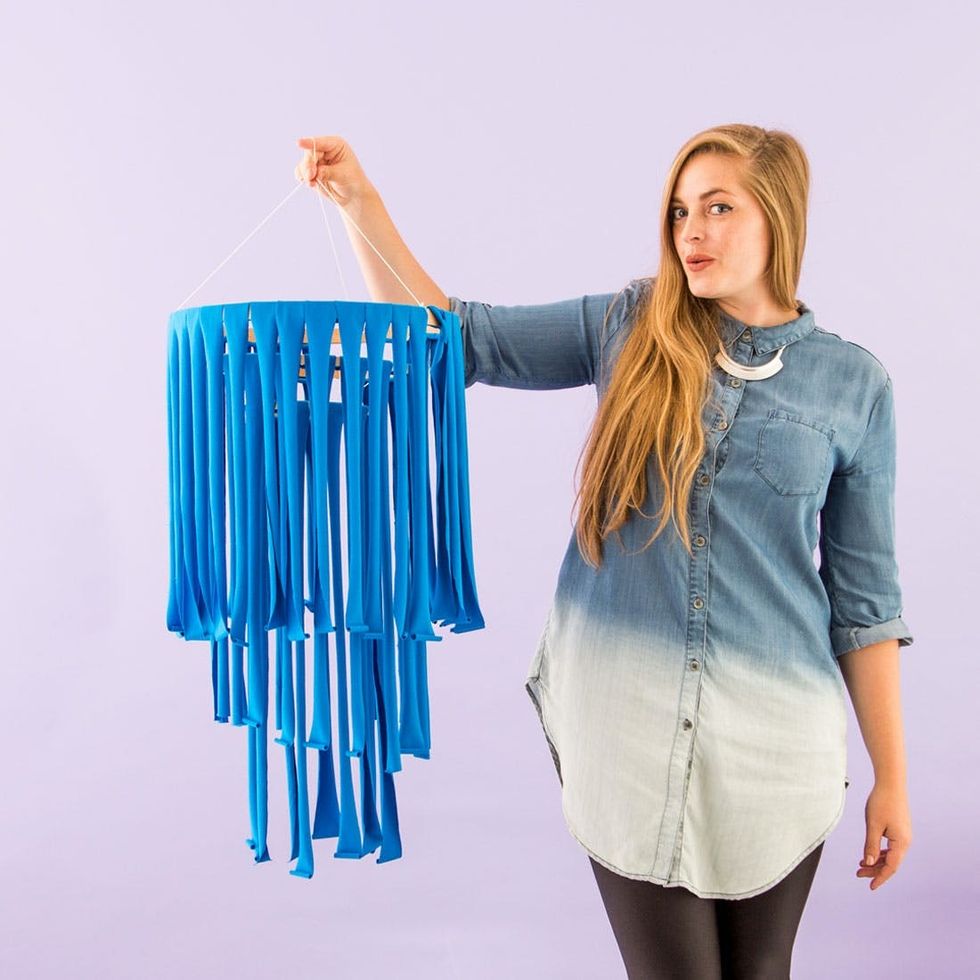
Hey there! I’m Lee, one of Brit + Co’s Kit Designers and a fan of super fast DIYs. I’m famous for my lack of patience, but luckily that’s turned into a knack for DIY on the fly! Given a yard of cotton and whatever was lying around the office, I chose to grab a few embroidery hoops and make some last-minute décor magic happen with this easy fabric chandelier. If you’re ever in need of quick wedding or party décor, make a few of these in whatever color cotton you’d like and you are GOOD to GO!
LEE // FABRIC CHANDELIER
<b><br/></b>
 1. Cut 1 ½-inch by 1 ½-foot strips of fabric.
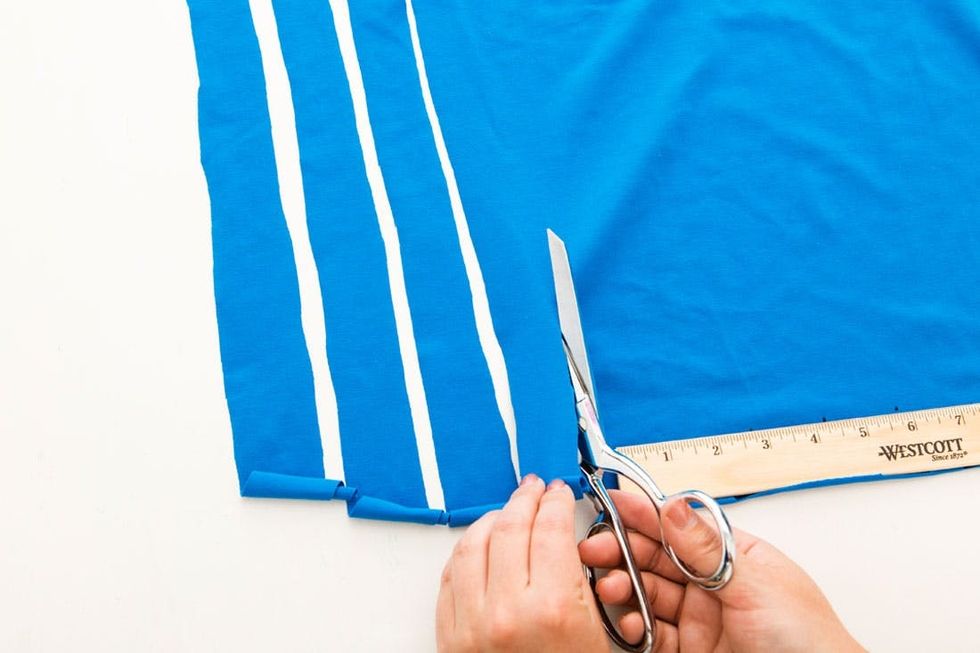
2. Separate the inner and outer rings of your first embroidery hoop and lay your fabric strips on top of the outer hoop.
3. Place the inner hoop over the fabric strips and tighten the two hoops together.
4. Repeat for two more hoops of different sizes and tie them together with twine so that they hang in three tiers.
5. Attach three long pieces of twine to the top hoop and tie them together at the top so you can hang your new fabric chandelier.
Measure out a rectangle of fabric with a width that fits all the way around your largest hoop and gives you about a foot and a half of length. Mark off one-and-a-half-inch sections along the width of your rectangle using a permanent marker, then cut the entire rectangle into one-and-a-half-inch by one-and-a-half-foot strips.
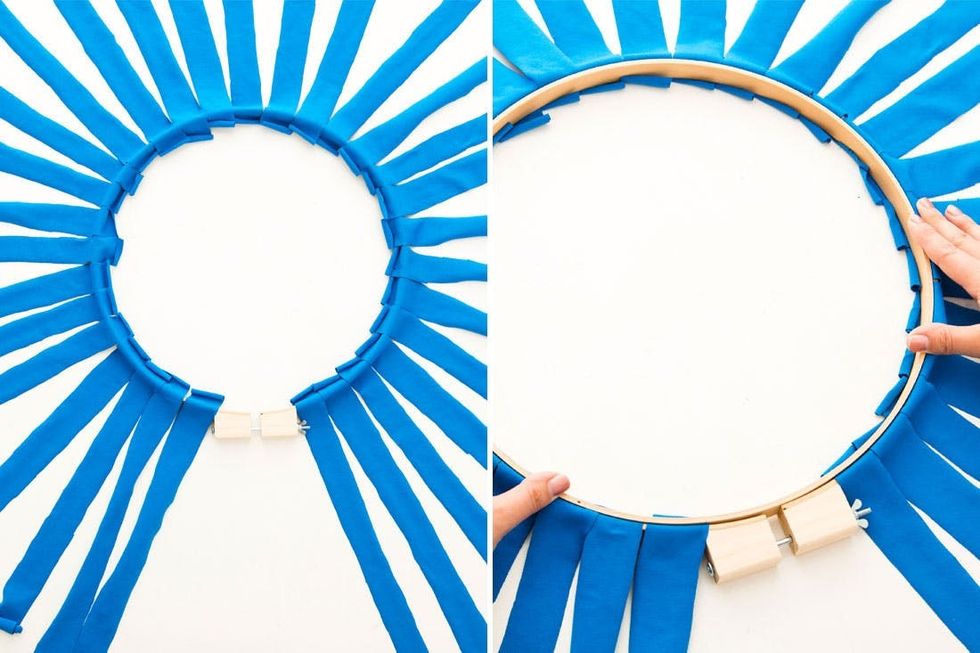
Loosen and remove the smaller inner hoop from the larger outer hoop and lay your fabric strips over the top of the outer hoop so that they look like the left image above. When the whole hoop is covered with strips, place the smaller inner hoop down on top of them and tighten the two hoops together, sandwiching the fabric strips in between.
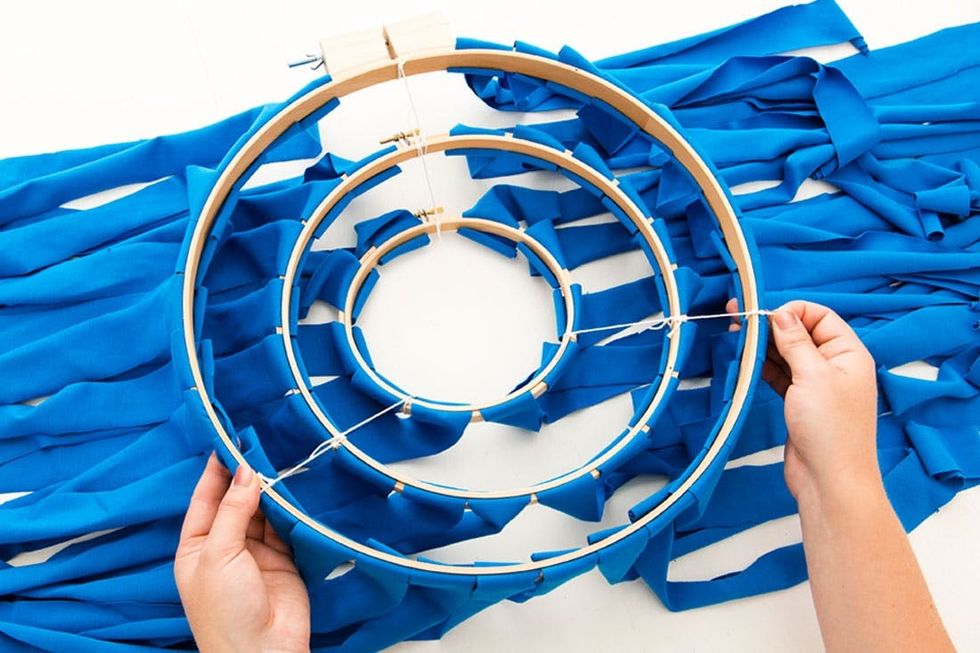
Repeat this same process for your medium and small hoops and then tie them together in three spots with twine. Make sure your pieces of twine are all the same length so that the three tiers hang evenly.
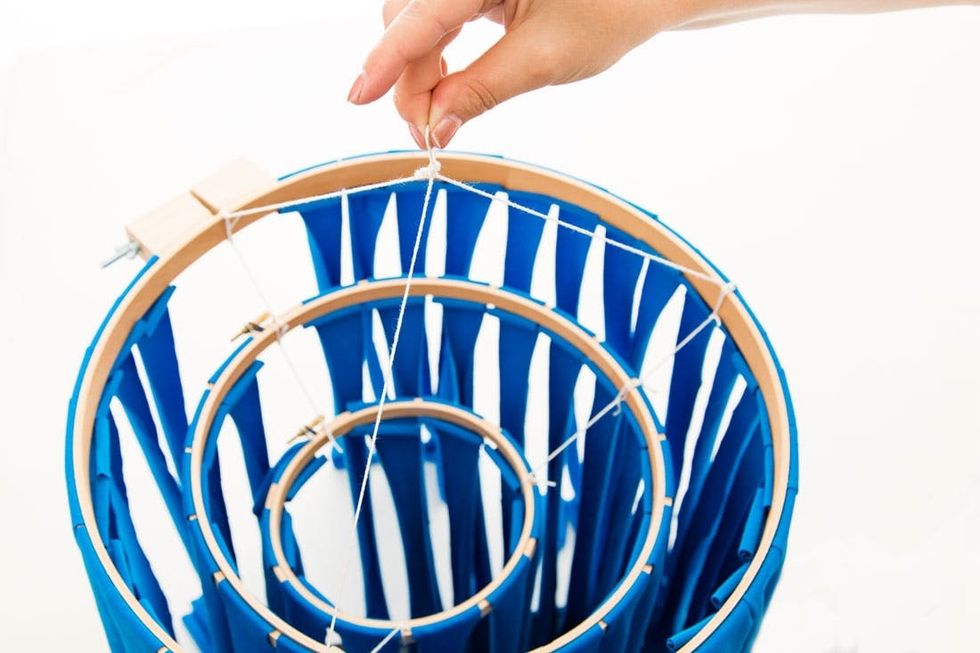
Attach three longer pieces of string to the largest hoop and tie them together at the top to hang your new fabric chandelier!
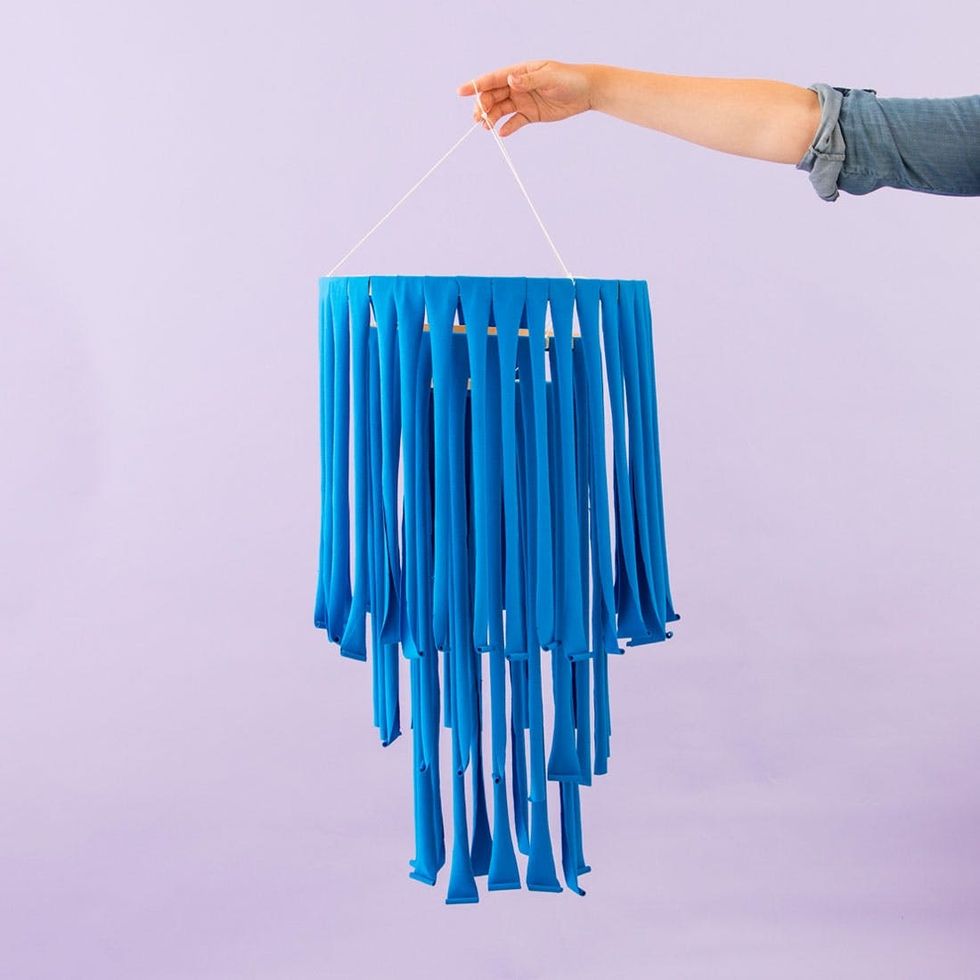
And there you have it! The easiest party décor EVER, made with just one yard of cotton. Play with different color fabrics or throw a strand of string lights in to take this to the next level.
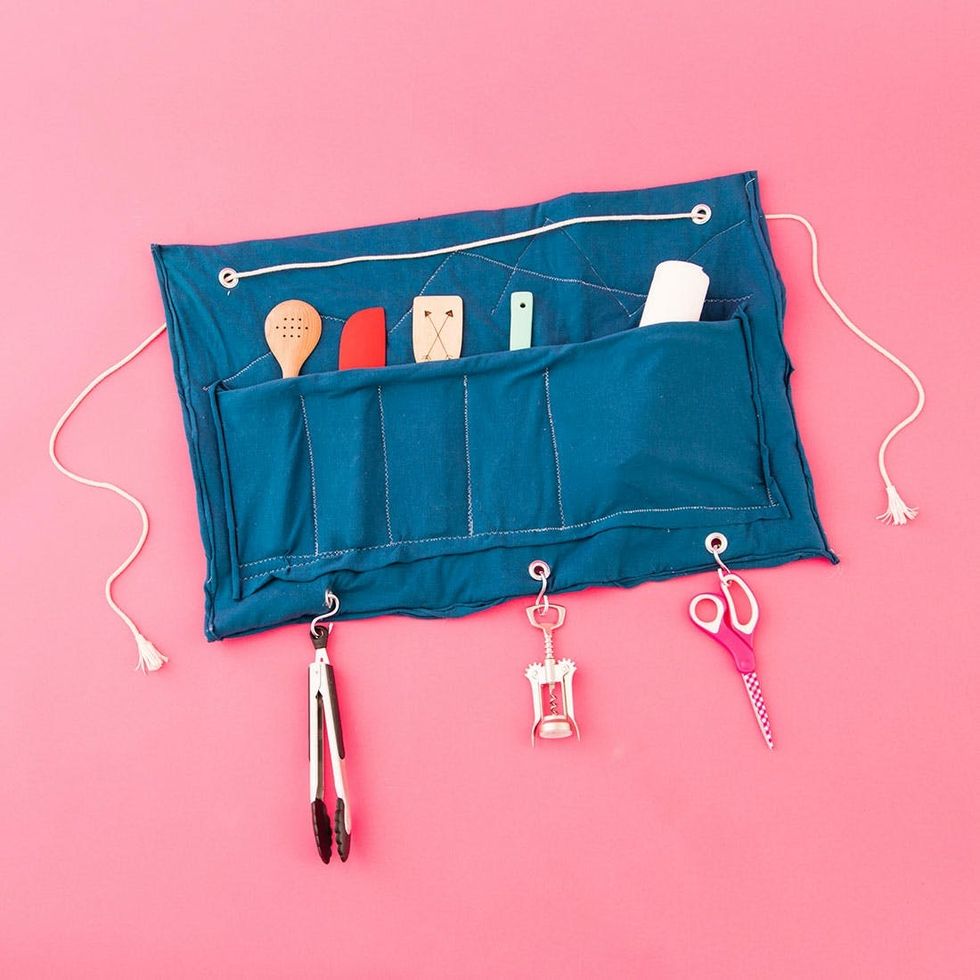
I’m Anita, Creative Project Manager here at Brit + Co, and if there are two things to know about me, it is that I love people and I love the outdoors. So naturally, group projects (like this!) and camping are MAH JAM. I’ll also toot my own horn and say that I’m a pretty incredible packer when it comes to adventures outside, however, carrying my camping utensils has been a pain, especially when camping with multiple people. This was the perfect opportunity to make my own camping cookware holder to house everything from my forks to paper towels. I hope this inspires you to head outside and enjoy cooking among the mountains!
ANITA // CAMPING COOKWARE HOLDER
<b><br/></b>
 1. If not already to size, cut your quilt batting down to 20 x 25 inches. Place on top of your cotton fabric and fold over until completely covered. Make sure there is an inch of extra fabric on the three sides that you will sew (the quilt batting can be flush against the folded side). Pin to secure.
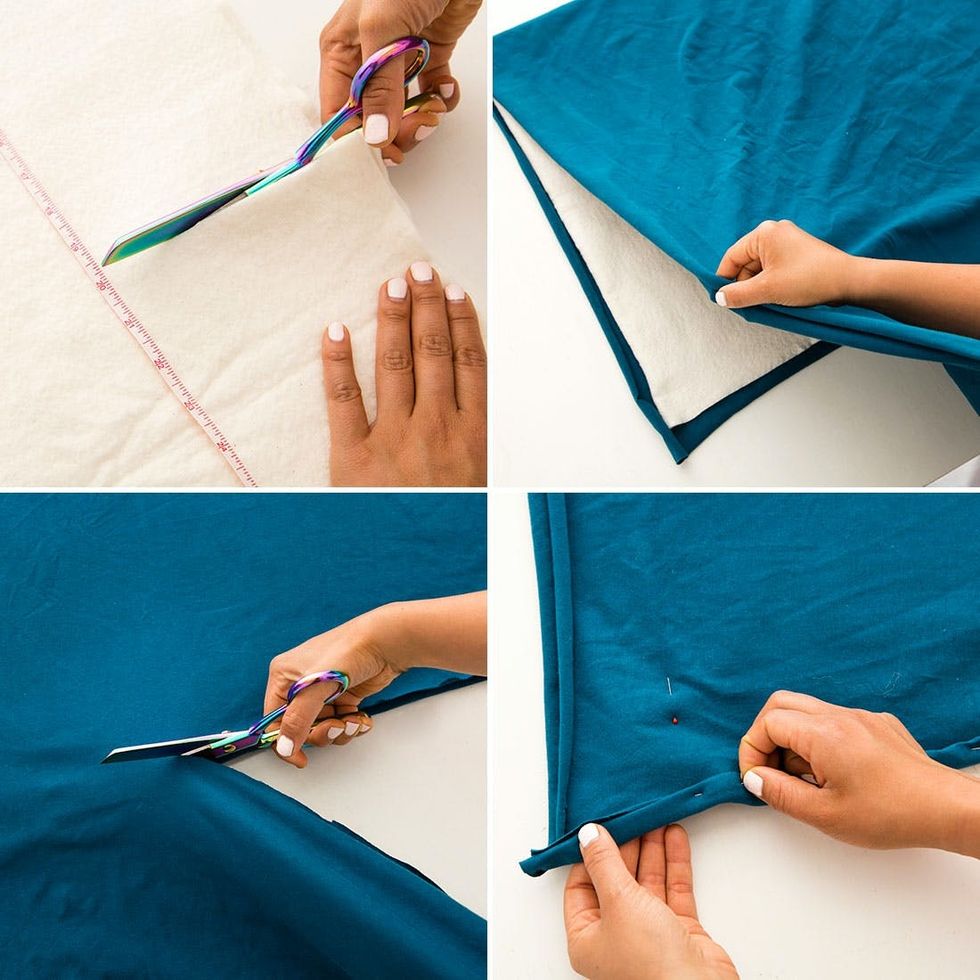
2. Since you want the quilting batting to stay secure, sew some zig-zags across the jersey. This is a great way to add a design.
3. Fold over your edges twice (a quarter inch each time) to create a clean double-folded hem. Sew all three sides (the folded side does not need to be hemmed).
4. Use the excess fabric that you cut off in Step 1 for your utensil holder. Cut to the size you would like. Sew the edges to the jersey with the quilt batting — remember to leave the top open to insert your cookware! Next, sew inlet lines to create multiple pockets.
5. Cut two small holes in the top left and top right corners to insert your grommets. Use the grommet tool to secure. Repeat this on the bottom of your utensil holder — this will be for your S hooks. Space them evenly apart so the weight of your cookware and utensils are distributed equally.
6. The rope tassel is simple and fast! Cut four inches of your tassel fringe and hot glue to one end of your rope, then wrap the fringe until you can’t wrap any further. Hot glue to the end of the rope. Repeat to the other end of the rope. This rope is purposefully long to use for both wrapping up your utensil holder and stringing through your top grommets to hang.
If not already to size, cut your quilt batting down to 20 x 25 inches. Place it on top of your cotton fabric and fold over until completely covered. Make sure there is an inch of extra fabric on the three sides that you will sew (the quilt batting can be flushed against the folded side). Pin to secure.
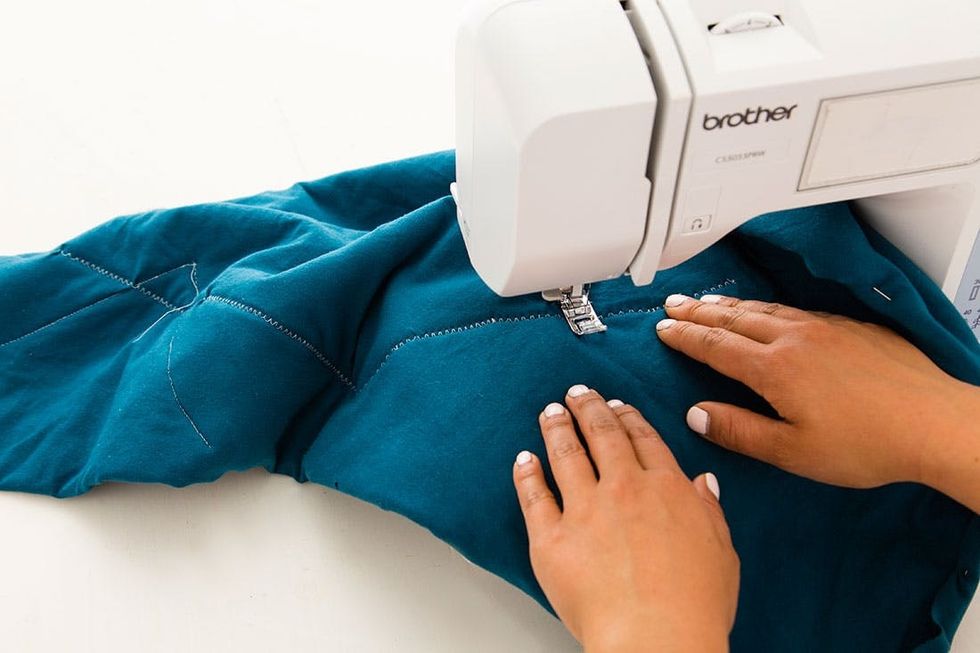
Since jersey fabric has a bit of stretch to it, I wanted to give it more structure by adding the quilt batting and sewing a mountain scene by zig-zagging some lines onto the top half. The moments when I feel so small amongst all the peaks is one of my favorite feelings when I’m camping.
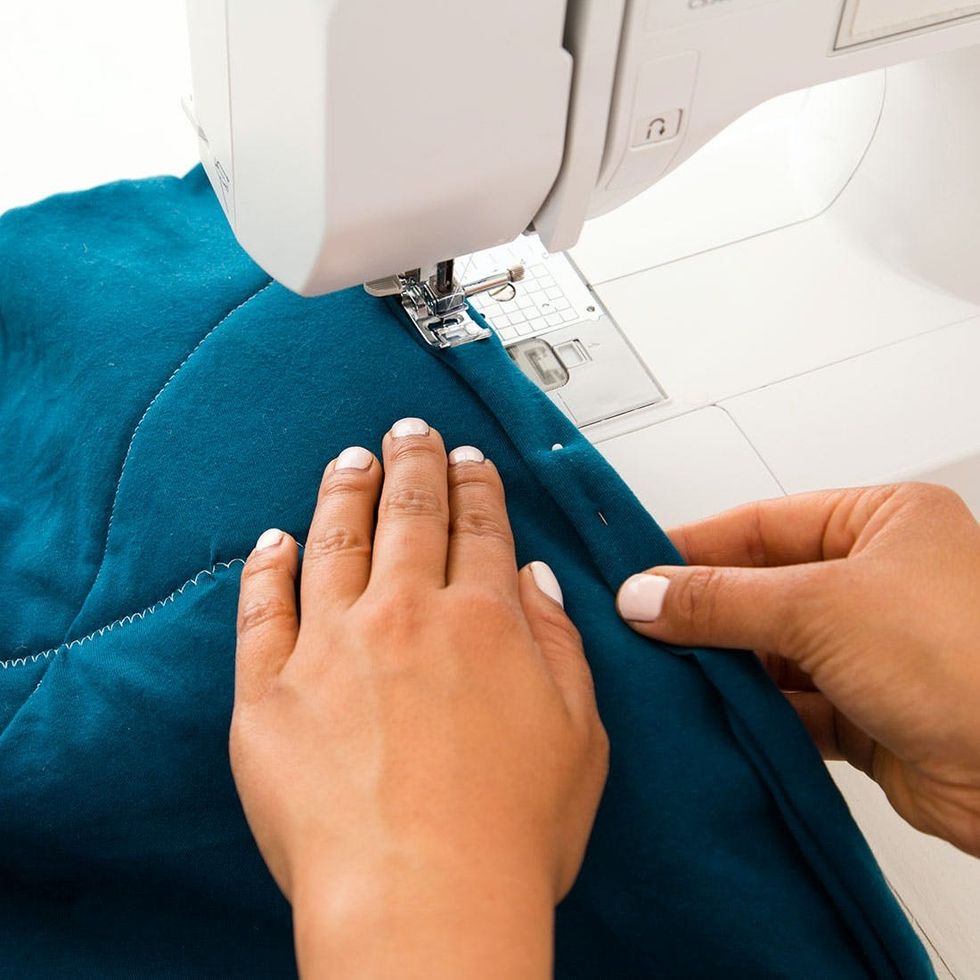
For your hemline on the edges, fold your fabric over ¼ inch, then fold it over another ¼ inch to create a clean double hem. Pin to secure and then sew.
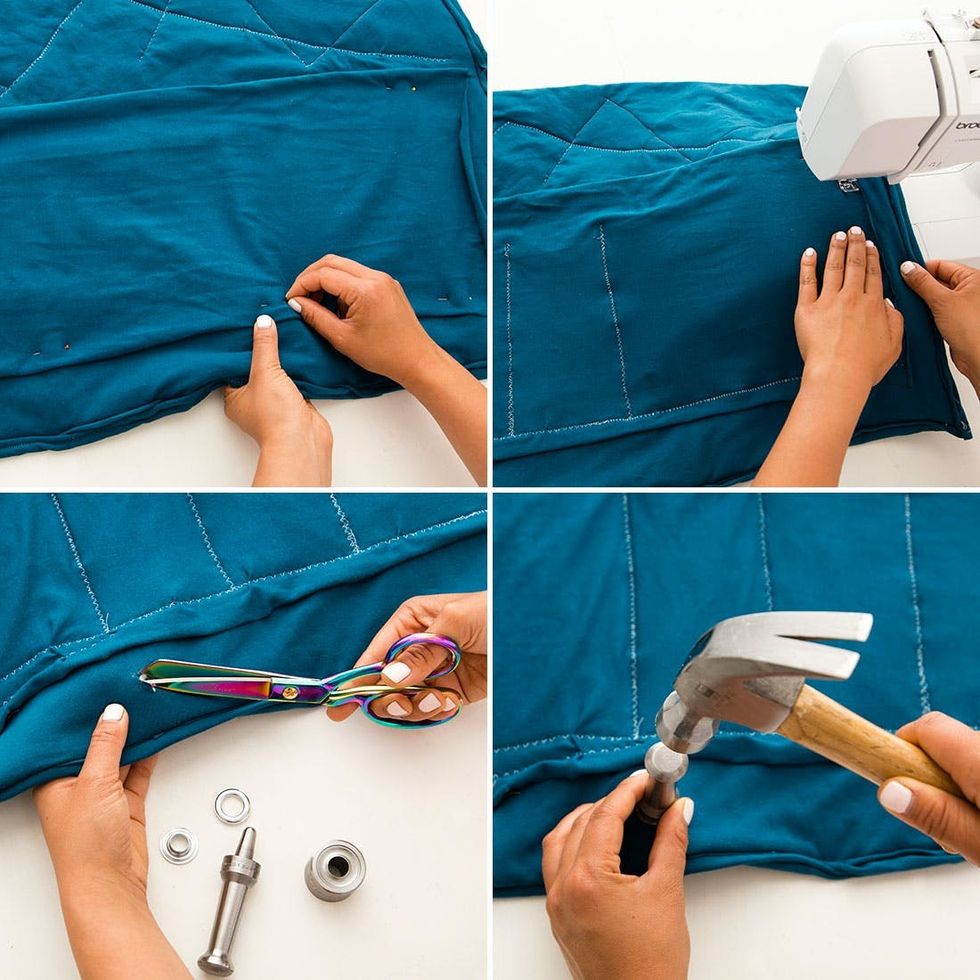
Take your excess fabric (that you cut off from the first step) and place where you would like your utensil holder to be. I picked front and center, but that is just a suggestion. Sew the side and bottom edges. Next, sew the inlets where your utensils will go. Here is another free-for-all opportunity — any design goes! Remember to leave the top open so you can store your camp gear.
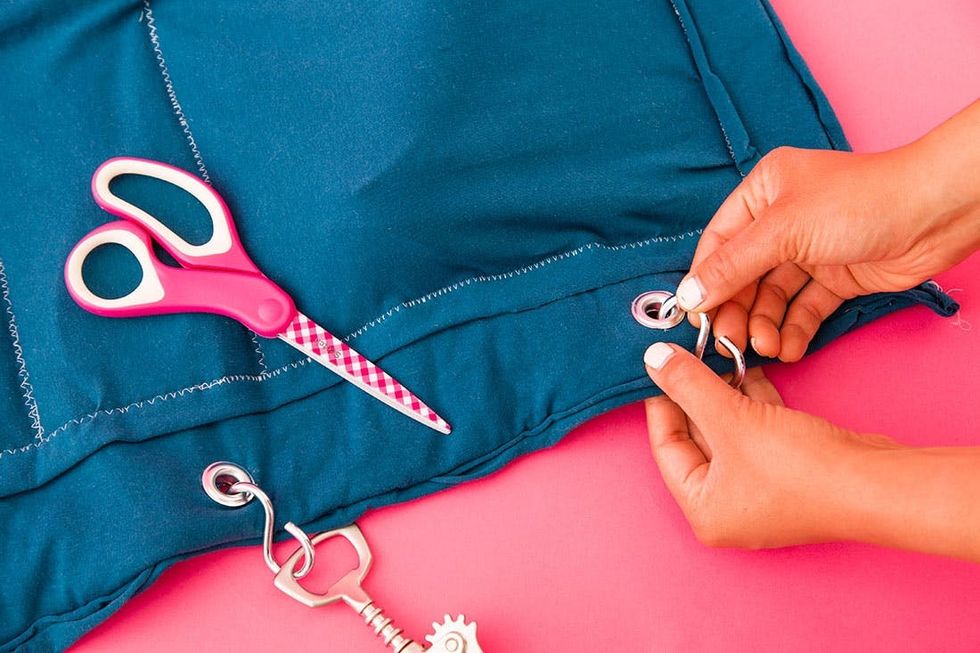
Next, cut a small hole with your fabric scissors just big enough to fit your grommet through. Use your grommet tool to hammer it closed. Do this to your top two corners so that you have the option to hang your utensil holder.
Add a few more grommets on the bottom and loop your S hooks in the grommets to hang various tools or cookware supplies.
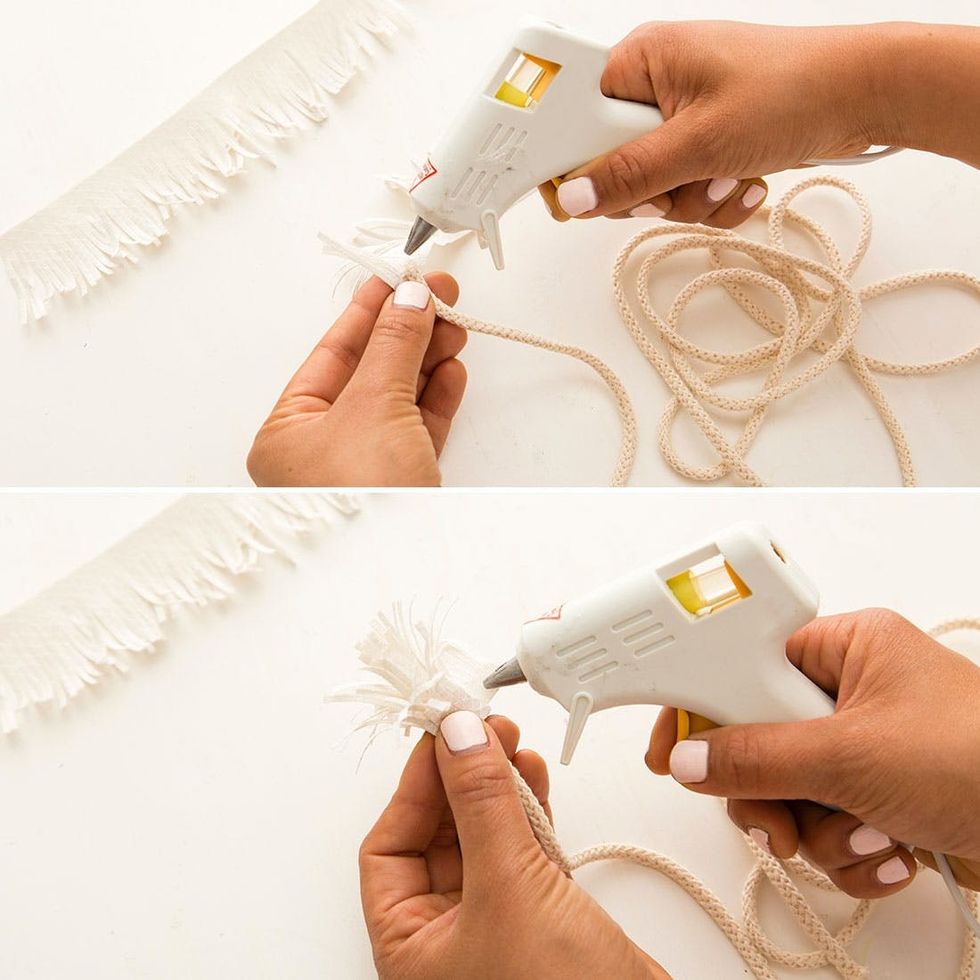
I found this tassel fringe at our local fabric store. Snip four inches and hot glue to one end of your cotton rope, fringe facing away from the rope. Roll and wrap the tassel until it is tight and hot glue to secure. Repeat to the other end of the rope.
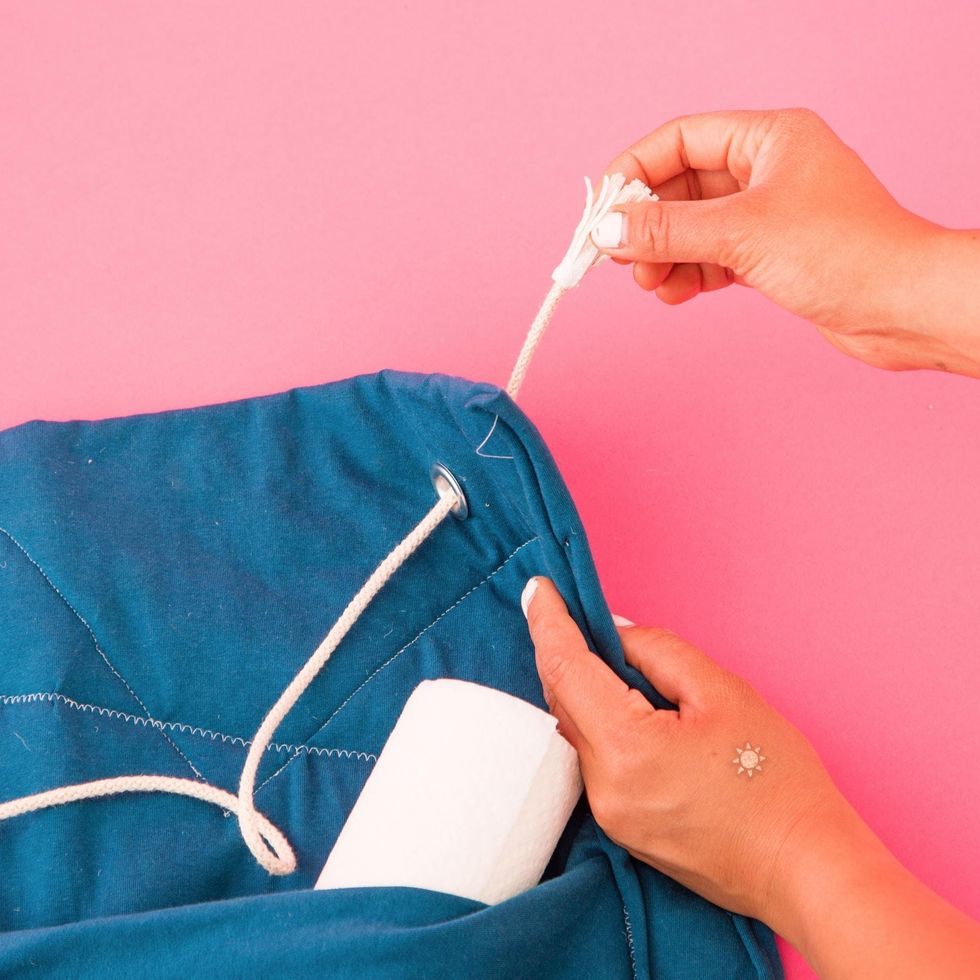
Use this rope to hang your utensil holder on the edge of a picnic table or tree for easy access to all the tools you need when whipping up that campfire dinner. Once you’re ready to pack up, thread the rope back through your grommet and roll your fabric to create a tube. Wrap the rope around the center for easy packing and transport!
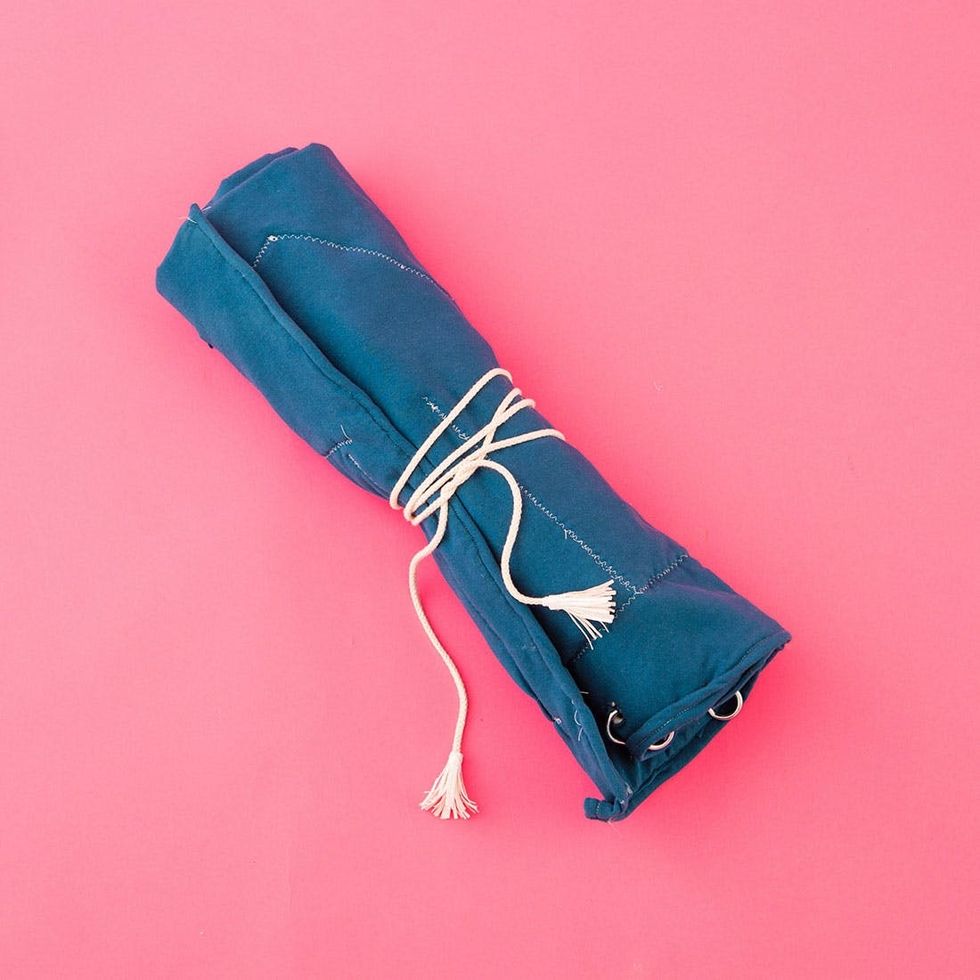
Wham, bam, thank you ma’am!
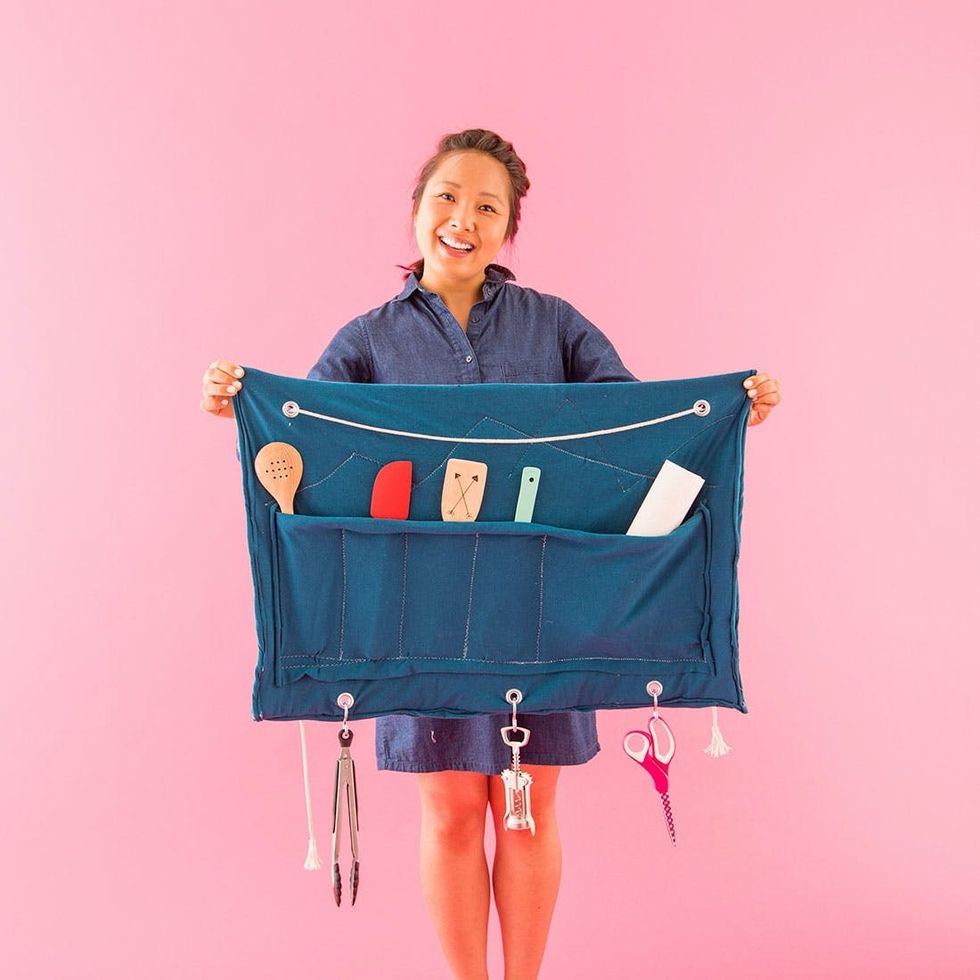
What a good-lookin’ utensil carrier.

And now — drumroll please — a few outtakes from this straight-up cotton-palooza.
Tell us, are you completely blown away by the versatility of cotton?

HAPPINESS.

Fun fact: Maddie carries a Frisbee around with her on the weekends. She’s in her element.

Dang, Alonna’s got HOPS.

ChandaLEE-r, anyone?

Hello? It’s me. And my art supplies.

The drama is REAL.

Obviously more than one of us appreciates the softness of this jersey :).


