3 Summer Updos You Can Do in Under 5 Minutes

5-minute summer hairstyles

Summertime, and you know what they say about the living being oh-so-easy. Your hair should be easy, too! The best thing about summer hairstyles is that somehow the more messy and undone the finished look is, the better. Can't really beat that, can you? Here are three super easy, super fresh updos to add to the mix this summer.
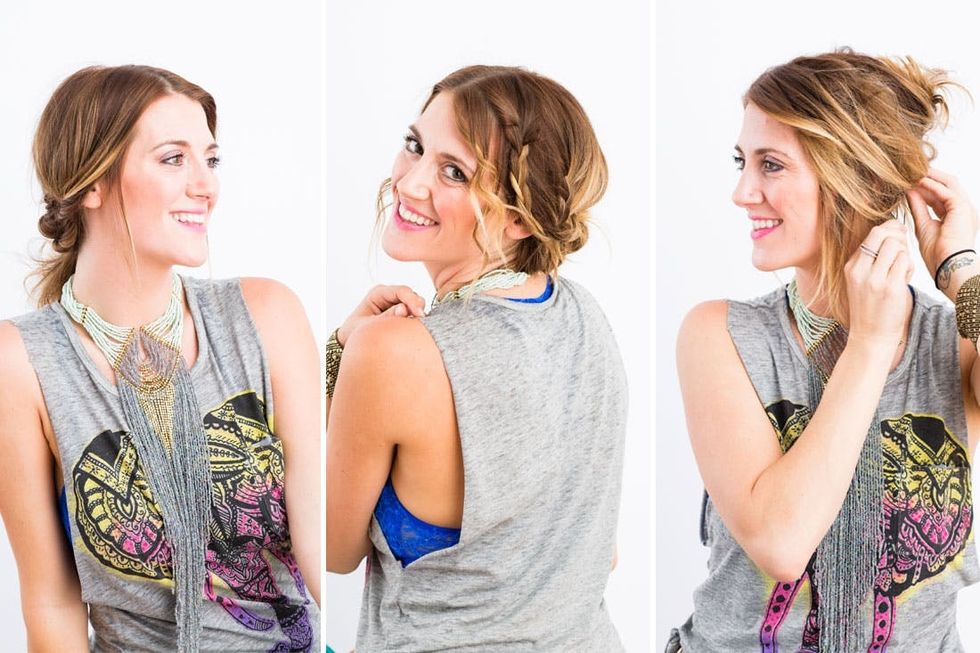
Now, can someone mix me up a refreshing cocktail? ;)

Totally Twisted
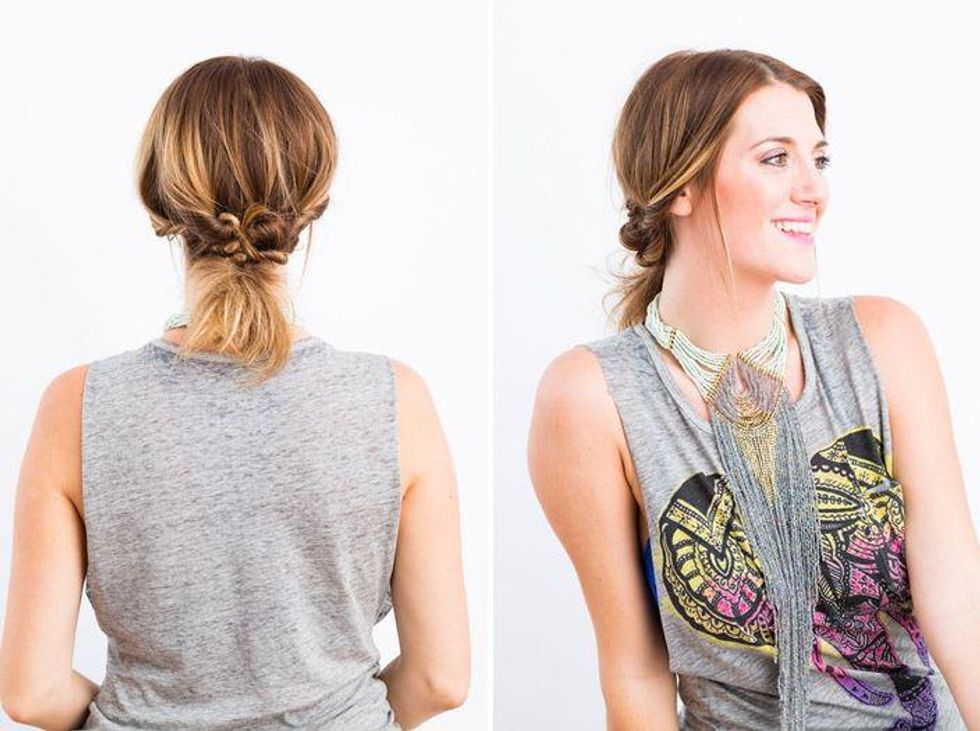
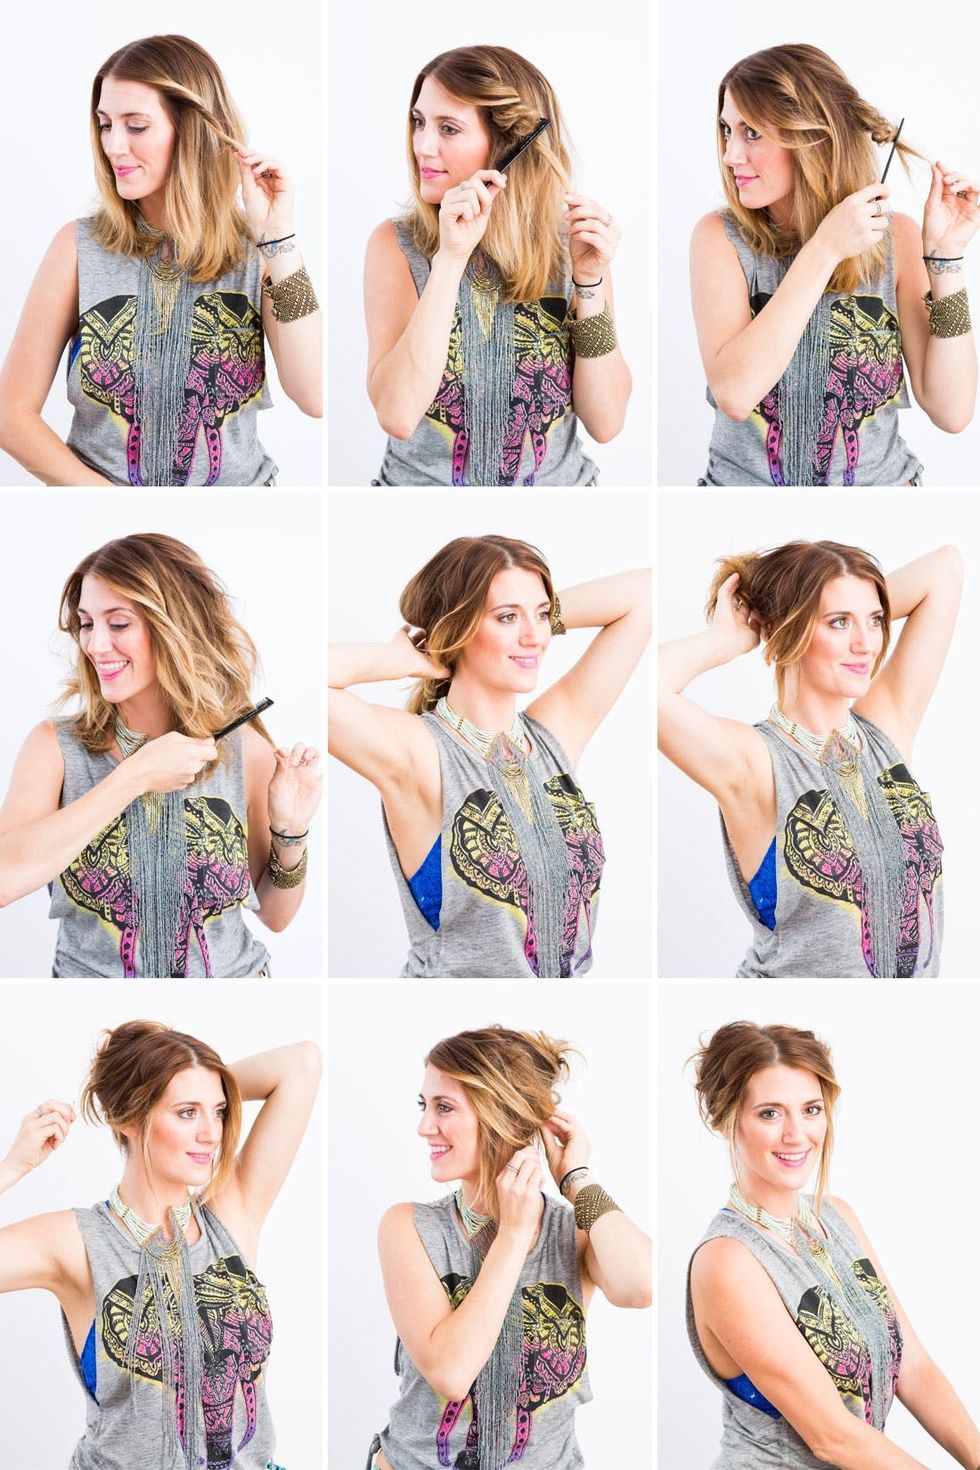
1. Start off by separating your hair on one side, a little behind your ear.

2. Use a clip to hold the front section in place and out of your way.

3. Do the same thing on the other side.

4. Now, working with the back section, split it into two sections (it is okay if it is not perfectly even) and twist each section.

5. Join the two twists together and secure in place with an elastic.

6. Remove the clip from one of the sections in the front.

7. Twist the front section until you get to the ends.

8. Cross the twisted front section over the back ponytail and then secure the end of the twisted hair with a bobby pin into the previously twisted section.

9. Repeat the same steps for the other side.

10. Back comb the hair that is in the original ponytail to create a messy, fuller look.

11. Pull out some random pieces in the front to keep the look more playful and undone.

We love this take on the low pony.

Effortlessly Tousled
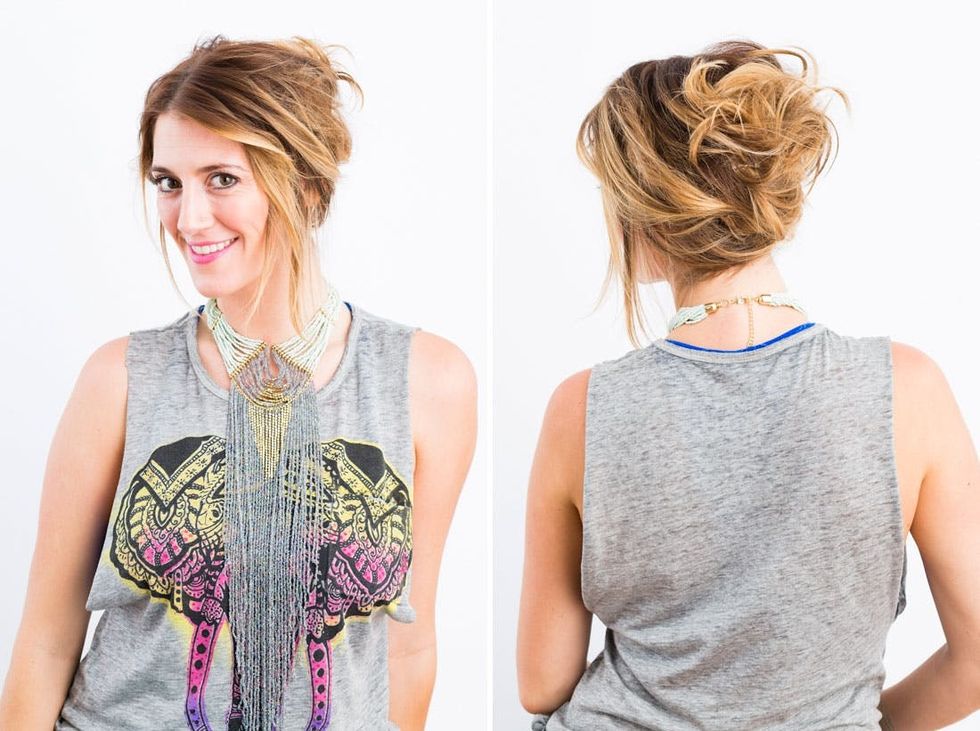
1. Pick up a small section of hair from the front and twist it in the direction away from your face.

2. Using a fine toothed comb, backcomb gently to create a messy curl that will stay in place.

3. Do this all throughout your hair on both sides of your head remembering to twist away from your face.

4. Gently pull your hair back in a low pony trying not to pull out the shape you just back combed in.

5. Twist the hair around until it is in a secure place to pin.

6. Using bobby pins that match your hair color, pin the twisted hair into place. Don't worry about a few stray hairs — they add to the tousled look.

7. Repeat the same steps on the other side of your head. Done!

Va va voom!

Ultimate Texture
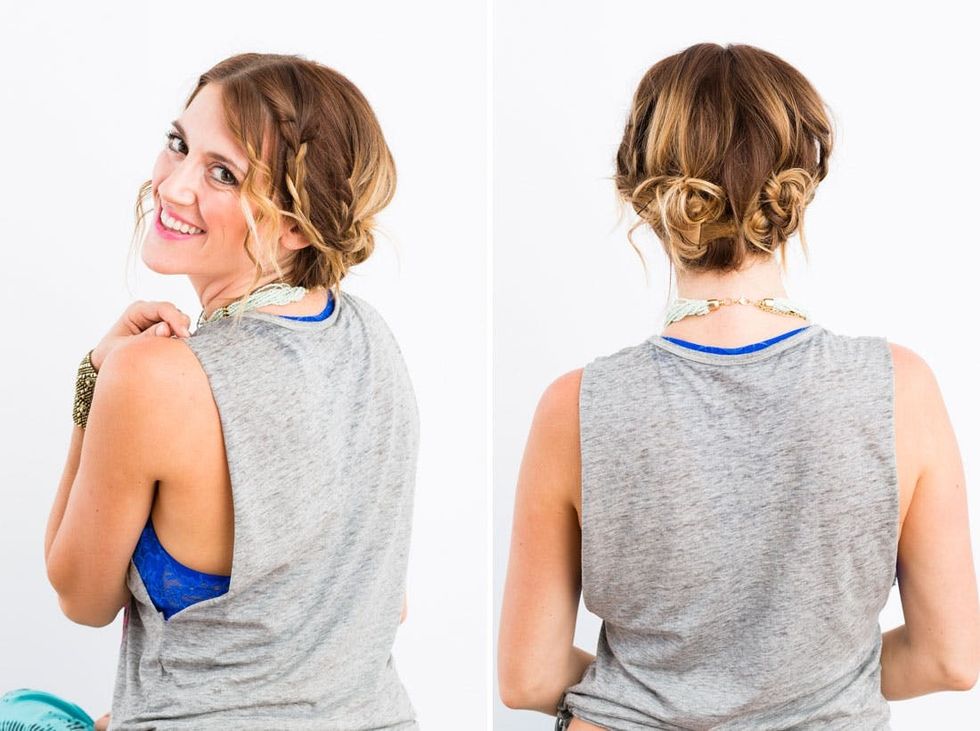
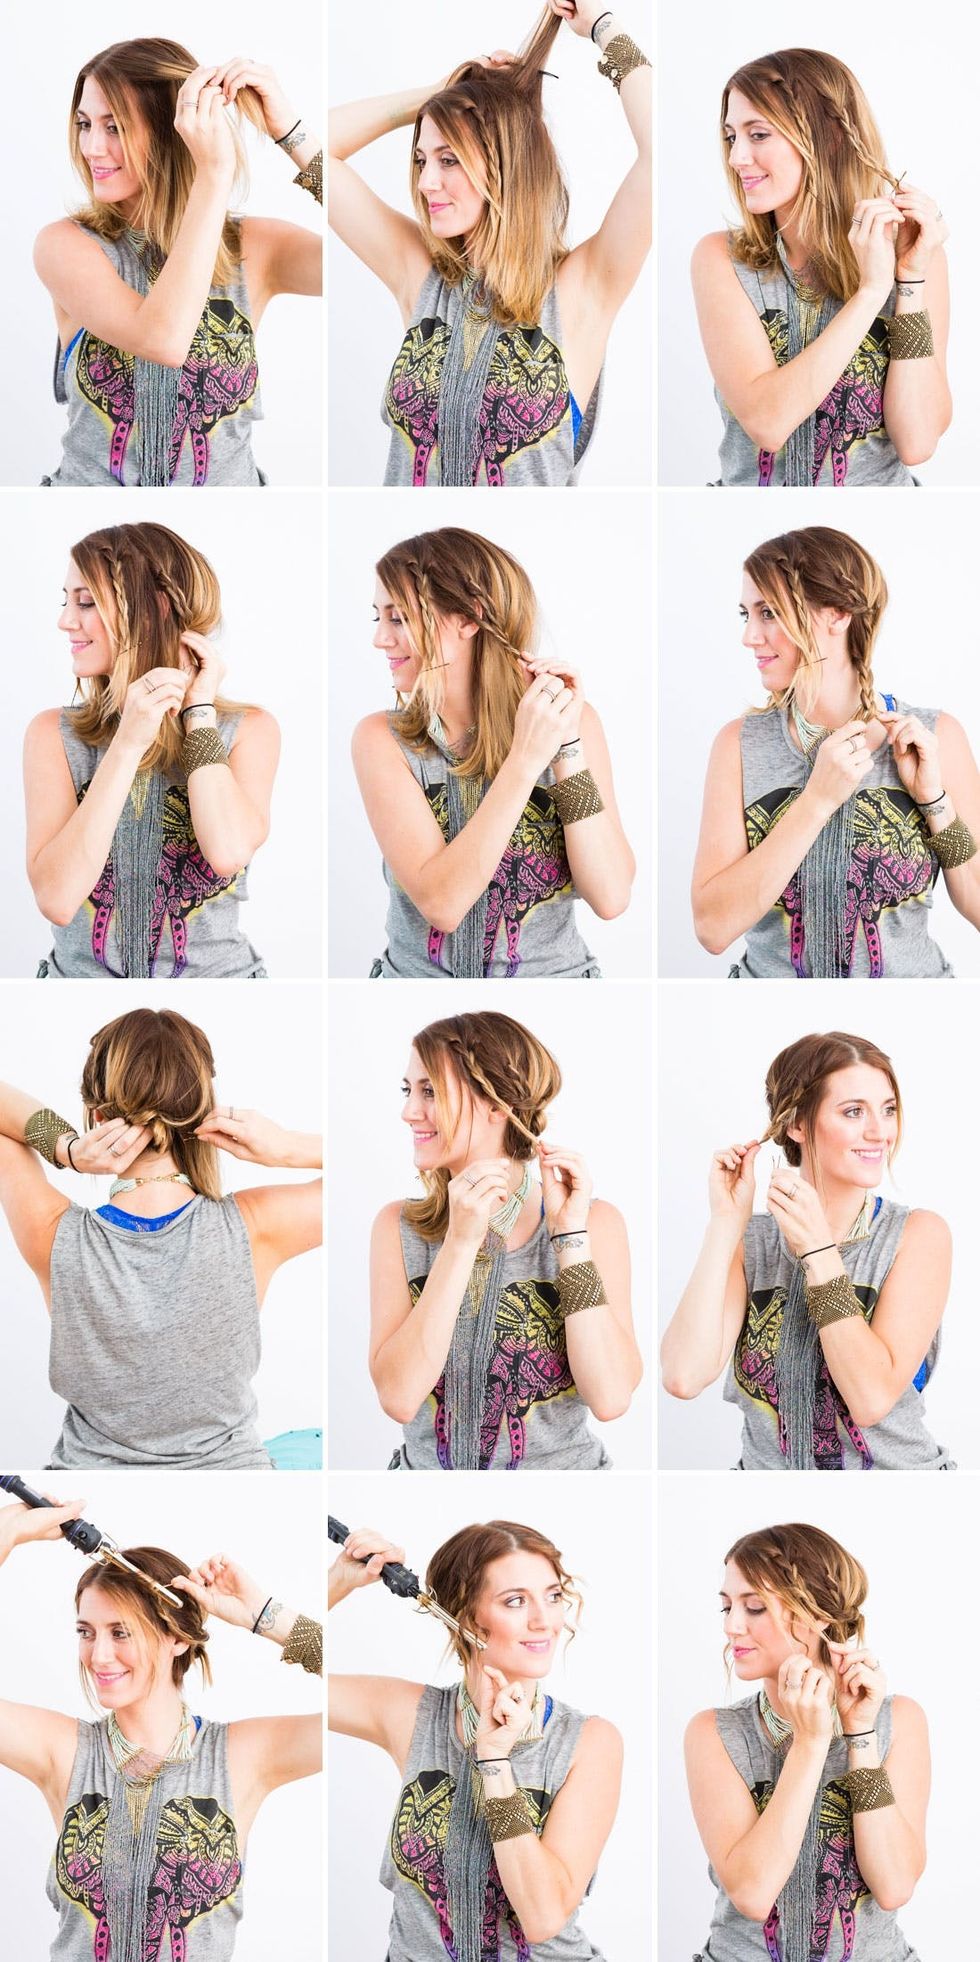
1. Pick up a small section of hair from one side of your head leaving out some of your bangs or front section of your hair.

2. Braid that section and use a bobby pin to hold in place. You can set this braid aside for now.

3. Backcomb the back section of your hair to create volume.

4. Place another small braid on the same side.

5. Repeat the same thing on the other side of your head.

6. Pin the braid towards the back of your head in the lower back section of your head.

7. Pick up another small section of hair and this time twist it back and then pin it as well.

8. Pull all the hair from that side into a low pony in the back of your head, twist it up and secure it with a few bobby pins.

9. Now, pull the original braid you placed in the front section back and pin it in place.

10. Repeat these steps on the opposite side of you head.

11. For all those stray hairs that fell out and the section of hair you left out in the front, use a ½-inch curling iron to place tiny random curls for a contrasting texture.

12. Use your fingers to pull some of the curls a little looser for an even more textured look.

That's it!

We can't wait to lounge on the beach, go window shopping, and grab our favorite lattes this summer. After a year spent indoors, we're ready to throw our hair up and get outside. Good thing these summer hairstyles only take five minutes!

Follow us on Pinterest for more beauty inspo!

This post has been updated.

Deciding who to marry is arguably the biggest decision of your life (no pressure). But even after you've chosen the person, the decisions just keep coming: the place, the cake, the dress, and, of course, your hairstyle. With seemingly endless options out there, we're here to assist you with the best look for your big day. Are you leaning towards soft, romantic waves? Or perhaps a classic updo? Or maybe you're all about standout accessories? Whatever the case may be, below you'll find 37 wedding hair ideasto help you decide on a 'do to say “I do" in.

1. A Braid Crown (via Brit + Co)

www.instagram.com

2. Pony Perfection

www.instagram.com

3. Voluminous Twist Updo

www.instagram.com

4. Khaleesi-Approved Side Braid

5. Twists and Vines (via Angelo Pantazis/Unsplash)

www.instagram.com

6. Half-Up Twist

www.instagram.com

7. Classic Wrapped Pony

8. Pearl Pony (via With Love Caila)

www.instagram.com

9. Messy Center Part

www.instagram.com

10. Feather Headband

www.instagram.com

11. Braided Pony

12. Nourished Natural Curls (via Brit + Co)

www.instagram.com

13. Loose Top Knot

www.instagram.com

14. Sleek Swoop

www.instagram.com

15. Pancaked Pull-Through Braids

16. Wispy Face-Framing Curls (via 小谢/Unsplash)

www.instagram.com

17. Shimmering Chignon

18. Statement Accessory (via With Love Caila)

www.instagram.com

19. Daisy Side Braid

20. Touch of Feathers (via Brit + Co)

www.instagram.com

21. Boho Crown Braids

22. Edgy Bubble Braid (via Kimson Doan/Unsplash)

www.instagram.com

23. Sleek Side Pony

24. Sophisticated Low Pony (via VellaSyah/Unsplash)

www.instagram.com

25. Piecey Braid

www.instagram.com

26. Floral Hair Accessory

www.instagram.com

27. Vintage Headpiece

www.instagram.com

28. Twisted Rainbow Updo

29. Bubbled Half-Up Look (via Lindsay McGrath/Unsplash)

www.instagram.com

30. Shiny Low Bun

www.instagram.com

31. Piecey Updo

www.instagram.com

32. Rapunzel-Esque Mane

33. Half-Up Half-Down Braid (via Maria Nila)

www.instagram.com

34. Flirty Fishtail Waves

www.instagram.com

35. Lace Details

www.instagram.com

36. Flower Clip

www.instagram.com

37. Beachy Curls


What wedding hairstyle do you love? Tell us @BritandCo!

This piece has been updated.

Things are heating up between Kylie Jenner and Timothée Chalamet. The celebrity couple, who went public with their relationship in January of 2023 are only getting closer, and according to one source, who says that Kylie's already considering Timothée “the one," they're getting serious.

Here's the latest news on Kylie Jenner and Timothée Chalamet's relationship.

Kylie Jenner "definitely" sees her relationship with Timothée Chalamet as a longterm thing.

According to the Page Six insider, Kylie Jenner “has never felt like this about anybody else before and definitely sees a future with him," especial since she “feels like Timothée is so different from all her other exes she’s dated in the past.”

Kylie's dating history involves names like Tyga and Travis Scott (who's the father of her kids Stormi and Aire), but she's never had a relationship like this.

A source told People in December 2023 that Kylie and Timmy are "incredibly happy" together.

“He is very supportive of her career and she of his,” the source said. “They both try to attend important events for each other.” And in addition to being super supportive, Timothée Chalamet is “in awe of everything [Kylie] is accomplishing” and “especially thinks she is an amazing mom.” I can't get enough of these two!

Most recently, Kylie Jenner and Timothée Chalamet got cozy at the 2025 Golden Globes, where Timothée was nominated for Best Performance by a Male Actor in a Motion Picture for his role as Bob Dylan in A Complete Unknown.

Timothée rocked the goatee he's had since he started filming Marty Supreme along with a dark suit and a blue tie worn like a scarf. Kylie looked gorgeous in a silver 1999 Versace dress that Elizabeth Hurley wore to the CFDA Fashion Awards that same year in New York.

I can't wait to see this couple make many more appearances together!

Check out all our favorite Celebrity Couples and read up on the latest news on Timothée Chalamet's Dune 3!

The holidays are here, and you know what that means? Holiday parties! We've armed you with party dresses, party jumpsuits, and holiday nail art ideas, but now it's time to bring the holiday style party up top. We've created three holiday-ready hairstyles that you can adorn with leaves, feathers, and branches, oh my! Follow the tutorials below to see how each of them are done. We'll also show you how to set your hair to prep it for just about any updo!

First, here are six steps to set an updo that will make every hairstyle easier to create.

1. Take the first section of hair from behind the ear to the front of your face.

2. Use Kenra 25 as a setting spray.

3. Curl with a big wand and pin in place with a duck bill or pin curl pin.

4. Continue this process until all of your hair is up in curls.

5. Let it set for 5 minutes to let the heat cool. This allows your curls to have maximum bounce and hold.

6. Pull out the pins and get ready to style!

This first look is a take on the classic updo, made way more simple. For a finishing touch, we adorned the crown of Cecelia's head with a silver leaf necklace.

1. Let your pin curls set for 5 minutes.

2. Pull out the pins and run your fingers through your hair to loosen the curls.

3. Backcomb and smooth over the crown of your hair to add volume and shape.

4. Start by pinning the top section of your hair into a half up half down style.

5. Take the remaining portion of the hair and twist it into a pony.

6. Roll up the pony into a twisted knot style shape. Secure with bobby pins.

7. Add a pretty necklace or headband to make the updo more festive.

8. Smooth fly-aways with Tigi Bed Head Stick.

9. Get ready for your closeup!

Next up, this look comes straight from A Midsummer Night's Dream, braids, branches, and all.

1. Start with pin curls, and take them out.

2. Backcomb to add volume.

3. Separate hair into three sections. Braid a small piece on top of each section.

4. Twist each section of hair including the braid.

5. Twist into a bun and pin.

6. Repeat with each section.

7. Add a branch or twig using bobby pins.

8. Pucker up!

9. We love this whimsical style.

Last, the fanciest one of the bunch, combining a classic updo with punk, boho, and modern style elements.

1. Backcomb the top section to create a pomp.

2. Create the pomp and secure with bobby pins.

3. Take the hair from the section you just pinned and backcomb it to give it some more volume. Smooth with Tigi Bed Head Stick.

4. Twist the hair to create another pomp-like bun.

5. Pin in place.

6. Take the remaining hair and twist into a ponytail until it rolls up onto itself, creating a twisted bun-like shape.

7. Pin that bun!

8. Add a feather headpiece to make this look even more formal.

9. C'est magnifique!

Which of these holiday updos is your favorite? What other hair tutorials would you like to see on Brit + Co? Talk to us in the comments below.

I've been working from home since long before it became the norm. And my "office" has evolved from a spindled-back chair at the kitchen table to an airy home office with a view. Back then, my productivity took a hit without essentials like adequate storage space, comfortable seating, and a bit of privacy. While it has its perks, working from home comes with its fair share of challenges; your home office setup doesn't need to be one of them.

Here are 10 ways to redesign your home office for better productivity!

Caio

1. Bad Lighting

Dim or harsh overhead lighting can strain your eyes and limit your focus. Try to get close to a window for natural light or use daylight bulbs to mimic sunlight to boost your mood, creativity, and focus. Find a desk lamp that works for you too!

Ella Jardim

2. Clutter Everywhere

A cluttered desk equals a cluttered mind, IMO. Reduce the stress that comes with a disorganized and cluttered desk by bringing in shelves and organizers; finding sleek cable-management solutions; and removing any unnecessary items to reduce visual distractions.

Vlada Karpovich

3. Uncomfortable Furniture

If you're sitting most of the day, it's so important to invest in a good desk chair. An unsupportive chair or poorly sized desk can be uncomfortable, making it harder to stay focused for long periods of time. Your back will thank you!

Ketut Subiyanto

4. No Boundaries Between Work and Home

Distractions at home like kids and partners can kill your productivity. Avoid blurring the line between work and home life by designating a private space, separate from high-traffic spaces, for your work hours if you can. Use rugs, curtains, or acoustic panels to reduce noise too.

Mizuno K

5. Lack of Storage

I get it, they're not the best-looking pieces in your home, but without proper filing systems you’ll waste time hunting for important documents or supplies. Invest in modern storage options that look good too from Mustard Made and The Container Store.

Vlada Karpovich

6. Unoptimized Tech Setup

Slow Internet or outdated tech tools can make you feel totally frustrated and can slow down your productivity. Upgrade your Internet to a faster connection, and refresh your tech gadgets and programs to make sure you work more efficiently.

Ivan Samkov

7. Awkward Desk Placement

Placing your desk in a spot with too much noise, traffic, or distractions — like facing a TV — will guarantee to disrupt your concentration. Find a more zen spot where you can focus on the tasks of the day.

Anna Shvets

8. Ignoring Ergonomics

Check your monitor height, keyboard positioning, and add a wrist rest so you don't lead to feeling uncomfortable and fatigued, cutting your workday short.

Mikhail Nilov

9. Lack of Personalization

A sterile, uninspiring office design does your motivation and creativity no favors. Make work feel less like a chore by adding personal touches through artwork, personal photos, candles, some fresh flowers or plants. Greenery can improve air quality and actually reduce work stress. Add a little snack station for quick energy boosts and keep water handy. Also, your Zoom backgrounds should reflect your personality!

Serpstat

10. No Inspiration

No matter what you do — whether it's a creative work or something more analytical — you want to feel inspired. Personalization can help, but dive into vision boards, books, magazines, quotes that inspire your work and help you bring fresh ideas to your workday. Color psychology can help too: blues and greens encourage focus and reduce stress while pops of yellow or orange can spark creativity! Break out the paint if needed!

Subscribe to our newsletter for more home decor ideas!

Brit + Co may at times use affiliate links to promote products sold by others, but always offers genuine editorial recommendations.

It’s almost time for our favorite holiday that celebrates accordingly with chocolate, hearts and the color pink: Galentine's Day! The love between gal pals is undeniable and totally worth celebrating. During this stage of life that we so lovingly call “adulthood,” we rely on our girls to support us through our jobs, the modern and scary world of online dating and any and all quarter-life crises. Let’s face it: We love and need our girlfriends. That’s why a day like Galentine’s Day is quite possibly the best day of the year!

Here's everything you need to know about hosting the perfect Galentine's Day brunch

Studio Ink for Brit + Co

Today we’re teaming up with Studio Ink to show you how to host the most epic Galentine's Day brunch (even if it's breakfast in bed). We’ve got everything from red velvet heart waffles to DIY centerpieces to Galentine card writing stations. Studio Ink has an awesome collection of cards that are the perfect mix of sweet, sentimental, funny and cute. It’s not truly Galentine’s Day unless you send your besties Valentines… I mean, Galentines! Alright, let’s dive in.

What does Galentine mean?

Walls.io

Galentines are like Valentines, but for the girls! Though you may have a lover in your life, this holiday is all about celebrating your platonic friendships with your girl friends and just having fun with it! The holiday is slated for Feburary 13, the day before Valentine's Day, so you can have all the time to cherish your gal pals. Funnily enough, the day was coined by none other than the iconic Leslie Knope from Parks and Recreation.

What food is eaten on Galentine's Day?

Brit + Co

Your Galentine's Day grub is really up to you and the girls, but the most popular bites include dips and chips, stuffed peppers, veggie skewers, waffles, cookies, cupcakes, cake pops, deviled eggs, bruschettas and charcuterie snacks. Finger foods are always a good way to go for any gathering.

What do you bring to a Galentine's Day brunch?

Brit + Co

For a Galentine's brunch, you can bring food items like cute snacks, desserts (topped with heart sprinkles, of course), healthy meals, drink mixers or mocktails. You can also bring handmade cards or gifts for each of your friends, and of course you have to bring your love!

The Spread

Studio Ink for Brit + Co

First, let’s talk about the food. It’s not brunch without a fabulous array of treats. For our Galentine’s Day brunch, the perfect setup includes: berry parfaits, donut skewers, mini muffins, bellinis and a red velvet waffle bar, displayed under a simple backdrop of letter balloons, paper hearts and tassels.

Decorate your table with a few gold bottles and single flower stems. You don’t want your table to be too cluttered, because you’ll want to also have space for all the card writing you’ll do!

Galentine’s Day Card Mailboxes

Studio Ink for Brit + Co

All your Galentine’s Day cards now have a home.

Studio Ink for Brit + Co

Add some stickers to your mailbox for extra cute flair. You can download these Studio Ink Galentine’s Day stickers here. Just print on sticker paper and cut them out!

Cards

Studio Ink for Brit + Co

Check out some tips and tricks for making your cards.

Studio Ink for Brit + Co

You’ve got mail!

Studio Ink for Brit + Co

I see more mail in the future. <3

Studio Ink for Brit + Co

Check out how cute these cards are!

Studio Ink for Brit + Co

I don’t know about you… but all this card writing is getting me hungry. Which brings me to….

Galentine's Brunch Foods

Studio Ink for Brit + Co

These red velvet waffles were a hit when we tested the recipe at the Brit + Co kitchen, and they certainly will be a hit on your Galentine’s Day brunch table.

Red Velvet Heart Waffles With Cream Cheese Glaze

Studio Ink for Brit + Co

Make these waffles with your favorite mix or from your go-to cookbook. Place the waffles on a platter along with the glaze and other toppings. We’re using heart-shaped sprinkles, obviously.

Studio Ink for Brit + Co

Drizzle the glaze on your waffles with a spoon or with a pitcher. No matter how you do that drizz, your waffles will be delicious!

Studio Ink for Brit + Co

Mmm, delightful!

Studio Ink for Brit + Co

Okay, I already know I want seconds. What better way to wash down your second (and maybe third) helping of waffles than with a bellini? Check out this downloadable signature recipe here!

Studio Ink for Brit + Co

Brunch babes!

Check out our email newsletter for more Galentine's Day ideas!

This post has been updated.