Make your own festival.
3 Boho Hair Tutorials to Try (Even if You Can’t Make It to Coachella)

You guys, it’s officially music festival season. And sure, it’s easy to feel major #FOMO when you’re scrolling on Instagram only to find all your friends flaunting the latest festival trends and rocking out at Coachella while you’re stuck at home. BUT you can in fact channel that festival vibe with a gorgeous (and cleaner-looking) ‘do. So why drop hundreds on festival tickets when you can rock out with some friends on your own and look great doing so? We enlisted our friends at Rachel Zoe‘s salon DreamDry for help with three festival-inspired hairstyles you can try out this weekend. So whatever you have planned — brunch, soaking up the first rays of spring sunshine or picnicking in the park with your faves — you are going to have just as much fun as your festival-going friends.
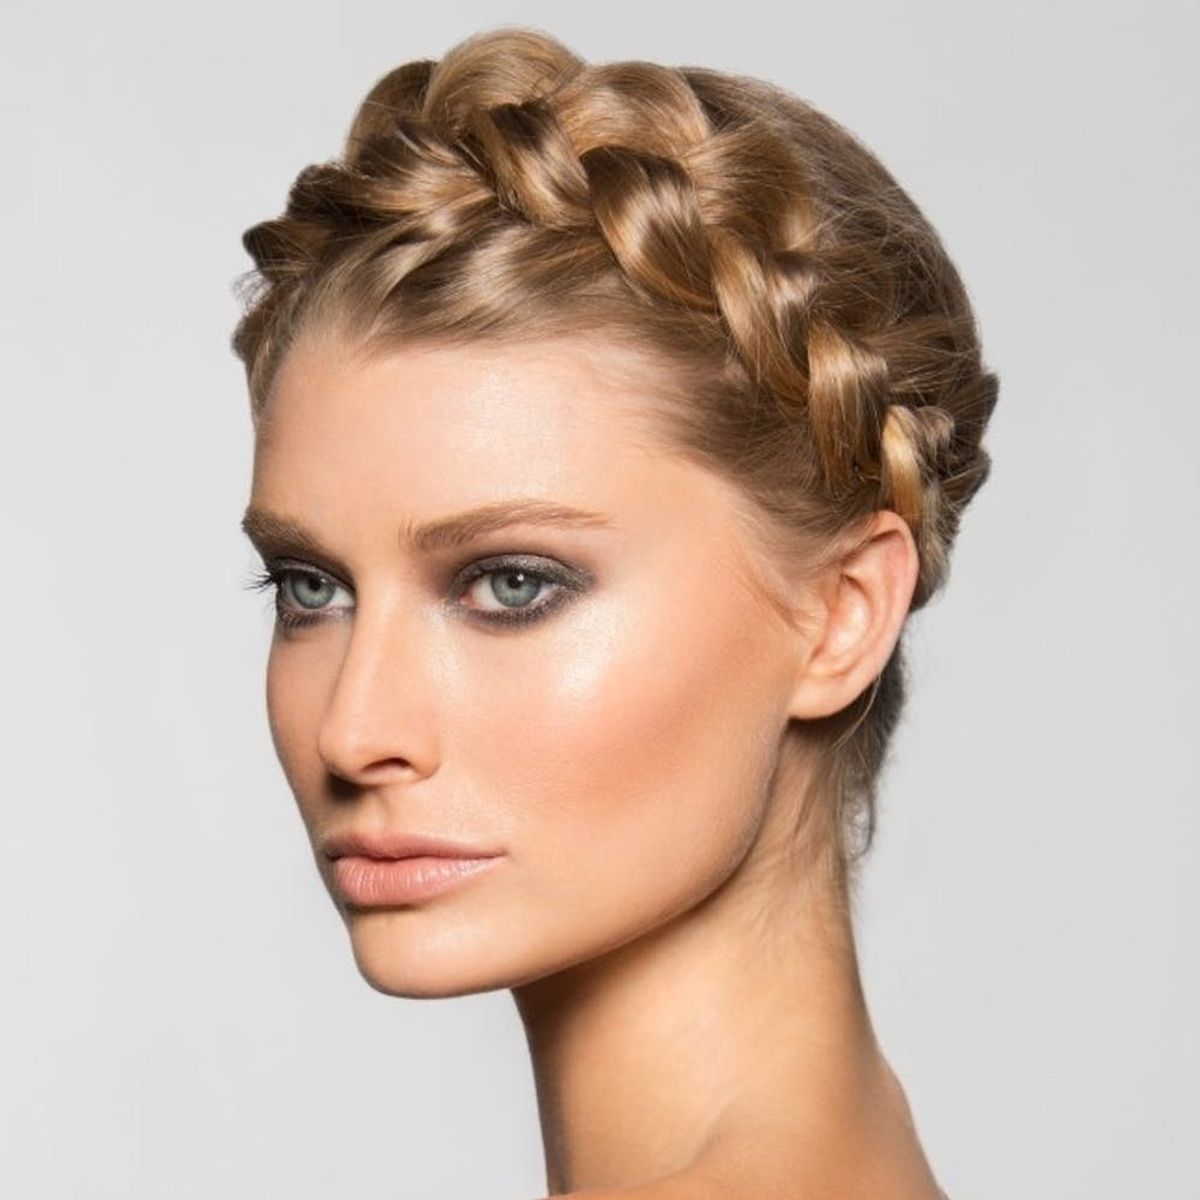
“The Bianca”
The crown braid is a chic, bohemian braid and a trending style on the DreamDry style menu. Depending on the desired finish, this ‘do can be recreated on either freshly clean hair for a polished finish or unwashed hair for an effortless, undone appearance. For the sake of these instructions, we will begin with clean, dry, detangled hair, ensuring that the hairline is smooth.
1. Tilt your head forward to evenly distribute all of the hair around the head. We are going to create a Dutch braid, AKA an inside out French braid, that forms a halo around the head. Beginning behind either ear, separate a small section, splitting it into three strands, and begin a horizontal braid, incorporating new hair neatly and evenly into each new stitch as you go around the head. DreamDry stylist Bricel Cury likes to use Oribe Smooth Style Serum ($49) on the fingertips for a better grip, hold and shine while he braids.
2. Continue to add hair to your three sections as you travel all the way around your head. Once the braid has wrapped completely around, create a three-strand braid with the length of the hair, and braid all the way to the end of your hair, securing the ends with a small elastic band.
3. To finish off your look, pin the tail of your braid seamlessly on the top of the braid you formed. Using Oribe Superfine ($22) hair spray, tuck away any flyaways and you’re ready to go. A great way to make your braid appear more effortless is by loosening it up a bit by carefully pinching the braid on both sides. This allows for the braid to open up, creating a more undone look.
“The Fishtail”
1. DreamDry stylist Stephany Preda suggests that, after your hair has been washed and rinsed, you pat dry and brush with The Dream Detangler. Follow by blow drying.
2. Once hair is dry, start by finger-combing your hair from the hairline to the back of your head. Lightly spray with hair spray to keep the hair out of your face.
3. Gather all your hair over one shoulder and divide it in half to make right and left sections. Begin the fishtail braid by taking a small section from under the left section. Cross it to the right, overlapping just like you would if you were doing a standard braid. Repeat on right side and continue overlapping pieces from both sides all the way down until you’re about an inch from the ends. Secure with an elastic band. Finish your fishtail braid by gently tugging on your braid with your fingers to loosen it for an effortless-but-glamorous look.
“The Juliette”
Before starting, make sure you have either a hair tie (clear or black) or bobby pins that match your hair to secure the waterfall braid. Keeping these hair accessories close to you during the end of braiding is crucial to achieve a secure style. Once your hair is clean and blow-dried, make sure your hair is combed through to eliminate any knots that can occur while creating this look.
1. On shampooed and conditioned hair that is still wet, Kérastase Ciment Thermique ($21) on the mid-lengths and ends is excellent as a prep before blow drying, and will help smooth the hair and prevent frizz. Misting your dry hair with the Kérastase Laque Dentelle ($21) hair spray before starting the Juliette helps to add a little hold beforehand as well as taming any flyaways.
2. DreamDry stylist Jenn Bradford says to start by finding your natural part. Once this is done, we will begin on the right side of your head. Take a 1 x 1-inch section on your front hairline right next to your temple. Split this section in two. It is important to never let these pieces out of your hands as these are the foundation to the braid and are your “twisting pieces.”
3. Starting with the two pieces, take the bottom piece of the section and twist it on top of the other piece. Always remember that whichever side of the head you’re working on, to twist the bottom piece up and over the top piece. Once you have twisted these two pieces just once, use your other hand and bring down a small section of hair in between the two pieces of hair you just twisted. This takes some maneuvering with your hands, but once you get the hang of it, it will be smooth sailing.
4. After you bring down the section of hair between the two twisted foundation pieces of hair, keep holding on to the two pieces, and in the same motion as before, cross the piece of hair on the bottom up and over the piece on the top. You will now see that the section of hair you just let down between the two foundation pieces should be secured between the new twist you just made while still using the foundation pieces from your front temple. Never let go of the section of hair from the front temple. This motion is what creates the Juliette braid. Repeat this motion until you get to the back-center of your head and secure the foundation pieces with a hair tie.
5. You will then move to the left side of your head and repeat this entire process until you get to the back-center of your head from the left side. Secure both sets of foundation pieces together in the back of your head. If you want the hair tie to be hidden, you can always take a few strands of hair and wrap them around the hair tie and secure it with a bobby pin to keep it from showing. Or, you can pull down a section of hair over the hair tie altogether, such that the hair tie lays underneath the section of hair.
What’s your favorite hairstyle to rock? Tell us in the comments.
(Images via DreamDry)


