DIY Basics: Chalkboard Cheese Trays

You’ve seen those cute chalkboard cheese trays all over Pinterest. Now it’s time to make your own in a few easy steps! We’ve even thrown in some ideas for how to stage your next cheese tasting party.

Materials:

– Basswood small country round by Walnut Hollow (5″ – 7″ diameter)

– Basswood medium country round by Walnut Hollow (7″ – 9″ diameter)

– Walnut Hollow clipped corner plaque (11″ x 14″)

Walnut Hollow chippendale tray (12″ x 16″)

– Chalk Ink 6mm white marker

– Chalk Ink reusable tags

Chalk

Start by gathering your materials, all of which can be easily found online or purchased through our sidebar.

Begin by painting your small country round followed by your medium country round. Completely cover the surface leaving a small border around the edge. Let dry and repeat with a second coat.

Repeat the process with your clipped corner plaque, painting all the way to the edge. You may want to use some painter’s tape if you have trouble coloring within the lines.

Last but not least, paint your Chippendale tray. You might want to use painters tape with this one as well.

Use Chalk Ink to write names or numbers on your chalkboard tags. FYI – After the party you can wipe the Chalk Ink clean with a wet towel and reuse the tags for another party or purpose (like wrapping gifts). Genius!

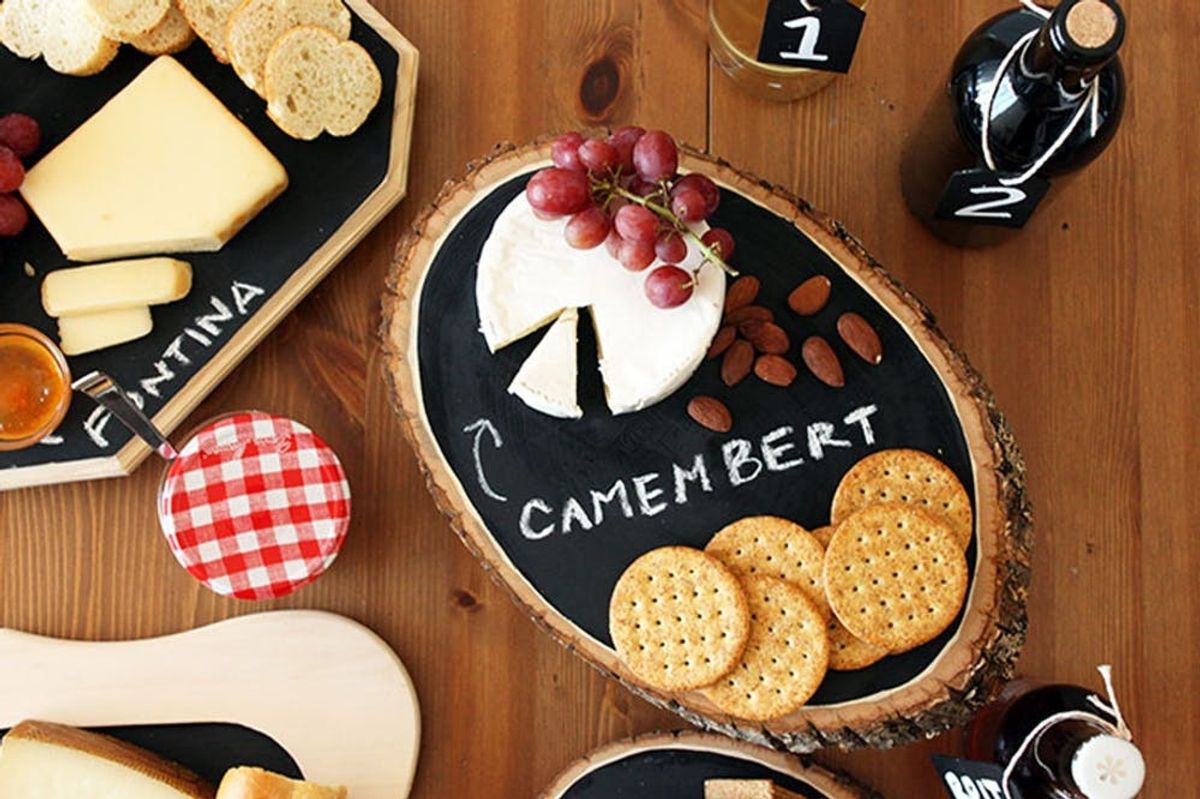
After all of your trays and tags are dry, practice staging your party. Write cheese names on your trays with chalk (the Chalk Ink might leave a mark).

Here’s an example of our staged party. We chose to add a wine tasting element by removing the wine labels and adding numbered tags.

And now for some cheese tray close-ups to help you nail down the details of your party. Note: It’s helpful to put some wax paper under the cheese before serving.

For the actual party, we staged everything on our dining table. As you might imagine, the Brit + Co. team was really happy about this DIY post.

We had a blast making these trays and throwing our cheese tasting party, and we think you will too.

What are your favorite DIY projects? Let us know in the comments section below or on Twitter and Facebook.

As home prices rise, homeowners are still eager to make their house a home, allowing the DIY world to expand almost exponentially. This trendy practice gave birth to so many little-known DIY products that are affordable and surprisingly effective.

But many of these items still feel like a gamble. How long will this really last? Is it really as easy as it looks? Is it worth it?

As a self-declared cheapskate and stubborn DIYer, I tried many, MANY do-it-yourself hacks, products, and tools over the years. Of the slew of products I’ve tried and tested, a few stand among the elite. Add these products to your cart for your next DIY home project, or keep them on-hand for whenever inspiration strikes next.

Rustoleum Tub & Tile Refinishing Kit ($50)

I know this gained recent traction because a few years ago, it was available everywhere. Now? It’s a miracle to find it in stock — and withs good reason. This smelly, yet simple product gives your bathtub or dated tile a total facelift. I used this to “paint”both of my 1980s almond-colored bathtubs and shower inserts. Yes, painted. This is the budget-friendly alternative to ripping out your bathtub or shower surround. The two-step kit comes with 1) your color of choice (I picked bright white), and 2) a sealant that makes it waterproof.

Rustoleum Floor Coating Kit ($70)

Tile can be really expensive to replace and even more tedious to remove yourself. This user-friendly kit is designed to cover and seal your floor while giving it a brand new look. Our bathroom floors were also that awful off-white color, and painting them black was exactly what the room needed. The product description boasts that it can be applied to “a wide range of flooring types including ceramic tile, porcelain tile, concrete, hard wood, laminate, vinyl and more.” It comes in several colors with a matte or semi-gloss finish.

Paint & Sealant Grout Pen ($9)

Maybe your tile is in good shape, but your grout has probably seen better days. It’s not uncommon for grout to get dingy over the year, even when properly maintained. If your tile’s grout needs a bit of a touch up, this fine-tip grout pen can save you hundreds of dollars. It has a precision tip, low odor, and dries quickly for an instant refresh.

Touch-Up Paint Pen (Pack of 2 for $20)

Save yourself a headache or two and stock up on a few of these touch-up paint pens. The refillable pens allow you to keep paint inside and easily cover scruffs, marks, or scratches that inevitably happen in a lived-in home. It keeps paint fresh for up to 7 years so you don’t have to worry about the mess and hassle of finding the paint color, opening the can, and painting the wall — all for just a tiny spot. Bonus points for labeling each color so you know which room it corresponds to.

Brick White Wash Kit ($50)

If your home features brick interior accents, or you have a brick fireplace that feels dated, you can easily refresh it by whitewashing it. This kit eliminates most of the guesswork when it comes to proper measurements and application. You can customize how dark of a wash you want and easily complete this project in a week.

Stain Markers ($15)

No need to panic over scratches or stains on your wood furniture — this pack of markers and wax crayons allows you to discreetly cover up imperfections. The pack comes with a variety of shades that can be used by themselves, or in tandem to customize the color. If you’re shopping secondhand, these are a must. They revive well-loved pieces and restore them to their former glory without much effort.

Leather Repair Kit ($25)

Leather that’s been used and loved often tends to show wear and tear that seem irreversible. I’m here to tell you it’s possible to revive that beat up leather couch of yours, and it luckily doesn’t involve spending hundreds of dollars for it to be reupholstered. This leather repair kit allows you to mix the perfect shade of leather and bring your old couch back to life.

Peel-and-stick Wallpaper ($36)

Renter-friendly wallpaper has been around for awhile, but if your earlier experiences were negative, I highly encourage you to try again. Peel-and-stick wallpaper has come a long way in terms of durability, available patterns, and ease of installation. Most brands make their wallpaper in this less permanent design, which relies on a self-adhesive to hold to your wall rather than a wallpaper paste. The best part is that if you change your mind or move out, it peels right off. You can find every pattern under the sun, as well as some finishes to get your creative wheels turning. For example, this marble wallpaper/contact paper can adhere to countertops or desks for a faux marble finish that looks expensive but isn’t. Additionally, removable wall decals are hugely popular if paint isn't an option, or you’re worried about getting clean lines.

Decorative Window Film For Style And Privacy ($10)

If you live close to your neighbors, you may always be choosing between privacy and natural light. These decorative window films allow light to filter in without having your home on display to the whole neighborhood. Not to mention, some bounce light in a fun and unique way that acts as art itself. You can even find some pretty stunning “stained glass” variations that add character and charm to your home while also being practical. It’s absolutely simple to do and can even be cut to fit your specific window.

Magnetic Garage Door Accents ($17)

Curb appeal can be a big expense and headache. But small changes can ultimately make a big impact, and that’s what I love about these magnetic garage door accents. They stick right to your garage door without impeding its use, but still add a custom, high-end look. It seems silly to ever invest in a new garage door or “real” accents when something this realistic and easy exists.

We’re so quick to “buy new” rather than fix things in our home, but having an arsenal of DIY products that you can rely on to refurbish your old stuff will give you so much freedom in your home. These budget-friendly and simplistic projects will save you money, time, and effort when creating your dream space.

What are your DIY must-haves at home? Let us know in the comments and on Twitter!

Header image via Blue Bird / PEXELS

Emma Mackey and Glen Powell are proving Barbie summer and Twisters summer really can last forever. The two actors are starring alongside Jenna Ortega in J.J. Abrams' new film and I'm absolutely losing my mind. All three actors are truly comedy geniuses with super dramatic acting chops to boot, and I just know their scenes together are going to be cinematic gold. We don't have too much information about the movie just yet but I've scoured the internet for every little detail you need to know — keep checking back here for updates!

Keep reading for everything we know about J.J. Abrams' new movie starring Glen Powell, Jenna Ortega, and Emma Mackey.

The untitled Warner Bros. movie will start filming in early-2025, which means we could see it in 2026. The movie was rumored to have a time travel plotline but that's not actually the case, according to The Hollywood Reporter. We also know that J.J. Abrams is serving as both writer and director (slay), which he's done on Mission: Impossible III, Super 8, Star Wars: The Force Awakens, and Star Wars: The Rise of Skywalker (double slay).

In addition to this new movie, Glen Powell's also eyeing a reunion with Tom Cruise for Top Gun 3, while Jenna Ortega's Wednesday season 2will hit Netflix in 2025. Warner Bros. is also giving us Margot Robbie's Wuthering Heights, which is another win for Barbies everywhere.

In addition to Barbie, you can watch Emma Mackey in Sex Education, Emily, and Death on the Nile. Glen Powell proves his rom-com capabilities with Set It Up on Netflix, while Jenna Ortega totally wowed us in Beetlejuice 2.

Are you excited for this brand new, ever so secretive movie? Check out 11 New Movies Coming In December To Add To Your Calendar ASAP for more titles you can watch starting next week!

So we’ve already shown you how to repurpose your old stacks of magazines, but in case none of those tickled your fancy we’ve got one more DIY for you. DIY magazine wall art! Ta dah! This DIY Basic is super simple. In just five easy steps you can create wall art that is fun, original, and packed with color.

Materials:

  • Magazines
  • Canvas/wood/board
  • Hot glue sticks
  • Pattern
  • Tape

Tools:

  • Hot glue gun
  • Scissors

Instructions:

  1. Print and cut out a silhouetted shape.
  2. Tear out a bunch of magazine pages. Fold in half twice to get four small rectangles.
  3. Start to roll! Try to keep the magazine rolls as tight as possible. Tape the end to avoid it from unraveling.
  4. Hot glue your magazine roll-ups to your silhouette. Once the silhouette is covered, trim off the extra magazine pieces. This will reveal your silhouetted shape.
  5. Glue magazine silhouette to your wood board.

Time to get started! Cut out your silhouette from scrap paper.

Next you want to tear up those pages. First fold the page in half and tear down the center, then fold in half again and tear. Now you will have tons of small rectangles ready to roll.

Start at the edge and tightly roll the page into a cylinder. Secure the end with a piece of tape.

You’re going to need a lot of roll-ups ;) Try to pick magazine pages that have fun colors!

Using the hot glue gun, glue the roll ups onto your silhouette. Don’t worry about covering the smaller sections. Once you trim off the excess roll up you will have smaller pieces that will fit into those tiny spaces quite perfectly!

Trim the excess magazine to reveal your silhouetted shape. Remember, don’t throw away those tiny pieces.

Patch up those paws!

Look at those colors!

Time to mount your silhouette to a board. We used a thin wood board that we found at the art store. You can use wood, cardboard, illustrator board, etc. You could even go directly on the wall. Wait, do I see one brown hand?!

This bear is ready to hang.

I spy San Francisco! :)

We couldn’t do a post about wall art without doing a geometric pattern! Try grouping the same colors together, this gives it a fun color blocking effect.

Follow us on Pinterest for more DIY projects and let us know if you try this magazine wall art on Twitter!

This post has been updated.

When you're often the life of the party and happen to be partnered up and in your 30s, you'll instantly turn heads when you say no to booze. I can personally attest to the difficulty of this. As someone who loves happy hour and has a particular affinity for lemon drop shotsin totally inappropriate settings, there was no way I could get away with *not* drinking without inviting questioning looks.

Before I give you the guide to fake drinking when you're secretly pregnant, let me take this moment to make a PSA. If you see that a female friend of yours isn't drinking and she usually does, try not to ask her if she's expecting in front of everyone. She might be secretly pregnant, taking fertility drugs that can't be combined with alcohol, just trying to lower her dosage of alcohol with the hope that it helps her get pregnant. There's also the chance she might just be…not drinking. Be as it may, no one wants to be bombarded with pregnancy questions.

Of course, not everyone is going to take my PSA seriously, so I've got some tips and tricks for all you pre-reveal preggos. These same tips apply to gals who are not drinking because they are trying to conceive. I was personally in this non-drinking camp for about five months before getting pregnant.

And how's this for proof? I organized and attended a bachelorette party for two of my very best friends with about eight of my other besties present — and no one had ANY idea I was pregnant. So, trust me — I'm a bona fide pro at fake drinking.


Rosee Canfield for Brit + Co

Keep reading for the best tips to happily sip drinks in a way that won't make your besties raise an eyebrow

Rosee Canfield for Brit + Co

Opt for canned beer

This was one of my earliest discoveries in the world of fake drinking. No one can see your drink when it's in a can. You might read that and think, yeah so? Well, take that can with you to the other can, and dump it out in the sink. Fill it up with water and no one will be the wiser. In fact, they'll think — wow, she's really blasting through those Coors Lights. Pro tip: Be sure to wipe any water drips off the can before you leave the bathroom, and rinse the sink so there's no errant beer foam floating around.

Rosee Canfield for Brit + Co

If you have to order a real drink, choose a clear cocktail. This is the classic move. You creep over to the bar when no one else is around, and order a club soda with lime. Think of it as a mocktail. Be sure to ask the bartender to serve it to you in a cocktail glass — a giant water glass or plastic cup is a dead giveaway.

If it's impossible to get alone time at the bar, order a vodka soda (or gin and tonic). Then take it to the bathroom, dump out the liquid (use a straw to keep the ice and any garnishes in the cup), then fill it with water instead. Complain about the soda or tonic being flat if anyone questions your drink's lack of tiny bubbles.

Rosee Canfield for Brit + Co

Make friends with bartenders. At first, bartenders give you a bit of side-eye when you ask for a club soda in a cocktail glass. They won't ask you what the deal is, but you can let them assume what they like — especially when you order that second or third club soda in a cocktailglass.

If you're feeling cavalier, and you and the bartender have really hit your stride, you can even say, “I'll take anything non-alcoholic that looks like a cocktail." I actually made SUCH good friends with a bartender at a wedding where I was fake drinking that every time I came over to the bar, he immediately winked at me and gave me “my regular." My friends guffawed at the fact that I was already friends with the bartender. Pro.

Rosee Canfield for Brit + Co

Allude to a possible tannin allergy. Wine is the toughest thing to fake, so don't even try. Tell your friends about how, out of nowhere, you've started to get headaches immediately after drinking a glass of wine. When they're like, “Is it just when you drink red?" reply with a frustrated sigh, “No, both red and white make me feel crappy — maybe it's a tannin thing?" Then get your faux canned beer or clear mocktail, and call it a day.

Rosee Canfield for Brit + Co

Ginger ale is a GREAT substitute for Champagne. Ginger ale looks like Champagne, it smells kind of like Champagne, and if your friends are tipsy enough and take a sip, they'll actually believe that it IS Champagne. Don't overdo this one though — too much sugary soda is not a good thing for you and your secret babe!

Rosee Canfield for Brit + Co

Pretend to be getting over a cold (so no one asks for a sip). After all, it's sick season! [Insert fake coughs here]

Rosee Canfield for Brit + Co

Always be the one to order or serve a round of shots. Shots are one of the toughest things to fake. Like, really difficult. And you might be thinking, who still takes shots anyway? Well, the answer is: I do. Or rather, I did. It would have been impossible to be at my two besties' bachelorette party without at least one round of shots. So what's a preggo to do? Serve 'em up, of course.

Because shots are best served as a surprise to inspire a second wind in any given party, you can creep into the kitchen to set things up. Pour all but one, and fill that one with a substitute. Ideally, it looks like what you're serving, and if that's not possible, make 3-5 of them vodka shots including yours, which is actually… water! If ordering shots at a bar, you're probably already friends with the bartender, so just ask him to make yours a fake one and to put a napkin or coaster under it on the tray that comes out.

Rosee Canfield for Brit + Co

Keep a drink in your hand at all times. This is an obvious one, but it's worth mentioning. If you don't have a drink on hand, someone will either hand you one or give you a hard time for not drinking. DO NOT give them that opportunity ;)

Rosee Canfield for Brit + Co

Never leave your drink unattended. Hopefully, you already have this rule in your wheelhouse from your college days. In this case, the key here is avoiding two things: friendly refills and someone accidentally picking up your drink and finding out it's phony.

Rosee Canfield for Brit + Co

Avoid being the first one to hit the hay. If you've already been squirreling around on the beverage front, the next clear sign that you might be secretly pregnant is when you're the first one to go to bed. So don't do that. Don't go to bed. Ever! Okay, at some point you'll need to go to bed because you need a TON of sleep in your first trimester, but avoid being the first party pooper at all costs.

And don't use getting up early “for a run" or “to do some work" as an excuse for going to bed — friends that know you will see right through that.

And there you have it, all you need to know about being a fake party animal when you're in the very early stages of expecting. Cheers! (But fake cheers, obvs.)

What are your best fake drinking tips? Share them with us @BritandCo!

TikTok sensations Barlow & Bear are no stranger to the spotlight. Besides the fact their Unofficial Bridgerton Musical won a Grammy (and basically broke the internet), popstar Abigail Barlow has millions of streams of her own, while Emily Bear performed in places like the White House and Carnegie Hall before turning 10.

So, it’s safe to say these two know what they’re doing. But one thing they never saw coming? Composing a Disney movie — or becoming the first female duo to do so. But that’s exactly what happened when they booked Moana 2.

Keep reading for our exclusive interview with Abigail Barlow & Emily Bear.

  • Barlow and Bear composed Moana 2, in theaters November 27.
  • They're the first female duo to compose a Disney movie and they hope the experience shows young girls "that their voices matter."
  • The duo also spilled on how Lin Manuel Miranda, who composed the original, "empowered" them.

How Barlow And Bear's Bond Influences Their Art

“We have such a sacred sisterhood!” Abigail tells me over email. “We met and found musical soulmates in one another. It’s more than just special. It’s a once in a lifetime connection that laid an incredibly strong foundation for creation.”

“Most of my life I’ve been the only girl in the room writing with much older people,” Emily adds. “Honestly because Abigail and I are like sisters, it creates such a safe place to be vulnerable together and create without restraint. When writing for Moana 2, we leaned on that emotional connection to explore the complexities of the story and how much we see ourselves in Moana!”

And the empowering message of the film, which follows Moana’s journey through Oceania, actually influenced their art. “Every day that I worked on Moana, I was empowered to continuously choose who I wanted to be,” Abigail says. “A leader, a listener, and a learner. In being tasked to write for this movie, I was being asked to go past my comfort zones. I think by being completely open hearted to this experience, it allowed me clarity when crafting the lyric and melody with Emily.”

Moana 2 is a story about finding strength through vulnerability, and that message became a huge theme in the music,” Emily says. “All our characters’ journeys reminded us to embrace our imperfections and trust the process of growth — no matter how painful it may seem in the moment. Moana is THAT girl. No one defines her but herself and writing for such an inspiring heroine FOR SURE inspired us right back.”

Why Abigail Barlow And Emily Bear Loved Working On 'Moana 2'

Walt Disney Studios

But considering the fact these two women are huge Disney fans (Abigail tells me her favorite Disney movies are The Little Mermaid and Frozen, while Emily loves Hercules and Mulan), one of the most inspiring details about their involvement is the fact that Abigail Barlow and Emily Bear’s Moana 2 score marks the first time a female duo has composed a Disney movie — and it’s a moment they don’t take for granted.

“I hope this shows [young girls] that their voices matter,” Emily says. “Growing up, I barely saw people who looked like me in roles like this, so being here now feels surreal. I want girls and women to know that their stories are powerful and deserve to be told. I really hope that Abigail and I can continue to open doors for more female creatives in film and music.”

And Abigail agrees. “I hope our story encourages young girls and women to forge their own path, and to never let anyone tell them they can’t do something.”

But this unbelievable experience didn’t come without its challenges. “Imposter syndrome is so real and a part of life for every single creative, and anyone who tells you otherwise is lying,” Emily says.

“I’m just trying to enjoy the ride, trust the fall, and be so grateful for the opportunity to be a role model for any little girl who might have a song in her heart,” Abigail says. “It’s an absolute honor and privilege to show her that anything — even magic — is possible.”

And according to Emily, the challenge of imposter syndrome actually propels her forward. “I do feel like that little voice of self-doubt pushes me to do the best work I possibly can do…I zoom out and focus on the bigger picture: the little girls watching this movie and realizing they, too, can dream as big as they want.”

How Lin Manuel-Miranda Empowered Barlow And Bear

One friendly face that provided a soft place to land was actually the original movie’s composer, Lin Manuel-Miranda! To no one’s surprise, theIn The Heights and Hamilton writer had some wonderful advice for Barlow and Bear.

“He was such a wonderful resource especially at the inception of the project when we were just setting sail,” Emily jokes. “He urged us to lean into our heroes for inspiration!”

“He gave me a stack of books I needed to buy,” Abigail adds. “Finishing the Hat by Stephen Sondheim, LYRICS by Oscar Hammerstein, Lyrics on Several Occasions by Ira Gershwin to name a few. He empowered me to study the craft of musical theatre storytelling in a way I never had before.”

And thanks to Barlow and Bear, a whole new generation of young women will dream about musical theatre storytelling now too!

Check out Moana 2 in theaters November 27, 2024. Check out the latest news on the Live-Action Moana too!