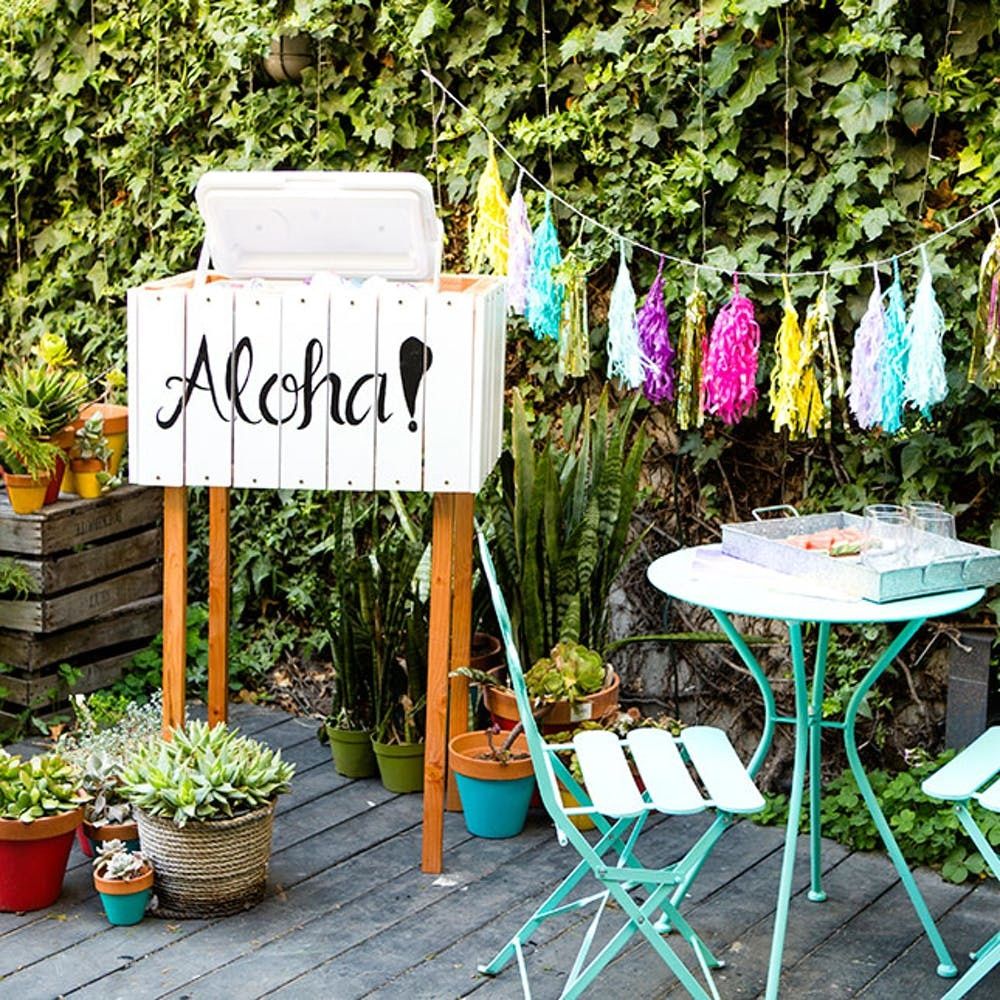
Summer is approaching, so that means it’s time to host friends and family outdoors. Whether it’s graduation, Father’s day, or Fourth of July, you’ll have plenty of reasons to spruce up your outdoor space. We created an outdoor cooler box to hold all of our favorite beverages (read: beer) and keep them cold in the hot months. What’s great about this piece is that the cooler is removable, so it’s extremely easy to pull out and use for a day at the beach.

Materials:
— (4) 38-inch pieces of 1 3/8-inch square wood
— (4) 16-inch pieces of 1 3/8-inch square wood
— (4) 25.5-inch pieces of 1 3/8-inch square wood
— (2) 18.75-inch pieces of 1 3/8-inch square wood
— (24) 15-inch pieces of wood 3.5 inches wide
— 2-inch wood screws
— 1.5-inch wood screws
— black paint
— cooler
Tools:
— 1/64-inch drill bit
— electric screwdriver
— paint brush
Instructions:
1. Drill holes at the ends of all four pieces of wood that measure 16 inches, 25.5 inches and 18.75 inches.
2. Using the screwdriver, attach the 16-inch piece of wood to the top of two 38-inch pieces of wood. Measure 15 inches down the 38-inch piece of wood and drill in the second 16-inch piece of wood.
3. Lay the two pieces you just created on their sides and drill the 25.5-inch piece in place to finish off your box.
4. Stand your cooler box upright and screw the last two 18.25-inch pieces along the bottom. This will hold your cooler in place.
5. Tape together seven 15-inch boards and hand letter a cute saying to spruce up your container.
6. Drill holes on the top and bottom of each 15-inch piece and then drill onto the outside of the box. Drill seven on the length and five on the width.
Now, this first step is a pain but totally necessary to avoid having your wood split when screwing it together. Drill holes at both ends of all pieces that measure 16 inches, 18.75 inches and 25.5 inches.
Lay a 16-inch piece across two 38-inch pieces and screw into place. Measure 15 inches down the 38-inch piece of wood and screw your second 16-inch piece in place. Do these same steps to the other two pieces of 16-inch and 38-inch wood poles. You should finish with two pieces that look like rectangle boxes with long legs.
Lay the pieces you just drilled together on their side and screw the 25.5-inch piece across to create the box shape.
Stand your box upright and screw your last two 18.25-inch pieces across the bottom. Your piece may be a bit wobbly but it will sturdy up in the next couple steps.
Time to add some pizzazz to this cooler container. Pick your favorite phrase and hand letter with paint onto seven 15-inch boards of wood. Seven? Yes, seven! I, of course, couldn’t count and centered my hand lettered masterpiece onto six boards of wood. Check out in the next step how I fixed my mistake.
I added an exclamation point! Next, drill holes in the top and bottom of all 24 pieces of wood, then screw them to your new cooler base. Seven pieces will lay across the front of the cooler box and five pieces will lay on the sides.
Slide your cooler into place and get ready for the party! Pro tip: If I was able to go back to the hardware store, I would have purchased more white wood to cover the top rim of the container to give it a polished look. Most of your guests will be seeing the top edge when they pull their drink from the cooler, so might as well make it nice :)
One of our favorite parts about this project is that this stand can stay put on our patio, but the cooler is mobile for a quick day trip to the beach.
Fill your cooler with refreshing beverages for you and your guests. Set up a side table with glasses, cute straws and refreshing treats.


