Gift This DIY Anthropologie Planter to Your Mama for Mother’s Day

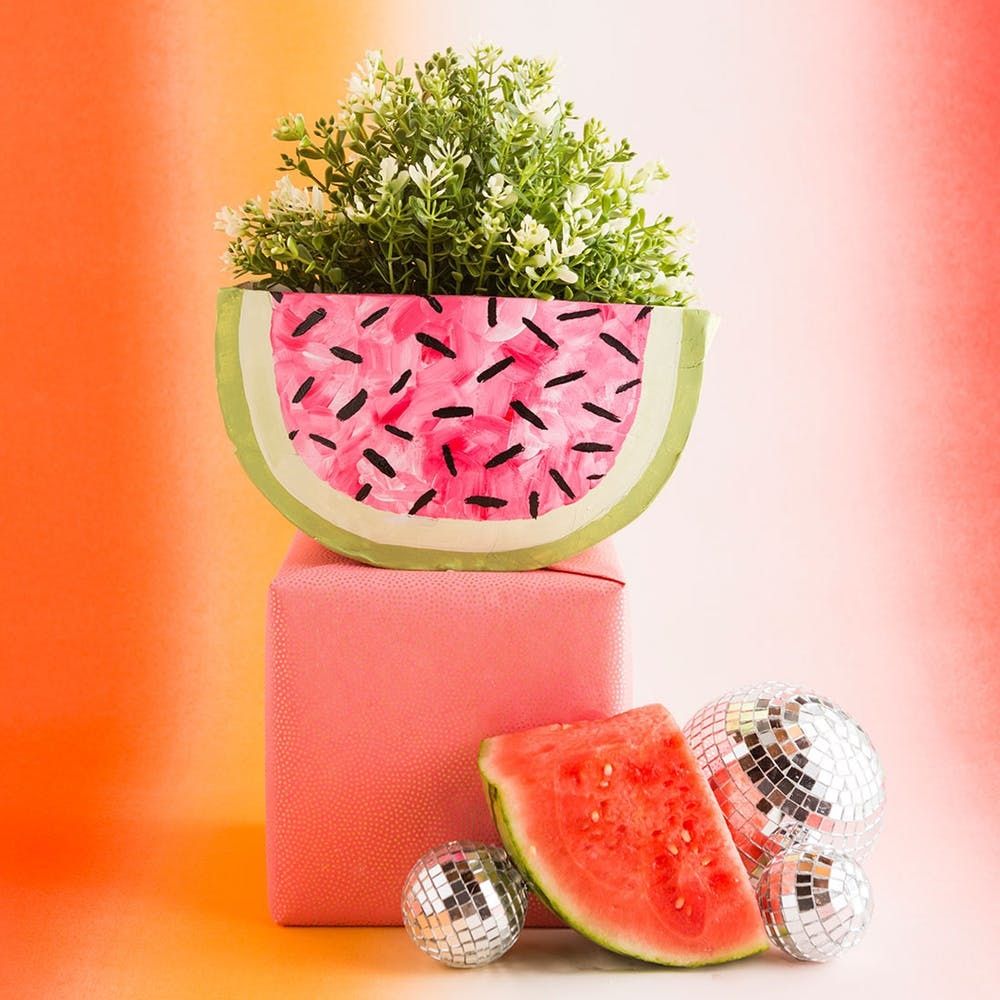
When I was little, I never quite understood why my mom would always gift plants to her friends, teachers, neighbors, etc. Now that I’m the wise age of 25, I’ve realized that they’re just awesome and give any room a breath of fresh air and beautiful, natural color. Today we’re hacking the Anthropologie Favorite Fruit Pot ($14+) for a handmade touch to this classic gift. This DIY is made out of Sculpey, so it’s important that you water your plants outside of the planter, then return it to the planter once all the water is soaked up. Another option, which is what we did, is to fill it with fake plants :) It’s just as nice!

Materials and Tools:

Instructions:

  1. Roll out four blocks of white Sculpey to be about 1/4 inch thick.
  2. Use an 8-inch plate and ruler to create a half circle shape. Roll out another four blocks and trace your previous half circle so you now have two.
  3. Roll out the last of the Sculpey to make a 3-inch band that is long enough to wrap around the curve of your half circle.
  4. Score the edges and attach the band to the curved edge of the planter. Roll out a thin, snake-like piece of clay and press into the inner seem of the band and circle attachment.
  5. Repeat with the other half circle. Bake in a 250-degree-Fahrenheit oven for 15 minutes. Let cool.
  6. Use green, white, red, and black paint to turn your planter into a watermelon slice!

Roll out four blocks of Sculpey clay to make a disc that is about 1/4th of an inch thick. Use an eight-inch plate and ruler to create a half circle. Cut the clay with an X-ACTO knife. Create two half circles.

Roll out the last four blocks of Sculpey into a long rectangle. Trim so that it is 1/4 inch thick and three inches in width.

Score the inner edge of the half circle and then attach the clay band. Roll out a thin, snake-like piece of clay and place in the inner crease of the planter. Use your finger to press into place.

Score the other half circle and attach to the curved band. Add a snake-like piece of clay to the inside of the planter and use your thumb to press into place. *Note: Use a roll of paper towels to help hold up the top wall of the planter. It will be flimsy until you bake it.

Place the planter on a cookie sheet and add a ceramic glass to the center to help keep the walls standing up straight. Bake for 15 minutes in a 250-degree-Fahrenheit oven. Once it has cooled, use the paint to turn it into a watermelon slice!

We filled this planter with a fake plant, because here at B+C HQ we often forget to water plants — eek! If you fill it with a real plant, just make sure to water it outside of the planter, due to the fact that Sculpey isn’t the most water-resistant material.

Show us your latest project by tagging us on Instagram + using hashtag #iamcreative, and follow us on Pinterest for more DIY gift inspo!

DIY Production and Styling: Kelly Bryden
Photography: Brittany Griffin

Brit + Co may at times use affiliate links to promote products sold by others, but always offers genuine editorial recommendations.

You survived winter and with spring comes the chance to prep your garden. Whether you’re growing veggies, flowers, or just looking to add some life to your backyard, the possibilities are endless. The best gardening tips for spring are simple: set yourself up for success and do the hard work. With a trusty plan, a willingness to get a little dirty, and — perhaps the hardest part — a little bit of patience, you’ll be surrounded by new life in your outdoor oasis soon enough. Here are a few tips for getting started!

​What should I do first in my garden?

Photo by Mikhail Nilov / PEXELS

The hardest part of any new venture is getting started. It’s easy to be overwhelmed at the getgo but fear not, breaking down your gardening journey into easy steps can make the process seem less daunting. Let’s get started:

Assess Your Garden: First things first, take a leisurely stroll through your garden space, observing any winter damage, areas of overgrowth, or potential improvements. This initial assessment will guide your planning and help you identify areas that require attention.

Prepare the Soil: Healthy soil is the cornerstone of a thriving garden so survey what you’re working with and prep it for growth.. Begin by clearing away debris and gently turning the soil to aerate it. Incorporate organic matter such as compost or aged manure to enrich the soil with essential nutrients, promoting robust plant growth.

Prune and Trim: Out with the old and in with the new. Trim back any dead or damaged branches from trees, shrubs, and perennial plants. Pruning encourages new growth and enhances the overall appearance of your garden.

Weed Control: Tackle weeds early to prevent them from overtaking your garden beds. Pull weeds by hand or use organic mulch to suppress weed growth while nourishing the soil. Regular weeding sessions throughout the spring will keep your garden looking tidy and vibrant.

Plan Your Plantings: With a clear understanding of your garden's layout and soil conditions, strategize your plantings for the season. Consider factors such as sunlight exposure, water requirements, and plant compatibility. Draw a quick sketch and map out how you’ll create your space.

What's the key to a good garden?

Photo by Anastasia Shuraeva / PEXELS

You’ve done the prep work and your seeds or plants are in the ground. Now what? Besides an abundance of patience, the secret to a successful garden is nurturing it regularly.. Here are some key principles to keep in mind as the season goes on:

Water Wisely: Plants need water, especially as the sun comes out and the days get warmer. But there are some ground rules. Water your garden in the early morning or late afternoon to minimize evaporation and ensure optimal absorption. Use a soaker hose or drip irrigation system for efficient water distribution, focusing on the root zone of plants.

Practice Patience: For me, this is the hardest part. The fact is that gardening takes time. Understand that growth takes time, and not every seed will sprout overnight. Embrace the process and celebrate each milestone, knowing you’re on your way to a harvest.

Encourage Biodiversity: Things thrive in nature thanks to a healthy dose of biodiversity. Create that in your own garden by integrating a variety of plants that will attract insects, pollinators, and birds. Companion planting is a great way to make the most of your garden. In placing companion plants together, they mutually benefit from each other’s nutrients, and can aid in pollination, pest control, and flavor.

Continuous Learning: Gardening is a lifelong experience. With each season, your intuition will grow and you’ll gather nuggets of information to aid in your future gardens. Don’t be afraid to experiment with new plant varieties, techniques, and design concepts.

What's the best garden layout?

Photo by Annie Spratt on Unsplash

When it comes to garden layout, the possibilities are as vast as your imagination. Whether you envision a lush English cottage garden or a sleek modern landscape, the key is to design a layout that reflects your personal style and maximizes the potential of your outdoor space. Here are some popular garden layout ideas to inspire your creativity:

Traditional Rows: Ideal for vegetable gardens and formal landscapes, traditional row planting maximizes space efficiency and makes it easy to maintain everything. Arrange plants in straight rows with defined pathways for easy access and visual appeal.

Circular Gardens: Embrace the elegance of curves with a circular garden layout. Plant circular beds with a focal point at the center, such as a fountain or sculpture, to draw the eye and add visual interest. You’ll create your own zen space to go and relax.

Container Gardens: Perfect for small spaces and city livers, container gardens are the way to go. Plant flowers, herbs, and vegetables in decorative pots and containers, arranging them creatively on patios, balconies, or windowsills.

Vertical Gardens: Vertical gardens have gained in popularity in the past years for how versatile and space-saving they can be. Install trellises, arbors, or living walls to support climbing plants and create vertical interest. Vertical gardens are not only space-saving but also add a striking visual dimension to your outdoor oasis.

Naturalistic Landscapes: Embrace the beauty of nature with a naturalistic garden layout inspired by wild landscapes and native plant communities. Incorporate meandering pathways that feel whimsical and natural.

What if I don't have a green thumb?

Photo by cottonbro studio / PEXELS

I wasn't born with a green thumb, but over the years, I’ve picked up tidbits that have helped me with more success each year. Gardening is a journey of learning and a little patience and persistence will lead you to success. Start small, choose low-maintenance plants that suit your climate and soil conditions, and don't be afraid to ask for help.

​How can I attract pollinators to my garden?

Photo by Debadutta / PEXELS

Pollinators such as bees, butterflies, and hummingbirds play a crucial role in plant reproduction and ecosystem health. To attract pollinators to your garden, plant a diverse array of nectar-rich flowers, provide shelter and nesting sites, and avoid using pesticides that harm beneficial insects.

​What's the best way to deal with garden pests without using harmful chemicals?

Photo by Raychan on Unsplash

Natural pest control methods are safe and effective alternatives to chemical pesticides. Encourage natural predators such as ladybugs, lacewings, and birds by providing habitat and food sources. Employ physical barriers, such as row covers or netting, to protect vulnerable plants from pests, and practice crop rotation to deter pest buildup.

You’re ready! Even if you’re nervous, just get started. There’s no better time than now. With a step-by-step plan and a little bit of hard work, you’ll be enjoying the fruits of your labor sooner than you think.

Looking for more home and backyard tips? Be sure to sign up for our weekly email newsletter!

Header image via

Paris Hilton and Nicole Richie created reality TV gold when The Simple Life debuted in 2003. Their antics were outlandish, but we couldn't help repeating their iconic phrases like "That's hot" or "Sanasa" during random moments in our own lives.

It's no secret the two didn't really act that way, but their 'characters' left a huge mark on a generation of millennials. "I knew what I was doing but the whole world didn’t, so it was kind of frustrating to me to be perceived in that way because it’s not who I am at all," Paris told People.

Even though she may have felt judged, it seems that Paris Hilton realizes how many people actually loved The Simple Life because she and Nicole Richie are teaming up to film a reunion special that'll debut on Peacock as we speak! Here's everything we know so far!

When did speculations about 'The Simple Life' reboot begin?

NBCUniversal Media

Peacock first shared a video clip on Instagram that hinted something special involving Paris Hilton and Nicole Richie is coming in May. A nostalgic TV set with a black and white screen can be seen while our favorite duo's voices can be hearing saying, "Sanasa, Sanasa."

Peacock captioned the post, "New Era. Same Besties. Coming soon to Peacock," and fans could barely contain their excitement. Even celebs like Naomi Campbell and Katy Perry commented on these hot vibes.

Bravo

Then Paris Hilton took to her own Instagram to share more about what fans could expect. She said, "As some of you may know, we are doing a reunion special to celebrate 20 years of our show The Simple Life and it's been so much fun."

Actress Selma Blair shared how much she's looking forward to this by commenting that she's "living for this."

So are we!

What was 'The Simple Life' about?

The Simple Life/20th Century Fox

The Simple Life showed Paris Hilton and Nicole Richie as they basically traded their wealthy lifestyles for 'everyday' living. Cameras followed them from fast food jobs to dealing with getting out of sticky situations they'd supposedly never experienced. Needless to say, it was hilarious, iconic, and instant reality TV gold.

How long was 'The Simple Life' on air?

Peter Kramer/Getty Images

The Simple Life was on air from 2003 to 2007 with five successful seasons. It seemed like it wasn't going to be hit at first, but it defied expectations. By how much you ask?

According to reporting from The Cut, somewhere around 13 million viewers tuned in to watch Paris Hilton and Nicole Richie's oddball take on daily life. That's a pretty huge deal if you ask us!

When will 'Paris & Nicole: The Encore' debut?

Frederick M. Brown/Getty Images

Paris & Nicole: The Encore will premiere on Peacock December 12! The two were previously seen at a Sonic drive-thru yesterday so it can be assumed filming is underway (via People)!

Sporting partial Sonic uniforms, Paris Hilton and Nicole Richie added accent pieces that match their signature flairs. Paris wore a pair of reflective sunglasses, silver sequin heels, and added a pink flip phone to front of her blue apron. Nicole wore gold hoops and a pair of slingback pumps alongside her hotdog mascot costume. That's hot (dog).

How does Paris Hilton and Nicole Richie feel about reuniting for a reunion special?

Frazer Harrison/Getty Images

Paris Hilton has expressed how much she loves to be sharing the screen with Nicole Richie again. "I'm so excited to be doing this with Nicole on Peacock. Nicole has been my best friend since we're 2 years old, every memory that I have is with her," (via E! News).

Nicole also posted a few throwback moments from The Simple Life on her Instagram, but the most notable one is the video mashup of them singing "Sanasa, Sanasa" over and over. "20 years ago, not only did we become television stars… we became song writers. Happy Anniversary Sill @parishilton#TheSimpleLife#sannnasaaaaa" she wrote in the caption.

What have Paris and Nicole said about their reunion special?

Peacock

Paris Hilton and Nicole Richie sat down with W Magazine to let the world know the Paris & Nicole: The Encore show is on its way! Not only that, but fans can expect to see an Opera version of the show they fell in love with two decades ago. Paris said, "The idea of the opera was unexpected" while Nicole chimed in with, "What people need, even though they don't know it yet, is for 'Sanasa' to be an opera.'"

The two besties came up with the idea via a series of texts that started off as ideas between them. Nicole said everything "came up organically" for the two and we can only imagine the memories this brought up for them. OG influencer Paris even talked about how The Simple Life was an "important show in pop culture history" and we couldn't agree more!

Nicole truly wants people to enjoy themselves while watching Paris & Nicole: The Encore and "find the same joy" she had while filming it. According to Paris, she feels what they have is "magic" because "there's just so much history behind it."

It's not every day that you can get to have fun with your best friend while coming up with long-lasting memories that contribute to pop culture, but Paris and Nicole have always danced to the beat of their own drums. Now we'll get to see them in action again!

Watch The Trailer For 'Paris & Nicole: The Encore'

www.youtube.com

- YouTube

Follow us on Facebook for even more pop culture news!

This post has been updated.

As soon as the days get longer and the slightest bit of green reappears on the trees, I enter my gardening era. I’m not blessed with a naturally green thumb, but over the years, I've learned a lot through trial and error and managed to grow some yummy vegetables. There’s plenty of guides out there about how to start a vegetable garden, but this one is specifically tailored for beginners. The city apartment porch growers. The new homeowners. The pot-by-the-window gardeners. We all have to start somewhere and a garden of any size is still a garden.

This guide will cover the basics from best places to plant to on-going maintenance, as well as some FAQs I’m sure you have. Activate your cottagecore dreams, let’s grow something!

​How To Plan Your Vegetable Garden

Photo by Greta Hoffman / PEXELS

Before you start planting, take the time to plan your vegetable garden. Consider the following steps:

Choose The Right Location

Select a spot with access to ample sunlight (at least 6 hours per day. For in-ground gardens, make sure the space you’re consideration has well-draining soil. Ensure the chosen area is easily accessible for watering and maintenance. For indoor, place your containers near windows that receive ample sunlight. Leafy greens like lettuce and herbs can thrive with around 4-6 hours of sunlight, while fruiting plants like tomatoes may need more. Also consider weight restrictions and wind exposure. Use lightweight containers, secure taller plants to prevent toppling, and choose wind-resistant vegetables like leafy greens and herbs.

Size Matters

It may be tempting to go all in your first season. But it can be very overwhelming, so don’t be afraid to start small. Begin with a manageable garden plot, perhaps 4x8 feet. As you gain confidence and experience, you can expand your garden.

Prepare The Soil

Test the soil in your chosen area and amend it with compost or organic matter to enhance fertility. Loose, well-aerated soil promotes healthy root growth. For balcony or indoor gardens, you’ll be starting from scratch so pick a quality compost or potting soil that drains easily and is packed with nutrients. Container gardening is the go-to method, but not just any container will do. Select containers with proper drainage holes to prevent overwatering.

Select The Best Vegetables

Consider starting with easy-to-grow vegetables like tomatoes, lettuce, carrots, and herbs. These are forgiving for beginners and fruit on their first season. If you’re in smaller, balcony space or indoors, choose vegetable varieties that are well-suited for container gardening such as bush or dwarf varieties of tomatoes, peppers, and compact herbs. Another option is vertical gardens. Leafy greens such as spinach, lettuce, and kale, as well as herbs like basil, mint, and chives, thrive in indoor conditions.

Best Practices for Planting

Photo by Greta Hoffman / PEXELS

So you’ve bought your soil and your seeds or plants, now what? Here are my best tips for planting!

Raised Beds vs. In-Ground Gardens

Raised beds provide better drainage and control over soil quality, making them an excellent choice for beginners. Planting directly into your existing ground can certainly be done, but will require you prep and care for the soil before planting.

Companion Planting

Some vegetables thrive when planted together, providing mutual benefits like pest control and nutrient-sharing. For example, plant tomatoes with basil to deter pests and enhance flavor.

Seed Selection And Starting

Opt for high-quality seeds or young seedlings from reputable sources. I’d recommend starting with seedlings for your first go, as they skip the germination stage and provide a head start.

Plant Spacing

Follow the recommended spacing guidelines on seed packets to prevent overcrowding. Proper spacing ensures each plant receives adequate sunlight, water, and nutrients.

​Watering, Feeding, and Maintenance

Photo by Gustavo Fring / PEXELS

Now the fun part — tending to your garden. Once everything has been planted and begins to grow, your job is only beginning. Consider these tips:

Watering

Provide consistent, deep watering to encourage strong root development. Watering early in the day is best and it’s worth it to invest in a drip irrigation system or soaker hoses for efficient water distribution. For your container gardens, use self-watering containers to maintain consistent moisture levels, especially in indoor environments with controlled humidity.

Fertilizing

Think of fertilizer as food for the plants. Use organic fertilizers or compost to nourish your garden. Follow recommended application rates and avoid over-fertilizing, which can harm the plants.

Weeding

If you see a weed, pull it! It can compete with your growing garden for nutrients. Mulching around plants helps suppress weeds and retain soil moisture.

Keeping Pests Away

Keep an eye out for common pests and diseases. When you can, Introduce natural predators like ladybugs and encourage biodiversity to maintain a balanced ecosystem in your garden. In small settings, reach for natural pest deterrents like neem oil. Regularly inspect your plants for signs of pests, and address issues promptly to prevent infestations.

​Harvest Time

Photo by Zen Chung / PEXELS

When the wait is over and your plants look ready to eat, there’s no better feeling. Keep these considerations in mind:

Understanding Harvest Times

Each vegetable has a specific harvesting time. Harvest leafy greens, such as lettuce and spinach, when the leaves are young and tender. Root vegetables like carrots and radishes are ready when they reach a desirable size, while tomatoes and peppers should be picked when fully ripe.

Check Often

Regularly inspect your garden for signs of ripeness. Look for vibrant colors, firm textures, and mature sizes. Overripe fruits and vegetables may lose flavor and nutritional value.

Harvesting Tools

Invest in a few basic harvesting tools, such as pruners or scissors for cutting, and a gentle touch for handling delicate produce. Proper tools can make the harvesting process more efficient and minimize damage to plants.

Storing And Enjoying The Harvest

After harvesting, store your produce properly. Some vegetables can be stored in a cool, dark place, while others may need refrigeration. Enjoy the fresh flavors of your harvest by incorporating them into delicious meals, salads, or even preserving them for later use.

Continual Harvest

Many plants, especially those like beans, cucumbers, and zucchini, benefit from continual harvesting. Regularly pick mature fruits to encourage the plant to keep producing.

What is the easiest vegetable garden for beginners?

Photo by ROMAN ODINTSOV / PEXELS

For beginners, it's recommended to start with vegetables that are forgiving and relatively easy to grow. Tomatoes, lettuce, carrots, and herbs like basil and mint are excellent choices. These plants typically require minimal care and flourish in a range of environments.

What vegetables grow well together?

Photo by Kampus Production / PEXELS

Try planting these together: tomatoes with basil, carrots with onions, lettuce with radishes, cabbage with dill, rosemary with sage, and beans with corn. These combinations create a symbiotic relationship that benefits both plants.

​How often should I water my vegetable garden?

Photo by Karolina Grabowska / PEXELS

This really depends on your climate, soil type, and the specific needs of your plants. As a general rule, water your garden deeply and consistently, aiming for about 1 inch of water per week. Adjust based on weather conditions and the moisture level of the soil.

​Can I use tap water for my garden, or is rainwater better?

Photo by Matteo Badini / PEXELS

Both tap water and rainwater can be fine for your garden. However, if your tap water is high in chlorine or other chemicals, consider letting it sit for a day before using it. Rainwater is ideal as it's naturally free of additives, and plants often respond well to it.

​How do I know if my plants need fertilizer?

Photo by cottonbro studio / PEXELS

Monitor your plants for signs of nutrient deficiencies, such as yellowing leaves or stunted growth. If your plants show these symptoms, it may be time to fertilize.

​What is the best time of day to harvest vegetables?

Photo by Any Lane / PEXELS

The best time to harvest vegetables is in the morning when temperatures are cooler, and plants are well-hydrated. Harvesting in the morning helps preserve the freshness and flavor of your produce.

​How can I extend the growing season for my vegetables?

Photo by Anastasia Shuraeva / PEXELS

Consider using techniques like mulching to retain soil warmth, row covers to protect plants from frost, and cold frames or greenhouses for temperature control. These methods can help you harvest fresh produce for a more extended period.

How do I know when my vegetables are ready to be harvested?

Photo by Kampus Production / PEXELS

Harvest times vary for different vegetables. Generally, vegetables are ready when they reach a mature size, have vibrant color, and can be easily separated from the plant.

Be sure to sign up for our weekly email newsletter to make sure you get all the latest home & garden tips!

Header image via Karolina Grabowska / PEXELS

The average calf circumference for women is 15 inches – a fact that a lot of brands making trendy tall boots completely ignore.

My calves measure 16 inches around, meaning fitting comfortably into the boots I would give an arm and leg for (ahem, the famed Frye Campus boots and these sleek Sam Edelman steppers, 14 and 15 inches, respectively) will never be a reality.

Meredith Holser

As a gal with a little more meat and muscle on her bones, this has always been a problem for me. It’s infuriating, but it feels even more isolating. I can’t always wear the same styles that smaller women do, and even if I do find similar boot designs fashioned for wide calves, they look noticeably cheap or simply don’t check all the boxes in terms of my desired look.

I grew tired of saving all the “perfect” tall boot outfit inspo pics to my Pinterest board only to find that the boots in question had way too small of calf sizes, so I did what I always do when I shop for size-specific pieces: I took to Reddit.

Meredith Holser

I primarily consulted r/femalefashionadvice, r/plussize, and r/ausfemalefashion to see what people like me are saying about wide calf boots. The frustrations with finding good-looking, comfy tall boots was pretty similar across all three subreddits. As one passionate user put it:

“Even at a size 6, I have never been able to just buy any old pair of boots and have them fit. It is interesting to me how we've made great progress the past several years in regards to body inclusivity, yet somehow there seems to be a huge lack of sizing in regards to tall boots… It makes me so sad to see these beautiful boots everyone else gets to wear, slouchy, over the knee, western inspired, leopard/snake print, etc. Nothing like that comes in wide calf.”

Luckily, Redditors across all three threads suggested a handful of brands that actually offer cute wide calf boots with extended sizing. I had never heard of a few of them, but after scrolling through their sites, it felt like I struck gold.

The top-recommended brands for wide calf boots:

  • Penningtons
  • Børn
  • DuoBoots
  • Franco Sarto
  • Sam Edelman
  • Billini
If you, like me, have been searching endlessly for stylish tall boots (but have larger-than-average calves), consider your search over. Scroll on for the best wide calf boots that will fit like a dream.

Franco Sarto

Franco Sarto Bowman Wide Calf Knee High Boots

You're meaning to tell me these chic boots can really accomodate my calves?! The deep red color already had me sold, but that 15.75-inch calf circumference made this style so much better. They also come in a smooth brown color and a foxy faux-snake pattern, if those speak to your personal style more.

Børn

Børn Hayden Extended Calf Boots

The suede leather construction of these boots honestly rivals that of the beloved Campus boot, but their fit is much more roomy, boasting a 16.5-inch calf circumference. These zippered boots also have a playful lace-up detail on the back that's utterly unique.

Penningtons

Penningtons Extra Wide Width Black Tall Heeled Boots with Harness Straps

The calf circumference on these bad boys starts at around 17 inches for shoe size 6, and tops out around 19 inches for shoe size 12. I can't get enough of these moto-style boots and I love that they have the signature harness with silver hardware around the base that other similar boots do.

DuoBoots

DuoBoots Saffron Knee High Boots

The fact that you can choose the calf sizing yourself when purchasing these Western-esque boots is ahh-mazing. The options start at 13 inches and go up to 20 inches to hold your beautiful legs without any fuss.

Billini

Billini Granger Extended Curve Boots

From all the wide calf boot brands suggested on the Reddit threads I scrolled through, Billini has to be my favorite. They state that these adorable camel-colored boots can fit calf sizes from about 18.11 to 21.42 inches, and while they do have an elastic panel on the sides to stretch even further, I think it's discreet enough that it doesn't distract from the overall look. Score!

DSW

Baretraps Thalia Wide Calf Boots

A very similar style to my wishlist Sam Edelman boots, this black pair actually has a 16.5-inch calf circumference that'll fit my legs to a tee. The block heel is the perfect shape and height, plus the toe isn't overly pointed (I don't necessarily care for pointy toes).

Sam Edelman

Sam Edelman James Wide Calf Western Boots

Finding cowboy boots with wide calves can be a big challenge – but no more! These reddish-brown boots have a 16-inch calf circumference so you can confidently rock any and all Western looks.

Billini

Billini Oshea Curve Boots

Immediately yes. These broader-fit boots are everything you need to make a statement with your shoes. They're definitely going on my wishlist! The calf circumferences for this style start at 16 inches and go up to 19 inches based on your shoe size.

DSW

Vince Camuto Seshon Extra Wide Calf Boots

With a 18-inch calf circumference, you won't have to worry about squeezing into these tall boots. I adore the timeless squared toe and wide block heel on these!

Subscribe to our newsletter to shop more of our fave boots!

Brit + Co may at times use affiliate links to promote products sold by others, but always offers genuine editorial recommendations.
The Holiday movie is an absolute unicorn. Not only does it capture the Christmas magic I want to feel during ~the holiday~ season (and features an all-star cast with Jude Law, Cameron Diaz, Jack Black, and Kate Winslet), but it's also an amazing rom-comand compelling family story. Each relationship, both platonic and romantic, is compelling, and it'll make you feel just about every emotion: glee, heartbreak, yearning. And I'm convinced that, in addition to an absolutely bulletproof script from our queen Nancy Meyers, the movie's magic can be chalked up to one other thing: the fact they filmed the final scene of the movie first.

What happened at the end of The Holiday?

Sony Pictures

Yes, you read that right — they filmed the final scene of The Holiday before they filmed anything else! The final scene of the movie takes place at Jude Law's Graham's house in England during the characters' New Year's Eve party. The four leads, and Graham's daughters, are dancing, having fun, and celebrating the new year together. In an interview with Vulture, Miffy Englefield (who plays one of Graham's daughters) talks about how filming that party first set the stage for the rest of production.

"That’s the one scene in the film that all of the main characters are together," she says. "So it was a really, really nice starting point for us to be able to get to know each other...It was the loveliest first day I’ve ever had."

Miffy continues that since she was so young when they filmed the movie, she didn't really understand who she was working with. "My dad was really good at showing me [Jude Law, Cameron Diaz, and Kate Winslet's] work and more underground things that they’d done. He wanted me to realize they were humans and not just these actors."

Is Jude Law's Graham divorced in The Holiday?

Sony Pictures/YouTube

Even though Miffy didn't necessarily know Jude Law before working with him, they grew closer throughout the process of filming. When Amanda shows up to Graham's house, she learns (as do we) that he isn't divorced — he's a widower. That's why he hadn't asked Amanda over before, and why he always answers the phone when Sophie or Olivia call. They're not other women in his life, they're his daughters!

The evening Amanda spends with Graham and his daughters is one of the standout moments of the film because it shows a whole new side of Graham, but it also allows the girls (and Jude Law, TBH) to take center stage.

Why is Jack Black in The Holiday?

Sony Pictures/YouTube

While she wasn't familiar with all her costars in The Holiday, there was one actor Miffy Englefield recognized when she got to set, and that was Jack Black ("I think at that point it was when it hit me like, 'Oh goodness, this is like a thing. This is real, this is real life.'").

Even though Nancy Myers had written the role of Miles for Jack Black, he was hesitant to be in a rom-com. That is, until he realized he would get to work with Kate Winslet!

“I saw School Of Rock and thought he was the cutest guy and fell in love with him," Nancy told IndieLondon in a 2006 interview. “I assured him that I had [seen his work] and told him that I thought he was fabulous and that he’d be in a movie with Kate Winslet. He just said ‘yeah.’”

And I am literally so glad he did because Miles is my favorite part of the movie! His quirky kindness and fun personality are definitely a reason The Holiday is so successful. Another reason? The chemistry between all the actors. Thanks to the energy and community on set for the final scene — which, TBH, I'd never have known was the first scene filmed! — the rest of the movie has that same kind of giddy electricity you feel when you reunite with your best friends or host your first adult party or finally visit New York City during the holidays.

Because just like the party scene is a celebration, The Holiday is about unexpected love and finding joy despite the most heartbreaking, mundane experiences. And THAT is the true magic of Christmas, isn't it?

Did you know The Holiday's end was filmed at the beginning? What's your favorite moment of the movie? Let us know on Facebook!

This post has been updated.