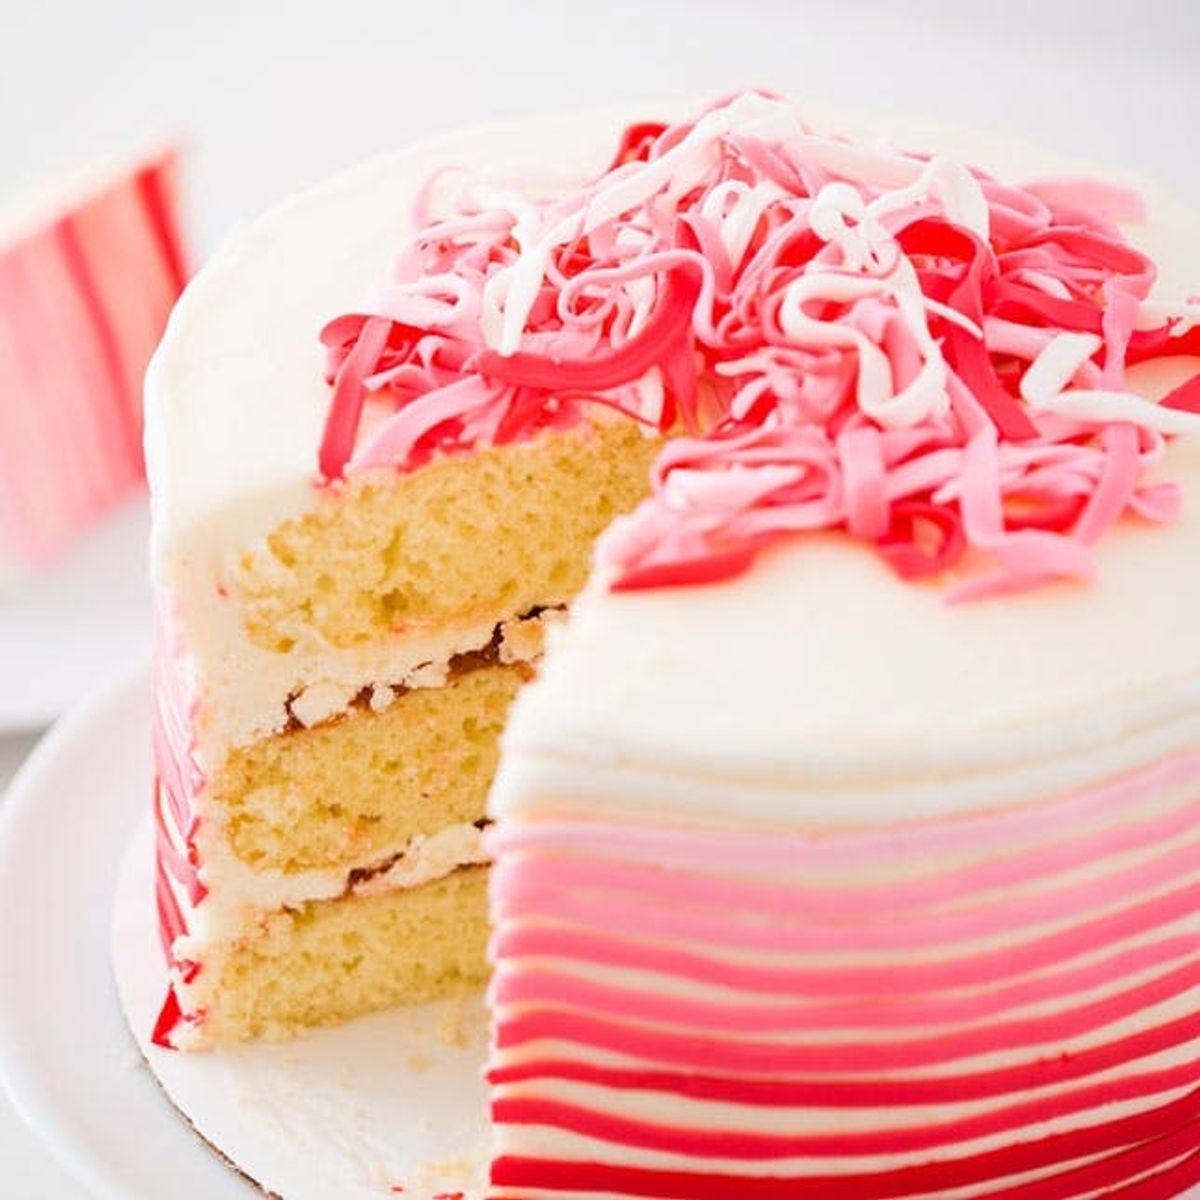
Stripes on stripes on stripes.
Stand Mixers FTW: How to Make an Epic Valentine’s Striped Cake

We asked, and you answered: the ultimate registry item is the one, the only, the totally iconic KitchenAid Stand Mixer! Over the past few weeks we, along with Target Wedding Registry, asked all of you to tell us your idea of the best wedding gift ever. From new cutlery to Vitamix-style blenders, kitchenware and cooking gadgets were at the top of everyone’s list. We have to admit, we completely agree with the mixer choice. It is simply the BEST.
To celebrate the awesomeness of this classic kitchen essential, we asked our resident epic-cake-maker Sarah Jones to create a brand new cake using the mixer not just for mixing, but for decorating too. Spoiler alert: We used the mixer’s pasta making attachment to make fondant stripes. How sweet is that?
Presenting our Striped Strawberry Champagne Cake. You know you want a piece. Now let’s get to it.
Ingredients for the Cake:
– 2 boxes vanilla cake mix
– 6 eggs
– 1 cup oil
– 2 cups champagne
For the Filling:
– 1 cup strawberry jam or preserves
For the Frosting:
– 2 cups butter
– 2 pounds powder sugar
– 1/2 cup champagne
– 2 teaspoons vanilla
For the Stripes:
– 8 ounces white fondant
– 3 ounces red fondant
Supplies
– KitchenAid stand mixer
– KitchenAid paddle attachment
– KitchenAid whisk attachment
– KitchenAid fettuccine attachment
– Parchment paper
– Rolling pin
Instructions:
1. To make the cake, mix together the cake mix eggs, oil, and champagne in a stand mixer with the paddle attachment. Divide mix between three greased and floured 9-inch round baking pans. Bake according to package directions and let cool completely.
2. To make the frosting, beat butter in stand mixer fitted with the whisk attachment until light and fluffy. With the mixer on low speed, slowly add in powdered sugar, champagne and vanilla until incorporated. Increase speed to medium-high and whip until fluffy.
3. Place the first cake layer on your serving plate. Top the with 1/2 cup of strawberry jam, leaving a 1/2-inch border around the edges.
4. Top the jam with frosting and repeat the process once more time before topping cake with the third cake layer.
5. Cover the entire cake in a thin layer of frosting and place in the refrigerator for 30 minutes. This layer of frosting is called the crumb coat and is used to seal in the crumbs before putting on the final layer of frosting.
6. Remove cake from the refrigerator and cover with remaining frosting.
7. To decorate the cake, fit the stand mixer with the fettuccine pasta attachment. Set aside.
8. Using gloves, gently knead the white fondant until it feels like slightly stiff Play-doh. Repeat process with red fondant.
9. Create six shades of red, pink and white fondant by combining the red and white fondant together. Be careful with the red — a little goes a long way!
10. Place a sheet of parchment paper on your counter and gently roll out your darkest red fondant into a long, thin strip. Process the fondant into stripes using the fettuccine attachment with the mixer speed turned to low. Gently place one to three stripes around the bottom of the cake.
11. Repeat the process with remaining colors making sure to process all of the red and pink stripes on one side of the attachment and the white stripes on the other side to ensure you don’t contaminate your white stripes with red and pink.
12. Once you’re through creating ombre sides of the cake, top the cake with leftover strips of fondant for a fun decoration!
We picked up everything we needed to create the cake at Target. You can easily change up the colors of fondant you used based on the occasion.
To make the cake, mix together the cake mix, eggs, oil and champagne in a stand mixer with the paddle attachment.
We won’t judge you if you “test” the batter at this point in the process ;)
Divide mix between three greased and floured 9-inch round baking pans. Bake according to package directions and let cool completely.
To make the frosting, beat butter in stand mixer fitted with the whisk attachment until light and fluffy. With the mixer on low speed, slowly add in powdered sugar, champagne and vanilla until incorporated.
Increase speed to medium-high and whip until fluffy.
Place the first cake layer on your serving plate. Top the cake with 1/2 cup of strawberry jam, leaving a 1/2-inch border around the edges. Top the jam with frosting and repeat the process once more time before topping the cake with the third layer.
Cover the entire cake in a thin layer of frosting and place in the refrigerator for 30 minutes. This layer of frosting is called the crumb coat and is used to seal in the crumbs before putting on the final layer of frosting.
Remove cake from the refrigerator and cover with remaining frosting.
To decorate the cake, fit the stand mixer with the fettuccine pasta attachment. Set aside.
Using gloves, gently knead the white fondant until it feels like slightly stiff Play-doh. Repeat process with red fondant.
Create six shades of red, pink and white fondant by combining the red and white fondant together. Be careful with the red — a little goes a long way!
Place a sheet of parchment paper on your counter and gently roll out your darkest red fondant into a long, thin strip. Process the fondant into stripes using the fettuccine attachment with the mixer speed turned to low. Gently place one to three stripes around the bottom of the cake.
Repeat the process with remaining colors making sure to process all of the red and pink stripes on one side of the attachment and the white stripes on the other side to ensure you don’t contaminate your white stripes with red and pink.
Once you’re through creating ombre sides of the cake, top the cake with leftover strips of fondant for a fun decoration!
What recipes have you made using a stand mixer? We’d love to try them out — share them with us in the comments below.


