Make These Geometric Tasseled Pillows in Under 20 Minutes!

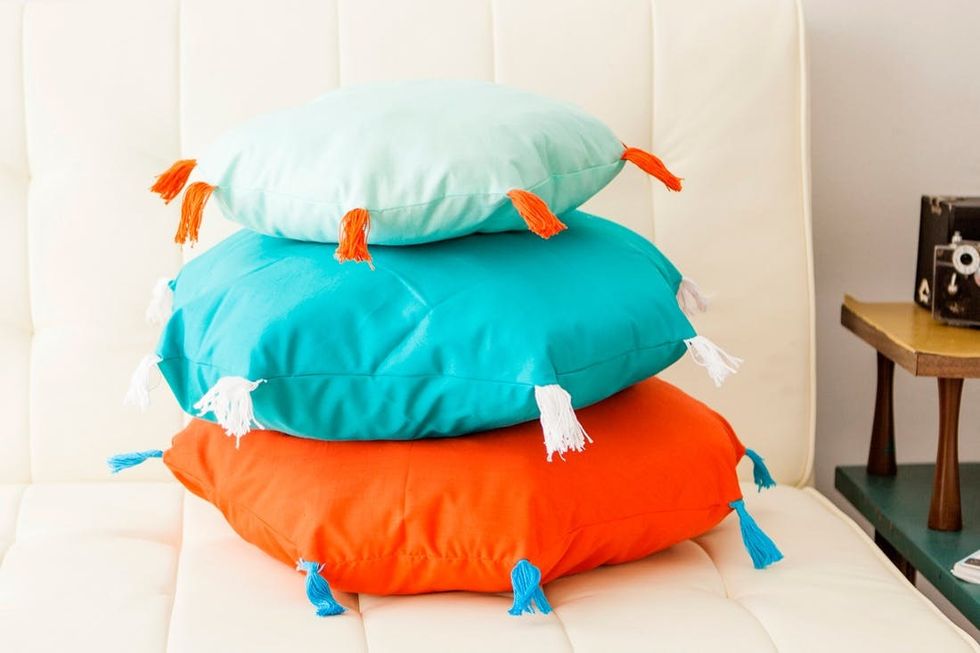
Alright, guys, it’s time to revamp your standard DIY throw pillow. We’ve taken your classic square throw and added four more sides and eight more tassels! Oh, and guess what? You can make these pillows in under 20 minutes, tassels and all. We think these poofs are a must for your spring redecorating plans. Now, let’s get to making these Octagon Pillow Poufs, baby!


– fabric

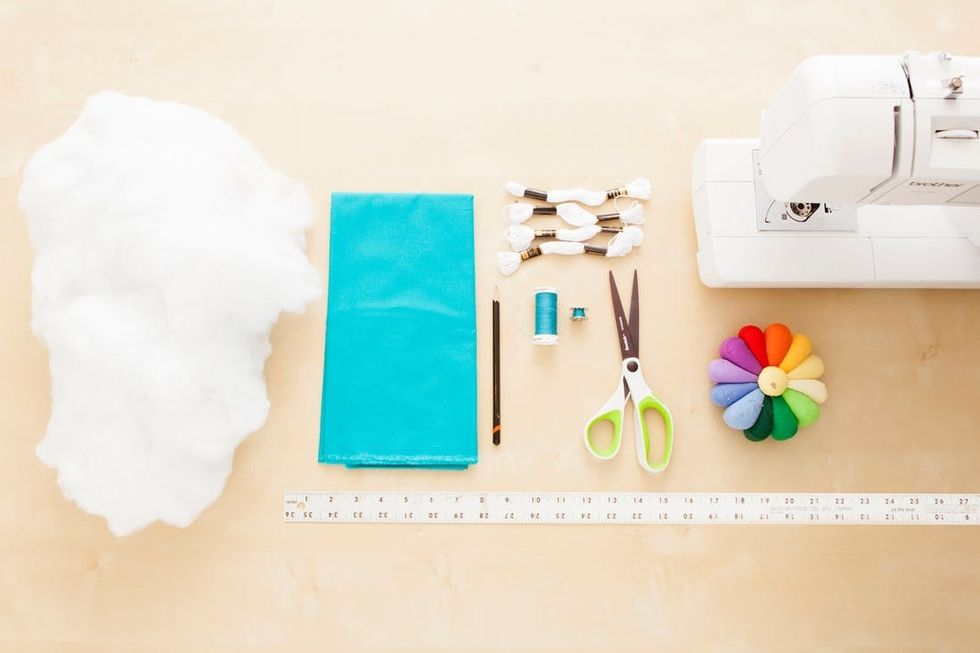
– four spools of embroidery floss

– thread

– stuffing

Tools:

– sewing machine

– needle + pins

– scissors

– ruler

– pencil

Instructions:

1. Fold fabric in half and measure out a 21 x 21-inch square. Make marks at seven inches and 14 inches.

2. Draw diagonal lines to connect your marks and create an octagon. Cut out the octagon.

3. Time to make your tassels! Hold the embroidery floss in your hand and wrap around your four fingers. Once you have wrapped about half of the floss around your hand, slip the bundle off and wrap string around the top. Knot and cut off the extra string. Create eight tassels.

4. Pin the tassels in between the two layers of fabric. Make sure the area above the wrapping is hanging out of the side.

5. Sew seven sides of the pillow leaving one open for flipping and stuffing.

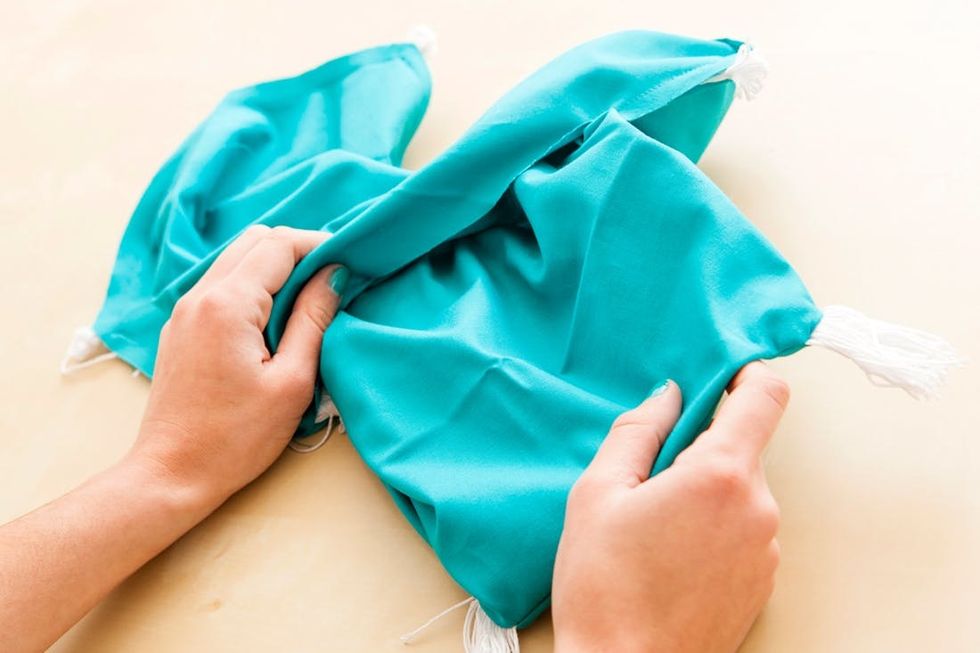
6. Turn the pillow right side out and start stuffing. Make sure you really get it in the corners!

7. Sew up the open edge with a needle and thread.

Okay, let’s make this thing!

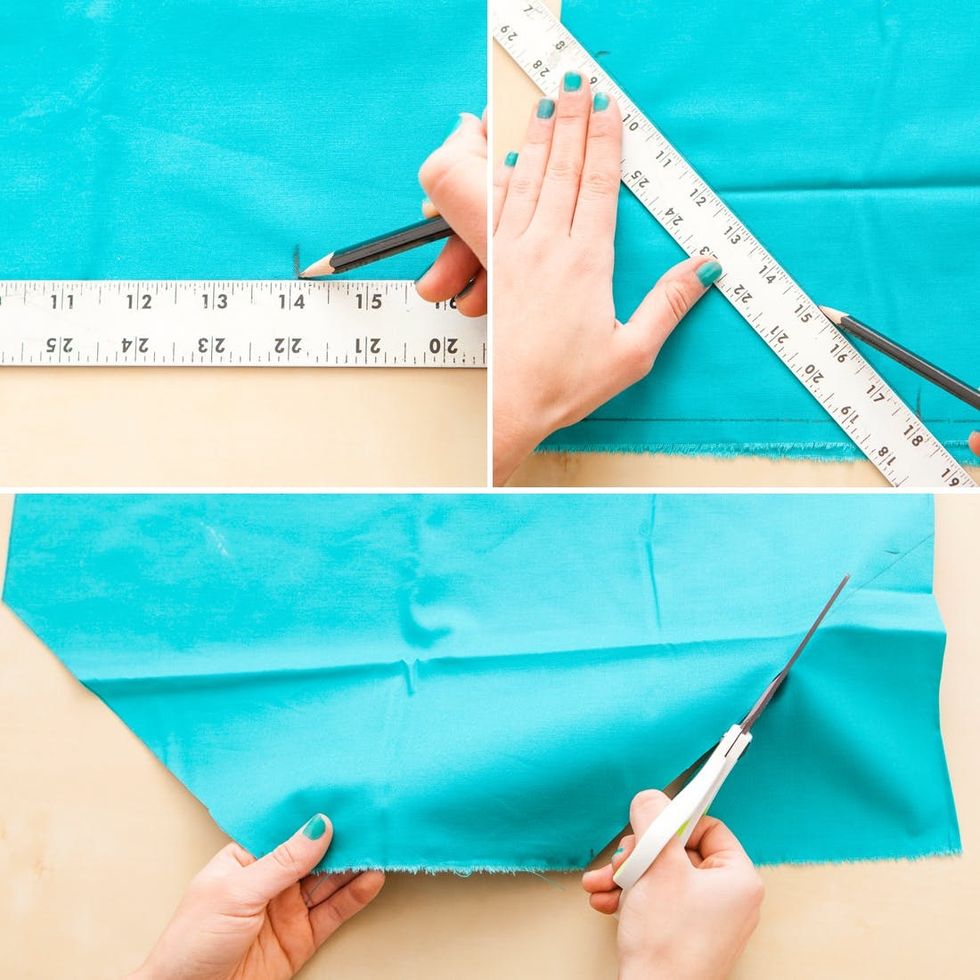
Usually we would suggest using the fold of the fabric as one of the sides of the pillow (less sewing!) but in this case you are going to need all open sides to insert the tassels. Measure out a square that is divisible by three, we chose 21. Divide the height and width into threes by creating a mark at seven inches and 14 inches. Now draw diagonal lines to each mark and create an octagon. Finally, cut it out!

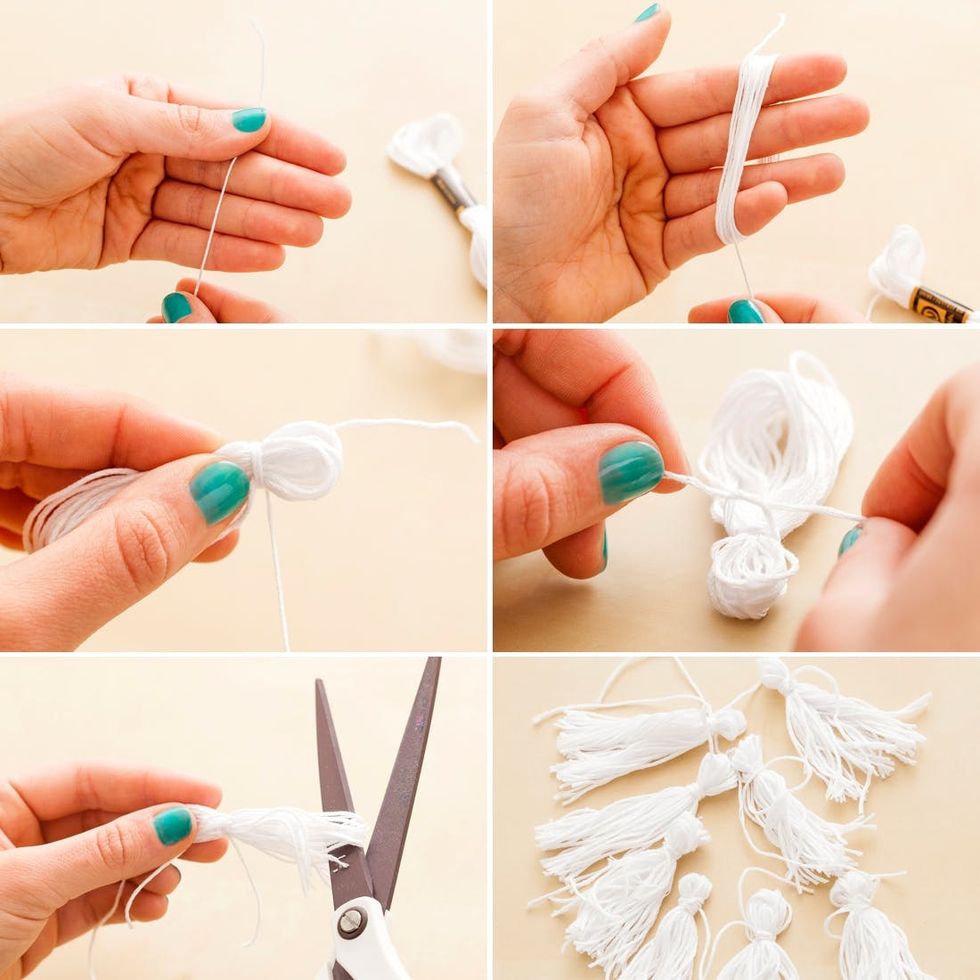
To make your first tassel, you are going to hold the embroidery floss in your hand and wrap it around your four fingers. Wrap about half of the floss around your hand, it should be quite a few strings (the denser the better). Remove the bundle from your hand and wrap extra string around the top. Cut and tie off the string at the top. You will want a total of eight tassels!

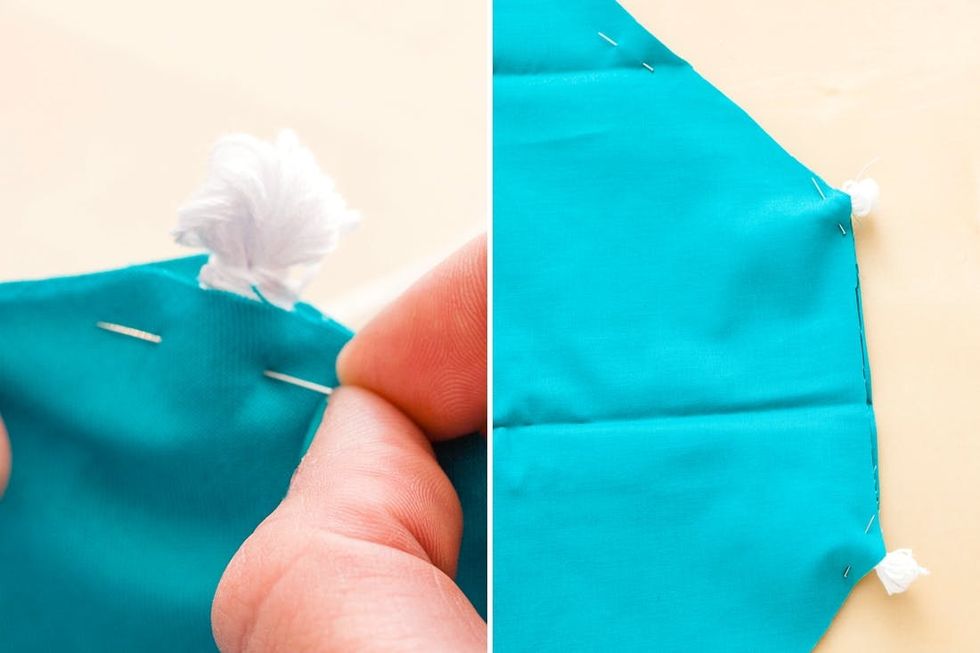
Time to pin those eight tassels in place. Position them in between layers so the top of the tassel is peeking out of the fabric.

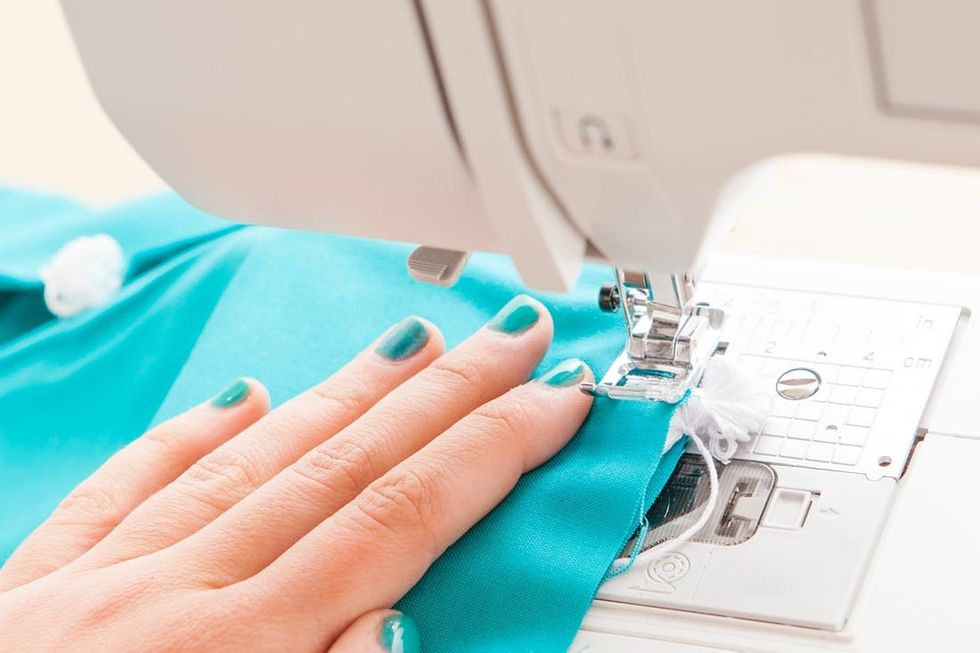
It’s best to start sewing right before each tassel. We know it’s kind of annoying, but it will ensure the best results. This way all the tassels will be secure when you are stuffing and you won’t have to deal with hand sewing the tassel on. Make sure you only sew seven sides of the fabric.

Tip for making sharp turns: Anchor the needle in the fabric, lift the presser foot up, turn the fabric, and place the presser foot back down.

Turn the fabric right side out and start stuffing.

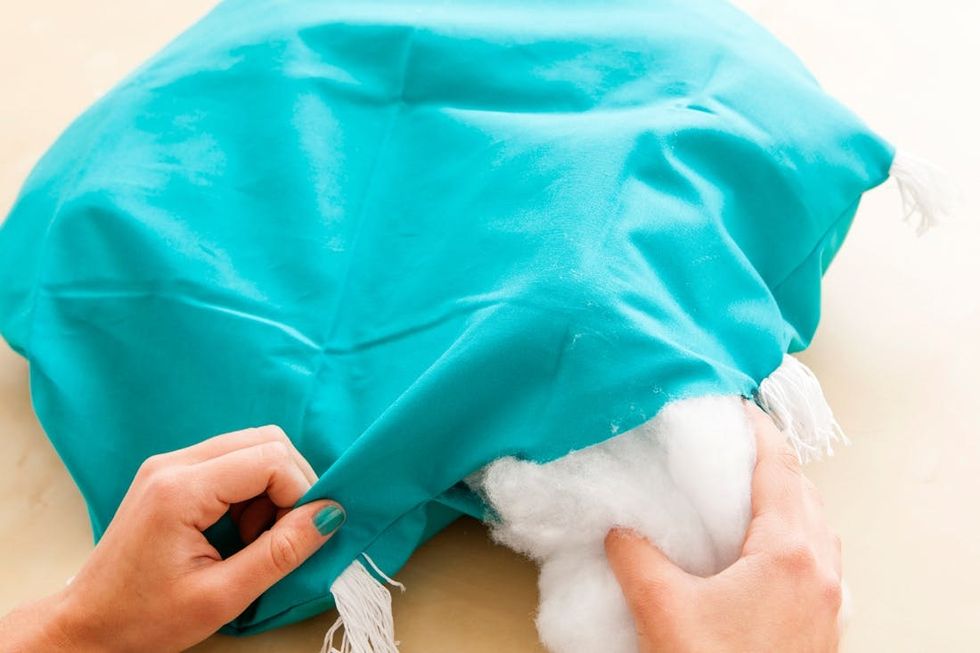
Really make sure the stuffing gets into the corners of the pillow.

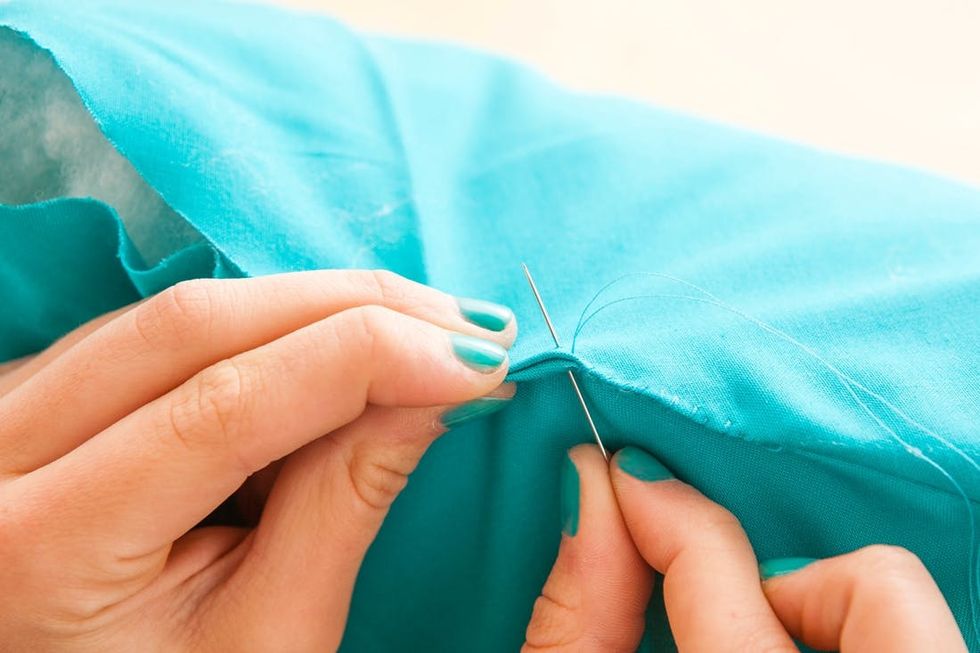
Once all the stuffing is in place, use a needle and thread to sew up the open seam.

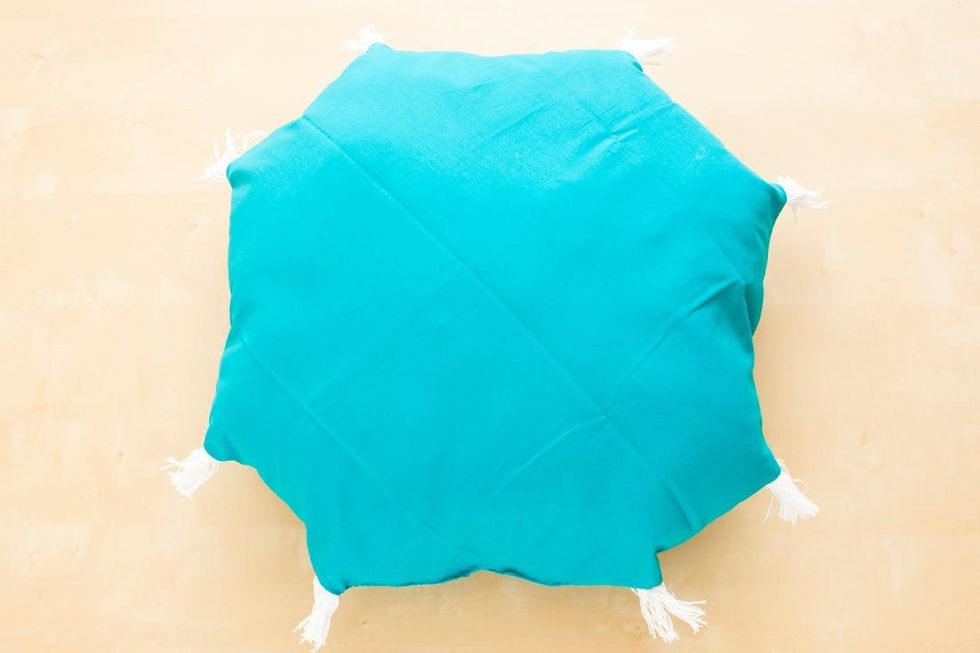
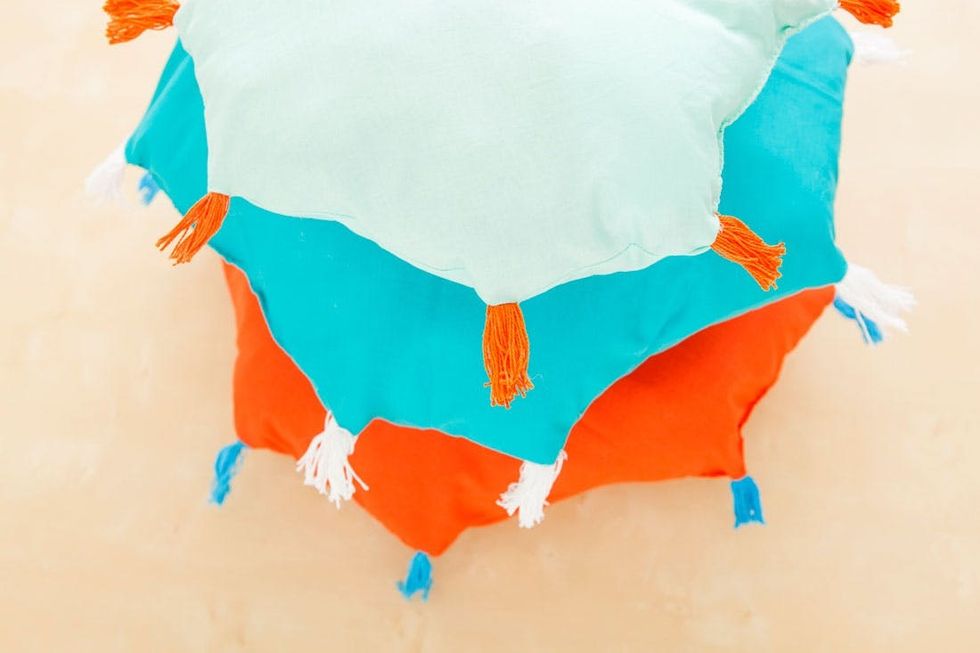
Stop right there. Look at that octagon pillow!

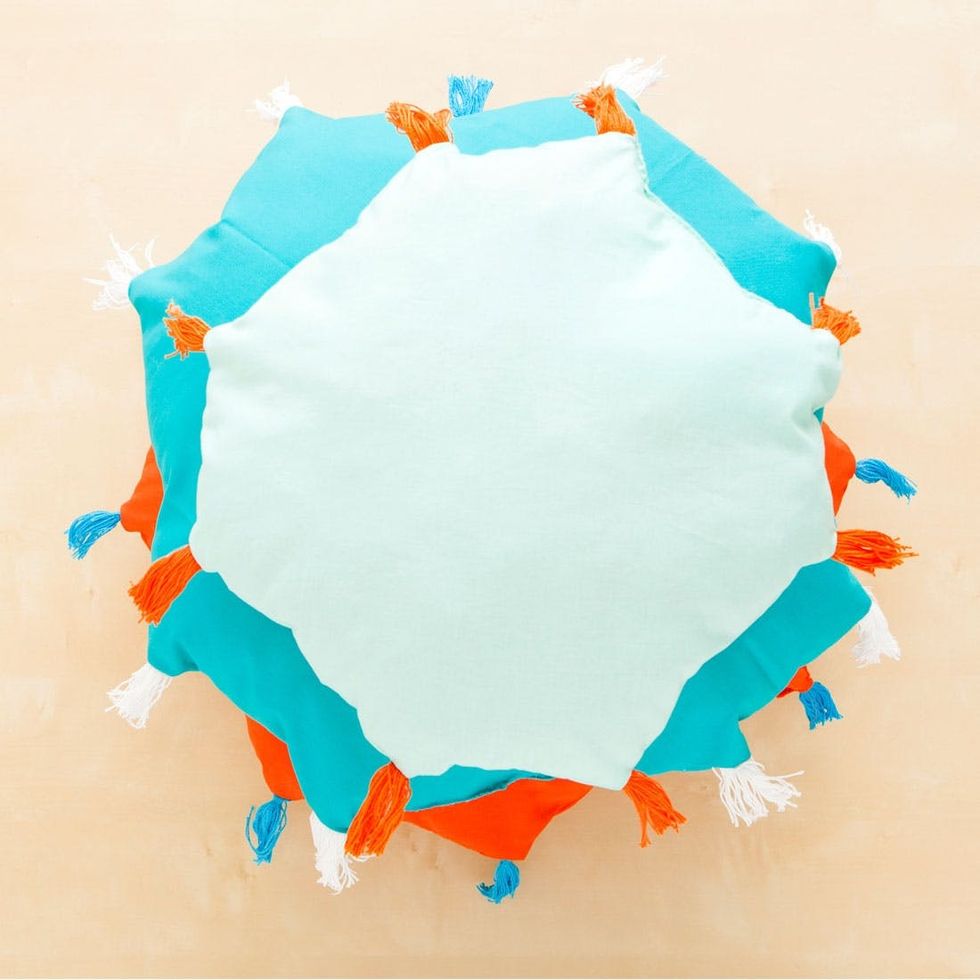
We created three and loved the look of them stacked on top of each other.

Try making different sized octagons. When first measuring out your square, we recommend sticking to measurements divisible by three (unless you’re a math whiz).

Turkey Temple totally approves! ;)

Kitchens are already one of the most used rooms in the house, accumulating clutter in all kinds of ways.

In the past, interior designers and homeowners alike tried to compensate for never-ending storage needs by installing upper kitchen cabinets that extended to the ceiling. Now, however, it appears this trend is dying out.

Not only is all that extra cabinetry expensive, but it can also cause kitchens to appear clunky, overfilled, or top-heavy. Plus, they cast shadows and may make the space appear darker and smaller.

This doesn't bode well with the latest home design trends, which emphasize open spaces with a lighter vibe. So, more and more people are opting to install other, more modern storage solutions.

Here's what we know about upper kitchen cabinets — & what's replacing them.

​What's Replacing Upper Kitchen Cabinets?

Wayfair

First, you might be wondering what you'd do with all that empty space on your kitchen walls. Don't worry: it's not just going to remain bare.

Instead, open shelving — like these shelves from Wayfair — has become the go-to decor choice. It still affords you storage space but with a playful twist. This parallels the direction that numerous homeowners have been heading– moving away from their kitchen looking, well, just like a kitchen and infusing more personality into their unique space.

West Elm

Think about it: your living room may have a typical couch and TV, like most homes, but it probably isn't a cookie-cutter replica of anyone else's house. You have knick-knacks, artwork, lighting fixtures, and other furniture that you've hand-picked and curated into your very own collection.

Of course, kitchens will always be used for cooking, and they should remain functional. At the same time, though, many homeowners recognize that if they spend so much of their lives in this room, it should almost be an extension of the rest of their decor, like with these shelves from West Elm!

Amazon

That's precisely why open shelving is taking over. It affords you the ability to customize your kitchen to the max, adding anything from antique dishware, cool cooking tools, and vintage mugs to funky cutting boards or cookbooks as decor.

And by giving yourself the opportunity to decorate on a vertical plane, you're opening up a ton of counter space that might've otherwise felt cluttered and, again, dark due to upper kitchen cabinet shadows.

While this might sound great, you may still be concerned about all those pots and pans that are currently stacked in your cabinets. Luckily, there are other more practical storage solutions you can integrate alongside open shelving.

Wayfair

Pantries are a great option. You can transform a broom closet to store your extra dry goods and cookware. Or, infuse your kitchen with even more character by picking up a vintage armoire and using it as an unexpected pantry.

Your lower cabinets can get an upgrade as well. Many homeowners are opting for deeper kitchen drawers, meaning they can hold more pots and pans, as well as shelves that are tiered and roll out.

Amazon

It's important to remember that everyone's space (and amount of kitchenware) is different, so being thoughtful is key. Consider how much storage you really need, say goodbye to anything that's no longer serving a purpose, and get creative.

One thing is certain: you won't miss having to drag out the stepstool or stand on your tip-toes to access those hard-to-reach upper kitchen cabinets anymore.

If you want more home decor inspo, be sure to sign up for our newsletter!

Brit + Co may at times use affiliate links to promote products sold by others, but always offers genuine editorial recommendations.

Holiday party season is almost upon us, and we could not be more ready for it! Sparkly dresses, fancy work parties, time spent with family and friends celebrating the end of the year? Count us in. Topping the charts of our favorite things about holiday parties are the creative backdrops we’ve been seeing popping up in our social feeds. That’s why we’ve teamed up with NBC’s Making It, a new reality DIY competition series, to bring you a holiday party photo backdrop tutorial that is sure to make jaws drop. Get ready to learn how to hand knit a super fabulous and classy backdrop decked out with colorful pom-poms and tassels!

Let’s get crafty!

Materials and Tools:

  • yarn
  • pom-pom maker
  • roving
  • cable ties
  • large needle
  • scissors
  • retail grid (not pictured)
  • 2×1-foot wood board (not pictured)

Instructions:

  1. Hand knit roving.
  2. Make pom-poms and tassels.
  3. Create garlands.
  4. Add roving to grid.
  5. Add pom-poms and tassels.

For our backdrop, we used a 4×7-foot retail grid, which you can find at most office supply stores.

HAND KNIT ROVING

Begin by wrapping the tail of the roving over your right hand with the working yarn tucked underneath your hand, creating a loop.

Holding the tail in your left hand, pull the working yarn through the loop with your right hand, creating a simple slipknot.

This creates the base stitch of your woven braid that you will continue to pull the working yarn through to create the rest of your stitches. Thread the working yarn through your stitch just enough to create a new loop and pull it tight with the tail.

This may seem daunting at first, but once you get the hang of it, it’s actually super fun and a task that we all fight over at the office!

Keep feeding your working yarn through and creating new loops until you have enough to cover your grid. We kept the grid handy as we worked to see how much we needed to make. You got this!

When you’ve reached a good length, cut the working yarn.

Feed the now cut working yarn through your last loop and pull it tight, creating a secure knot. Ta-da! Now on to your next yarn creation.

POM-POMS

If you haven’t used a pom-pom maker before, oh buddy, you are in for a treat! They make making pom-poms SO easy. To begin, make sure that both pieces of the maker are together. Pull out a pair of the arms on one side and wrap yarn around both arms until you’ve filled in the half moon shape, like above. Once it’s filled, snip the yarn and close the arms.

Repeat on the other set of arms, trim the end of the yarn and close the arms of the maker.

With all the arms closed, cut down the center of each side of the arms of the maker. You’re almost done!

Cut a separate piece of yarn and make a tight double knot through the center of the maker.

To free your new fringy friend, pull open both pairs of the arms and pull apart each side of the maker. Give your pom a little haircut to turn him into the perfect fuzzball or leave him shaggy for some extra texture. After you make a few more poms, you’ll be ready to make a garland.

Using your large needle, thread a long piece of yarn through the center of the pom-pom.

Thread the needle through your other pom-poms. Make a fun assortment of garlands in varying colors and lengths for your backdrop. Next up on the yarn decor front, tassels!

TASSELS

We are going to show you how to make three different types of tassels. The best thing about tassels is that once you have the basics, there are millions of ways you can jazz them up. Make ‘em chunky, make ‘em long, or make them teeny, tiny — they will all look cool in your backdrop.

First tassel, or you may call it a faux-tassel. Take an entire skein of yarn and wrap a separate piece of yarn tightly around it, about three inches from the top of the skein. Trim around the bottom of the tassel, creating a fringe-tastic look, while keeping the inside of the skein intact.

To make your next type of tassel, you’ll need to grab something flat, at least two feet long. You can really use anything — a plastic lid of a storage container, a wood block, or a piece of cardboard.

Pull the yarn off of the wood, keeping it in a large oval. Double knot a piece of yarn around the top of all the pieces of yarn. Pinch together the top of the yarn and wrap it with a separate piece to create the “neck” of the tassel. Trim the bottom and you are all set. You can make so many variations of this tassel, and that’s exactly what we did for our backdrop.

You can braid or twist the bottoms of the tassels. Try ‘em all out!

INSTALLATION

Start by weaving the knitted roving in and out of the grid. This does not need to be perfect by any means; just go with the flow!

We left some big loops and empty spaces to fill in in with roving that hasn’t been knit, pom-poms, and tassels.

To attach the tassels, thread the cable tie through the center of the top and secure it to the grid.

Look at the fun texture start to come together by weaving knit and un-knit roving through the grid.

Keep on adding pops of color until you cover your entire backdrop. Now you are all set to gear up for your party!

CHEERS to your super awesome new backdrop!

If you haven’t heard yet, make sure you stop by our annual Holiday House! While you’re there, head to Santa’s Workshop, sponsored by NBC’s Making It, where you can DIY and snap pics in front of this backdrop!

Show us your holiday party photo backdrops by tagging us on Instagram using the hashtag #iamcreative and #MakingIt.

This post was paid for by NBC.

Sometimes a sweet treat just hits differently in warmer weather, and Trader Joe’s (in true Trader Joe’s fashion) just dropped thedessert of the spring and summer. I hear you, I hear you… it’s a tad bit early to start thinking about scorching, sunny days, but trust me: this new $5 dessert will have you yearning for summer the second you see it.

Scroll on to discover the newly-dropped Trader Joe’s find shoppers are calling delicious, yummy, and amazing!

@trader_joes_treasure_hunt

The summery dessert in question is the all-new Blood Orange Mochi Ice Cream, and it’s so dreamy. Featuring dollops of blood orange-flavored ice cream cased in sweet mochi dough, it’s the kind of sweet treat you can easily eat with your hands… and keep eating over and over and over again.

Any Lane / PEXELS

The mochi ice cream is also crafted without any artificial colors or flavors, so you really get the full effect of the rich citrus. Blood oranges are also typically sweeter than regular oranges, making them perfect for putting into desserts.

@traderjoesobsessed

TJ’s fan account @traderjoesobsessed shared the new Blood Orange Mochi Ice Cream with their followers, saying the treat is “tart and creamy” and also “not too sweet.” One commenter that got a taste noted that each ice cream piece is like “a creamsicle's more worldly cousin.” Another person compared the flavor to a Flintstone's Push-Up popsicle.

Well-rounded and nostalgic? Now I have to try this!

Nadin Sh / PEXELS

The Trader Joe’s Blood Orange Mochi Ice Cream can be found on shelves for $4.99. Each box comes with 6 mochi ice cream bites, and what’s even more exciting is the nutrition label says a single serving size is 6 pieces – AKA the entire box. Woah!

Additionally, this sweet snack is kosher and gluten-free.

I’m definitely going to be grabbing several boxes to try – and hopefully manifest an early start to springtime!

What are your favorite Trader Joe's desserts? Let us know in the comments and subscribe to our newsletter to discover even more new Trader Joe's items!

Costco isn't just known for offering a shockingly wide array of products at unbeatable prices. The membership-only warehouse club is also a favorite shopping destination for all kinds of foods.

The infatuation among shoppers arguably began back in 1984. That year, the iconic hot dog and soda combo, which costs just $1.50, was first added to its food court menu, and it's been history ever since.

Today, people don't just frequent Costco; they're loyal fans of the store. So, when certain products disappear from shelves or the food court, outrage can ensue.

These are eight of the most popular foods that Costco has stopped selling, sparking a lot of upset.

Scroll to find out which popular Costco foods you can't find on shelves anymore!

1. Barbecue Beef Brisket Sandwich

Valeria Boltneva

The barbecue beef brisket sandwich is one past food court favorite that was sadly discontinued. It featured shredded brisket smothered in tangy barbecue sauce and topped with sweet coleslaw on a soft bun — similar to the sandwich pictured — for only $4.99.

While it was a hit with a decent amount of Costco members, there wasn't enough consistent demand to keep this sandwich on the menu. It also reportedly required more time and effort for employees to construct than other simpler options.

2. Kirkland American Cheese

Kirkland

You can no longer find Kirkland American cheese in Costco's deli section. This favorite for burgers and sandwiches was removed from stores in 2019, and it's unclear why.

However, some people speculate that the growing demand for other types of cheese, such as sharp cheddar and mozzarella, might've led Kirkland American cheese to become less of a priority. It seems like the above pictured American cheese slices are only available in Australia now.

3. Cinnamon Sugar Pretzels

Auntie Anne's

Costco's cinnamon sugar pretzel was warm, chewy, and popular among shoppers looking for a sweet pick-me-up. But you can't find it at the food court anymore.

The exact reasons for this treat's removal haven't been confirmed, either. Nonetheless, it's thought that cinnamon sugar pretzels got the boot due to a combination of low sales and Costco's shift toward offering healthier menu options.

If you're missing that Costco sweet treat, you can't go wrong with a cinnamon sugar pretzel from Auntie Anne's (pictured above)!

4. Kirkland Signature Turkey Burgers

Costco

Kirkland Signature turkey burgers were a convenient frozen food option packed with protein. In fact, each patty only had 200 calories yet carried 25 grams of protein.

Despite that, the turkey burgers were discontinued in 2018, and the reason remains a mystery. Some fans were so disappointed that they actually started a petition to get the product back in Costco freezers, but the store reportedly hasn't responded.

Instead, you can get a 32-pack of Rastelli’s Antibiotic-Free Turkey Craft Burgers (pictured above), if you're looking for a similar fix!

5. All American Chocolate Cake

Reddit/r/Costco

With multiple layers of rich chocolate cake that could easily feed a group of 20, this product was a go-to for countless shoppers. However, it was surprisingly pulled from shelves in 2020, possibly due to the COVID-19 pandemic.

Costco's exact reasoning is still unclear. Thankfully, though, chocolate lovers can now find mini versions of this dessert being sold as cupcakes.

6. Kirkland Signature Light Beer

Reddit/r/Costco

This product was Costco's attempt to enter the beer market. Unfortunately, it didn't quite hit the mark.

Kirkland Signature Light Beer received harsh criticism, with people online saying it "stinks" and has a "rubber smell." So, regardless of the fact that it was sold at a low price of around $0.50 per can, the beer was ultimately discontinued in 2018.

7. Polish Hot Dog

Costco

Despite Costco's Polish hot dog having a dedicated fanbase, it wasn't large enough to sustain this food court item. Low sales pushed it to be taken off the menu back in 2018.

In the wake of its removal, Costco shared a statement detailing how the Polish hot dog was discontinued to make room for healthier options, like the all-beef hot dog.

8. Chocolate-Dipped Ice Cream Bar

Costco

One final ghost of Costco's food court past is the chocolate-dipped ice cream bar. This dessert disappeared from the menu in 2013, but even a decade later, fans are still upset about it.

Sold for just $1.50, it featured vanilla ice cream dipped in chocolate and rolled in toasted almonds. It's believed that the rising costs of dairy and almonds pushed Costco to take it off the menu, and it's unclear if this product will ever make a comeback.

If you're looking for something similar, I'd grab these Kirkland Signature Ice Cream Bars — and they come in a pack of 18!

Looking for more food news? Be sure to sign up for our newsletter so you never miss a thing!

Brit + Co may at times use affiliate links to promote products sold by others, but always offers genuine editorial recommendations.