Get the Summer Party Started With This Mason Jar Mojitos Recipe

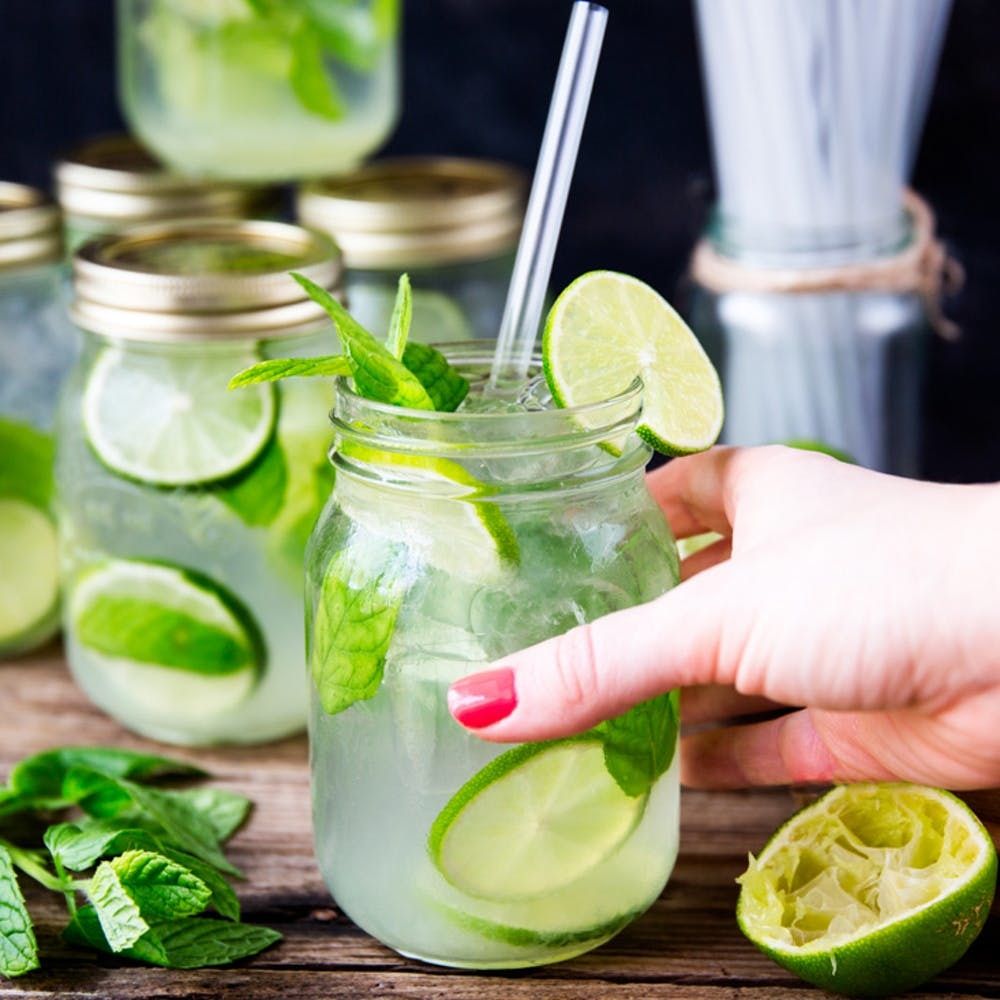
Just imagine: You arrive at your friend’s BBQ. They have a table full of beer, a few boxes of wine and a giant ice bucket filled with frosty jars of mint-infused mojitos. Which one are you going to go for? Exactly. That’s why you need to serve these super-simple but deliciously refreshing Mason Jar Mojitos at your next party. Spiked with white rum and served over ice, they’re fresh, zesty and the perfect cocktail centerpiece for any garden party.

Mason Jar Mojitos RECIPE

Ingredients:

makes 6 mojitos
— 36 mint leaves

— 12 tablespoons lime juice

— 6 tablespoons superfine or caster sugar

— 12 fluid ounces (equivalent to 8 shots) white rum

— ice

— club soda

To Serve:
— mint sprigs

— slices of lime

Instructions:

1. Place mint leaves in the bottom of the mason jar and bruise slightly with a spoon. Add the lime juice and sugar. Mix together to dissolve the sugar.

2. Add the rum and fill the glass halfway with ice. Mix together.

3. Add ice to top of the mason jar.

4. Top with club soda and stir.

5. Add 2 or 3 lime slices into each drink and one on the rim of the glass. Add a sprig of mint and serve.

Place mint leaves in the bottom of the mason jar and bruise slightly with a spoon. Add the lime juice and sugar. Mix together to dissolve the sugar. Add the rum and half fill the glass with ice. Mix together. Add more ice, to the top of the mason jar. Top with club soda and stir.

Add 2 or 3 lime slices into each drink and one on the rim of the glass. Add a sprig of mint and serve.

Got any mason jar hacks of your own? Share them with us in the comments below!

We know, we know, Mason jars again? Believe it or not, this uber-versatile craft goodie is still being reinvented. From summer cocktail glasses to hanging planters and even mosquito-fighting candles, your collection of mason jars can take on a new meaning with just a simple dip of paint and a bit of creativity. Check out these whopping 56 DIY mason jar crafts to repurpose your jars and put them to good use.

1. Polka Dot Jars: A few dots of puffy paint go a long way. Allow the adorable, fruit-inspired jars to dry overnight and you are ready to go. (via Whipperberry)

2. Hanging Macrame Vase: Show off the knots you learned back in Girl Scouts and string up this one-of-a-kind vase. (via Brit + Co)

3. Key Lime Pie: No bake and already divvied up? This is the perfect summer dessert to impress your guests. (via A Million Moments)

4. Vertical Herb Garden: Take your herb garden to new heights with this vertical planter tutorial. (via Brit + Co)

5. Summertime Sun Tea: Assemble the drinks and let the sun do all the work for you. Your guests will thank you for it. (via Thirsty for Tea)

6. Fabric Flower Vases: Raid your scrap pile and you’ll have cute new vases in no time. (via Dwelling In Happiness)

7. Mason Jar Aquarium: Have the kids each make their own underwater creation and take the opportunity to do a little Oocean lesson. This project is so much fun they will never suspect they’re learning at the same time. (via Hello, Wonderful)

8. Balloon-Dipped Jars: No messy paint or tape required here — just good old-fashioned balloons. (via Brit + Co)

9. Fancy Tumbler: Now you can drink your iced coffee in style. (via Pretty Providence)

10. Superhero Bank: Get your little sidekick excited about saving with a super cool bank they helped make. (via Fireflies + Mudpies)

11. Chalkboard Lid Labels: A simple coat of chalkboard paint will let you know what’s in stock at a single glance. (via Momtastic)

12. Cocktail Gift: This is one favor you’ll want to give out at the start of the party. (via Something Turquoise)

13. Citronella Candles: Add a little mood lighting and keep those pesky insects away at the same time. This one is an all-around winner. (via Marty’s Musings)

14. Picnic Caddy: Use it as a silverware caddy or stick a few flameless candles in the jars for instant ambiance. (Clean and Scentsible)

15. Storage Shelf: Give yourself a little extra storage without actually sacrificing your counter space. You will be amazed you didn’t think of this sooner. (via Poofy Cheeks)

16. Cozies: These cozies only take a few minutes to make and would be a great thank-you gift for any summer party. (via I Heart Naptime)

17. Layered Crayon Candle: Don’t toss out that pile of broken crayons! Reuse them to make a new colorful layered candle instead. (via Hello Giggles)

18. Cupcake Holder: We’re suckers for pretty packaging, and this one takes the cake ;) (via Nellie Bellie)

19. Painted Succulent Planter: Place a few rocks in the bottom of each jar for added drainage and remember not to overwater. Even the most novice gardener can keep these babies flourishing. (via Lolly Jane)

20. Cupcake Wrapper Storage: Instead of shoving all your cupcake wrappers in the back of the cabinet, put them on display and add color to your countertop. (via Table for Two Blog)

21. Glitter Vase: Every day is a good day when you have a glittery vase full of fresh flowers on your table. (via Perfect Wedding)

22. Hair Station: Mismatched knobs and hanging jars make this storage solution as practical as it is pretty. (via Nefotlak)

23. Lego Head Jars: Throwing a LEGO party this summer? Save your jars and make these adorable decorations to add a bit of flair to any table. (via Beau Coup)

24. Upcycled Belt Lantern: Run to the thrift store and buy every (faux) leather belt you can find. Then come home and make a few of these lanterns for your patio makeover. (via Nothstory)

25. American Flag Jars: Perfect for all the upcoming patriotic holidays, these painted jars are easy to put together and make a big impact. (via Mason DePax)

26. Monogram Light: Is there anything you can’t do with a mason jar? (via Oleander and Palm)

27. Bride and Groom Jars: These would look adorable at a bridal shower or on the dessert table at the wedding. You’ll be looking for every excuse to display this dapper pair. (via The 36th Avenue)

28. Gold Stripes: Gold spray paint can do no wrong in our books. (via Your Homebased Mom)

29. Match Stick Jar: Holy match sticks! You’ll never have to dig through your junk drawer for a lighter ever again. (via The DIY Playbook)

30. Mini Pies: Use the lid to cut out crusts for individual chocolate pies. These little gems are *almost* too cute to eat. (via Brit + Co)

31. Pallet Wood Planter: Grab the next pallet you find and let your kitchen table make a huge statement. (via I Heart Nap Time)

32. Patina Paint Job: With just a few simple steps, you can make your jars looks like they’ve been around for decades even though you just took them out of the box. (via Suburble)

33. Picnic in a Jar: If nothing else, this is a surefire way to get your kids to eat their vegetables so they can get to that cookie at the bottom. (via The Gunny Sack)

34. Salt + Pepper Shakers: In under an hour, you can have a pair of salt and pepper shakers to perfectly match your kitchen decor. (via Landeelou)

35. Gold-Dipped Planter: Hang your favorite herbs from a tension rod by the kitchen window for easy access during the dinner rush. (via Sincerely, Sara D)

36. Dirt Pudding: Made of layers of chocolate pudding, cool whip and crushed Oreo cookies, these pudding are so good even the adults will love them. (via Better in Bulk)

37. Utensil Holder: The buffet line will move with ease once you put out this DIY utensil holder. Attach it to the fence for a more permanent solution if you constantly eat al fresco. (via Design, Dining and Diapers)

38. Soap Dispenser: Throw out that old plastic soap dispenser (but save the pump!) and give your kitchen a straight-from-the-magazine look. (via Love Grows Wild)

39. Solar Lamp: These are perfect for adding a warm glow to any outdoor get-together. (via Creative Cain Cabin)

40. Terrarium: Get your hands dirty and make a living terrarium. Your kiddos will love putting in each layer and watching it thrive on the windowsill. (via Parent Pretty)

41. Toothbrush Holder: Now even your toothbrush can get the Mason jar treatment. (via Country Chic Cottage)

42. Tinted Jar Candle: It’s like getting two tutorials in one! Learn how to tint your jars and then make a candle inside. (via Something Turquoise)

43. Twine Holder: Does your ribbon and twine end up a tangled mess? Well, not anymore with this bad boy. (via ‘a Casarella)

44. Rainbow Cake: These cakes are baked right in the jar and will add just the right amount of whimsy to any party. (via Lovely Little Details)

45. Craft Kit in a Jar: Know someone who likes to get their DIY on? Give them a customized craft kit in, you guessed it, a Mason jar! (via The Gunny Sack)

46. Easy Buffet Service: Create a grab-and-go station so guests get their napkin, silverware and cup at the same time. Everything will be streamlined so you’re not running around looking for extra forks at the last second. (via The Sweetest Occasion)

47. Whipped Cream: Now you can have whipped cream that’s better than the store-bought stuff with just a few flicks of the wrist. (via Saveur)

48. Storage Jars: Gather a few different knobs to make a collection of storage jars that double as decorative art. (via Lolly Jane)

49. Air Freshener: If there’s one room in the house that could use an air freshener, it’s the bathroom. At least this one is nice to look at. (via Creek Line House)

50. Pin Cushion: Whip up a quick pin cushion and corral all your loose sewing needles before you have to find them the hard way. (via Wait Til Your Father Gets Home)

51. Ice Cream: Pre-scoop ice cream and set out a buffet of toppings like sprinkles and chocolate chips for a refreshing summer dessert. (via Pen and Paper Flowers)

52. Kids’ Table Favors: Fill the jars with things like crayons, a snack and a small toy, and the kids will be happily entertained all afternoon. (via Brides)

53. Makeup Jar: Are you a glass-half-full kind of girl? Then this one’s for you. (via Birchbox)

54. Red Velvet in a Jar: Bake your favorite red velvet cupcakes, then take them apart and stuff them in a jar. Attach a wooden spoon and you’re done. (via Cakies)

55. Sprinkles Pen Holder: Here’s a simple and unexpected new use for sprinkles. (via The Farm Chicks)

56. Glitter Vase: A layer of pink glitter makes this iridescent vase stand out from all the rest. (via My Common Slice of Suburbia)

Which of these DIY mason jar crafts are you going to try repurpose your jars?

Talk to us below or explore creative DIY pins on Pinterest!

This article has been updated from an original version.
Tourism can be a blessing for the economy of many cities around the world, but it often comes at a price. Destinations like Venice and Bali are iconic for a reason — they’re unique, breathtaking places that lure travelers from around the globe. But when a travel destination becomes too popular, it risks losing its charm and overcrowding can strain infrastructure, inflate costs for locals, and disrupt the peace and quiet of small, serene towns.

Here are 12 destinations that have struggled with overtourism. The good news? Many are implementing smart strategies to balance tourism with sustainability. Planning to visit? Consider booking during the off-season for a more authentic and enjoyable experience or try these hidden gems.

Pixabay

Venice, Italy

Cruise ships and swarms of tourists have overwhelmed this picturesque city, leading to overcrowded canals, damaged infrastructure, and skyrocketing prices. The local population is dwindling as Venetians leave due to the city’s unsustainable tourism boom. Last spring, in an effort to manage the influx, the city put into effect an entry fee for day-trippers and has limited cruise ships docking its shores.

Oleksandr P

Bali, Indonesia

Once an idyllic paradise, Bali now suffers from traffic congestion, environmental degradation, and overcrowded beaches. The island’s resources are strained under the weight of mass tourism, but there are efforts underway to promote sustainability like putting a moratorium on new hotels.

Willian Justen de Vasconcellos

Machu Picchu, Peru

Overtourism has led to erosion and damage to this ancient Incan citadel. A quota system and mandatory guides are helping preserve this popular South American destination.

Darren Lawrence

Tulum, Mexico

Once a tranquil paradise known for its pristine beaches, ancient Mayan ruins, and eco-chic vibe, Tulum has become a cautionary tale of overtourism. The surge in popularity, fueled by Instagram-worthy scenery, has brought overcrowding, environmental strain, and rising costs. The Guardianreported that locals are being pushed out by developers and despite the thinking that tourism helps local communities, poverty nearly doubled between 2015 and 2020. Local ecosystems, including fragile mangroves and coral reefs, are threatened by unchecked construction and pollution too. The local ruins have implemented stricter rules like no food or drink to limit trash and environmental impact from tourists.

Jimmy Teoh

Santorini, Greece

Instagram fame has turned this once-serene island into a tourist hotspot. Narrow streets are perpetually clogged, and locals are struggling with soaring costs of living due to tourism demand. The government has since capped the number of daily cruise ship visitors to keep overtourism at bay.

Chait Goli

Cinque Terre, Italy

Known for its colorful cliffside villages and breathtaking coastal views, these once-quiet fishing towns now see millions of visitors annually, way more than they can handle. To combat issues like congestion and cruise ships, local authorities have introduced visitor caps and encourage sustainable travel to protect Cinque Terre’s charm.

Rudy Kirchner

Reykjavík, Iceland

Is there anyone not going to Iceland these days? A small country with breathtaking landscapes, Iceland has been overwhelmed by tourists flocking to Instagram-famous sites like the Blue Lagoon and Diamond Beach. It's best to travel during the off season (November to April) and travel to lesser known spots like the Sturlungalaug hot spring.

youseflns

Maya Bay, Thailand (Phi Phi Islands)

This iconic beach, popularized by the DiCaprio film The Beach, suffered ecological devastation from hordes of visitors and anchored boats. Coral reefs were destroyed, and the beach was closed for years to allow recovery. It has since reopened after a huge revitalization project, but they have introduced visitor caps.

Pixabay

Kyoto, Japan

Traditionally quiet streets of this ancient capital city now teem with tourists during peak season. An increase in litter from tourists has required the city to install more trash bins to handle the crowds, and peaceful geishas are often chased down for photos. To mitigate the problem, Kyoto is considering running special buses to popular sites to reduce overcrowding, and temples and shrines are encouraging visitors to come early in the morning.

Prabin Sunar

Mount Everest, Nepal

The ultimate challenge for adventurers, Mount Everest has experienced overcrowding on the slopes and at base camps, leading to dangerous conditions, with litter and human waste piling up on the mountain. Permits are now harder to get, and stricter regulations for climbers are being enforced.

Mateusz Popek

Dubrovnik, Croatia

The Game of Thrones effect brought an influx of fans to this medieval city. Overcrowded streets and cruise ship arrivals have made it difficult to appreciate its beauty. The local government is taking steps to limit daily visitors and impose stricter cruise ship regulations.

Helena I

Lisbon, Portugal

Short-term rentals dominate the housing market now, thanks to affordable flights and the digital nomad craze. This has led to skyrocketing rents and displaced locals. Historic neighborhoods are inundated with tourists, making them less charming too. Everything from public transport to waste management struggles to keep pace with the influx. I went in December and it still felt a bit like Disneyland. Douro Valley and Madeira might be more favorable destinations any time of year.

Cure your wanderlust in 2025! Be sure to subscribe to our newsletter for more travel ideas!

Lasagna has to be the biggest temptation in the world for going-back-for-seconds (and thirds?), right? A huge tray of meaty, cheesy pasta that’s just asking to be picked at, even when you’re way past full! So let’s prevent the meagre leftovers and too-tight belts by portioning that lasagna up mason-jar style. Use fresh pasta sheets that can be cut to the shape of your jars,and add in some sliced zucchini for a splash of color. Finish it off with lots of sharp cheddar and mozzarella for a super satisfying dinner. Prefer a veggie version? Try the mason-jar style with one of these veggie lasagna recipes.

Ingredients:

  • 1 Tablespoon olive oil
  • 1 medium onion, peeled and diced
  • 1 pound ground beef
  • 3 cloves garlic, peeled and minced
  • 2 Tablespoons tomato puree
  • 1 teaspoon dried oregano
  • ½ teaspoon dried thyme
  • ½ teaspoon salt
  • ½ teaspoon ground black pepper
  • 2 x 14 ounce cans chopped tomatoes
  • 3 Tablespoons unsalted butter
  • 2 heaped Tablespoons all-purpose flour
  • 2 cups milk
  • 1 packed cup shredded sharp cheddar cheese
  • 1 packed cup shredded mozzarella
  • 3-4 sheets fresh lasagna
  • 1 zucchini, sliced
  • 4 sprigs fresh thyme

Instructions:

  1. Preheat the oven to 375 degrees Fahrenheit.
  2. Heat the oil in a large skillet. Add the onion and cook on a medium heat for 5-6 minutes, until the onion starts to soften. Add the ground beef and cook, breaking up any pieces, until browned.
  3. Add the garlic, tomato puree, oregano, thyme, salt, and pepper. Stir together, then stir in the canned tomatoes. Bring to a gentle bubble and simmer for 15 minutes.
  4. Take your four mason jars (we used squat, 16.5 ounce mason jars), and cut circles out of the lasagna sheets that will fit the jars. You need 2 lasagna circles per jar.
  5. Now make your white sauce. Melt the butter in a saucepan and add the flour. Stir with a whisk to let the flour and butter cook slightly for one minute. Add in the milk, a splash at a time, while stirring with the whisk. Incorporate each splash of milk before adding the next, until you have a smooth, thick sauce. Stir in a good pinch of salt and pepper, plus a quarter of the cheddar and quarter of the mozzarella, and turn off the heat.
  6. Divide one third of the meat sauce between the mason jars. Top the meat with slices of raw zucchini. Spoon on a heaped tablespoon of the white sauce and top with a lasagna circle. Repeat.
  7. Top the second layer of lasagna circles with the remaining meat sauce, followed by the remaining white sauce. Divide the cheddar and mozzarella between the mason jars. Place the jars on a baking sheet and cook in the oven for 20-25 minutes until the cheese is browned and the sauce is bubbling.
  8. Carefully remove from the oven and leave to cool slightly before serving topped with sprigs of fresh thyme.

Preheat the oven to 375 degrees Fahrenheit. Heat the oil in a large skillet. Add the onion and cook on a medium heat for 5-6 minutes, until the onion starts to soften. Add the ground beef and cook, breaking up any pieces, until browned. Add the garlic, tomato puree, oregano, thyme, salt, and pepper. Stir together, then stir in the canned tomatoes. Bring to a gentle bubble and simmer for 15 minutes.

Take your four mason jars (we used squat, 16.5 ounce mason jars), and cut circles out of the lasagna sheets that will fit the jars. You need two lasagna circles per jar.

Now make your white sauce. Melt the butter in a saucepan and add the flour. Stir with a whisk to let the flour and butter cook slightly for one minute. Add in the milk, a splash at a time, while stirring with the whisk. Incorporate each splash of milk before adding the next, until you have a smooth, thick sauce. Stir in a good pinch of salt and pepper, plus a quarter of the cheddar and quarter of the mozzarella, and turn off the heat.

Divide one third of the meat sauce between the mason jars. Top the meat with slices of raw zucchini. Spoon on a heaped tablespoon of the white sauce and top with a lasagna circle. Repeat.

Top the second layer of lasagna circles with the remaining meat sauce, followed by the remaining white sauce. Divide the cheddar and mozzarella between the mason jars. Place the jars on a baking sheet and cook in the oven for 20-25 minutes until the cheese is browned and the sauce is bubbling.

Carefully remove from the oven and leave to cool slightly before serving topped with sprigs of fresh thyme.

Do you have a favorite mason jar recipe? We’d love to hear!Tweet us @BritandCo with a pic, and follow us on Pinterest for more tasty recipes!

Christmas cookie decorating is holiday tradition for us here at B+C, so we were so stoked to find this recipe for paleo cookies that adds a healthy twist to this classic holiday dessert. These sweet treats will shine among the rest of your Christmastime tablescape, and they are super easy to make. Plus, they'll pair well with just about any Christmas dessert. Just combine your paleo-friendly ingredients to prep the dough, let it sit overnight, then bake for ten minutes! The best part about this recipe is of course, all of the fun holiday-time shapes you can cut. Consider this recipe your go-to for healthy cookies, though, since you can make them year-round in any shape you like. Let's get to decorating!

Ingredients for Paleo Christmas Cookies

Brit + Co

For the cookies:

  • 1/2 cup grass-fed salted butter, softened
  • 6 tablespoons raw honey
  • 2 eggs, room temperature
  • 2 teaspoons vanilla extract
  • 1/2 teaspoon almond extract
  • 3 cups almond flour
  • 1/2 cup coconut flour
  • 1/2 teaspoon baking soda

For the frosting:

  • 6 tablespoons coconut butter or coconut manna
  • 1/4 cup cacao butter
  • 1-2 tablespoons honey
  • Plant-based food coloring
  • Vegetable-dyed sprinkles, for topping*
* Look for vegetable and fruit-dyed food coloring and sprinkles in natural grocery stores or online, and avoid artificial colors to keep these cookies Paleo friendly!

How to Make Paleo Christmas Cookies

Brit + Co

  1. Add the softened butter and honey to a large mixing bowl. Cream the mixture together using a handheld mixer until it is smooth. Add in the eggs, vanilla extract, and almond extract and whisk until they are well combined. Pour in the almond flour, coconut flour, and baking soda, and continue mixing until the batter has come together smoothly.
  2. Separate the dough into two, and place each one on top of a piece of plastic wrap. Roll each dough into a ball, then flatten to a thick disk, cover completely with the plastic wrap, and place in the refrigerator to firm up for at least 2 hours or overnight.
  3. Preheat the oven to 350 degrees F. Remove one of the dough discs from the refrigerator, unwrap the plastic and place the dough on top of a piece of parchment paper, then top it with another piece of parchment paper. Use a roller to flatten out the dough to about 1/4 to 1/2 of an inch thick. Work quickly with your favorite Christmas cookie cutters, and use a thin spatula to lift the cut cookies onto a baking sheet lined with parchment paper.
  4. Bake the cookies in the oven for 10 minutes. Let them cool for a few minutes, then place on a wire rack for further cooling. Gather the leftover scraps back into a ball in the plastic wrap or parchment paper and place it back in the refrigerator, while working with the other piece of dough. Do this in batches to keep the dough from getting too warm and so you don’t overcrowd the baking sheet.
  5. While the batches of cookies are baking, use a small saucepan to lightly melt the coconut butter and cacao butter together over low heat on the stovetop. Remove the pan from the heat when the ingredients have just melted together. Stir in the desired amount of honey, then set aside to cool and thicken up slightly. If you are using food coloring, add in the desired amount into the frosting mixture (1-2 teaspoons of green or red should do the trick). If you plan on only using white frosting, only use a small amount of honey, as it can make the frosting an off-white or light brown color.
  6. After the cookies have completely cooled, decorate them with the frosting and sprinkles as desired. If you don’t have any professional piping tools, an easy fix is to place the frosting in a plastic sandwich bag and remove all the air when sealing the top. Cut a tiny tip off one corner of the plastic bag, then gently squeeze and pipe over the cookies. Use one plastic bag or piping bag for each color of frosting. Top with corresponding sprinkles and enjoy!

Is your mouth watering yet? Check out our newsletter for more delicious holiday recipe ideas!

Recipe development and photography by Sarah Anderson.

Heaping plates of Christmas cookies are synonymous with the holidays. It seems that nearly every country around the globe has their own variation on the holiday classic. In fact, some of these regions have been making their version of Christmas cookies for literal hundreds of years.

If you’re looking for a way to reconnect with your heritage, or maybe just want a little baking inspiration, check out our picks for the yummiest Christmas cookies from around the world.

The Noshery

Mantecaditos con Guayaba

These may look like ordinary thumbprint cookies, but these almond shortbreads from Puerto Rico are filled with a special guava marmalade. (via The Noshery)

Broma Bakery

Meringues

French meringues are a classic crumbly egg white cookie with a chewy interior. These get an extra European twist with the addition of Nutella. (via Broma Bakery)

Pretty. Simple. Sweet.

Alfajores

Deeply flavored dulce de leche, a caramel made from whole milk commonly found in Spain and many Latin American countries, is the key ingredient in these super pretty sandwiched Christmas cookies. (via Pretty. Simple. Sweet.)

Fancy Peasant

Melomakarona

These Christmas cookies that hail from Greece get their sweetness from a generous soaking of fresh honey! (via Fancy Peasant)

Very Eatalian

Baci di Dama

The name of this Italian treat translates to “lady’s kisses” — how adorable is that? These bite-sized cuties are made with ground hazelnuts and filled with a dollop of dark chocolate. (via Very Eatalian)

Cooking Classy

Linzer Cookies

These Austrian Christmas cookies are typically made with raspberry jam, but feel free to get crazy with a filling of your choice. Plus, the gorgeous windowpane look will make them a prize takeaway at your next cookie exchange. (via Cooking Classy)

Olivia’s Cuisine

Basler Brunsli

If you’re hanging out in Switzerland around Christmas time, you’ll definitely see these chocolate treats around. They’re often described as Swiss brownies due to their deliciously chewy texture. Perfect with a cup of eggnog or coffee! (via Olivia’s Cuisine)

Cilantro Parsley

Buñuelos

These tender miniature fritters from Mexico are a mix between a donut and cookie. Whatever you want to call them, they’re delicious. (via Cilantro Parsley)

Chef Lindsey Farr

Apricot Kolachys

The Hungarians definitely know what’s up when tart apricot jam gets wrapped in a blanket of flaky pastry. They’re a bright spot on a cold Christmas day. (via Chef Lindsey Farr)

Life, Love and Sugar

Cutout Sugar Cookies

In the United States, a plate of these festively decorated sugar cookies is just what Santa ordered. (via Life, Love and Sugar)

Saveur

Polvorones

You’ll find these simple pecan shortbread cookies all over Mexico around this time of year. The coating of powdered sugar and canela, a type of Mexican cinnamon, really bring the flavor to the next level. (via Saveur)

A Healthy Life for Me

Pignoli

These Italian Christmas cookies are made of a chewy almond base and topped with pine nuts. (via A Healthy Life for Me)

Fancy Peasant

Kourabiedes

These Greek Christmas cookies feature a buttery biscuit topped with mass amounts of powdered sugar. (via Fancy Peasant)

Does your family have a traditional cookie recipe for the holidays? Tag us @BritandBo in your Instagram photos and let us know!

This post has been updated with additional reporting by Meredith Holser.

Lead image via Pretty. Simple. Sweet.