Shibori Shabooyah! 4 Ways to DIY With Indigo Dye
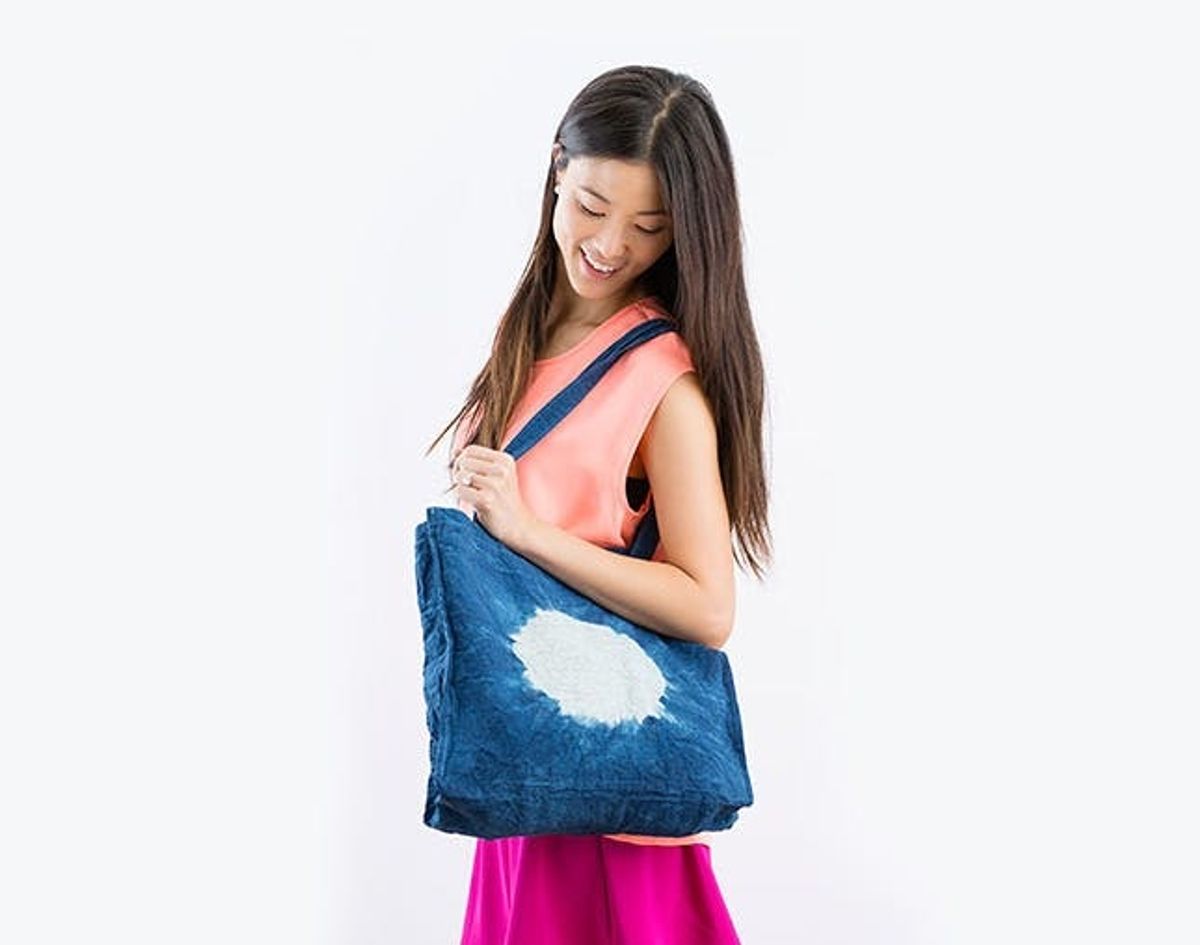
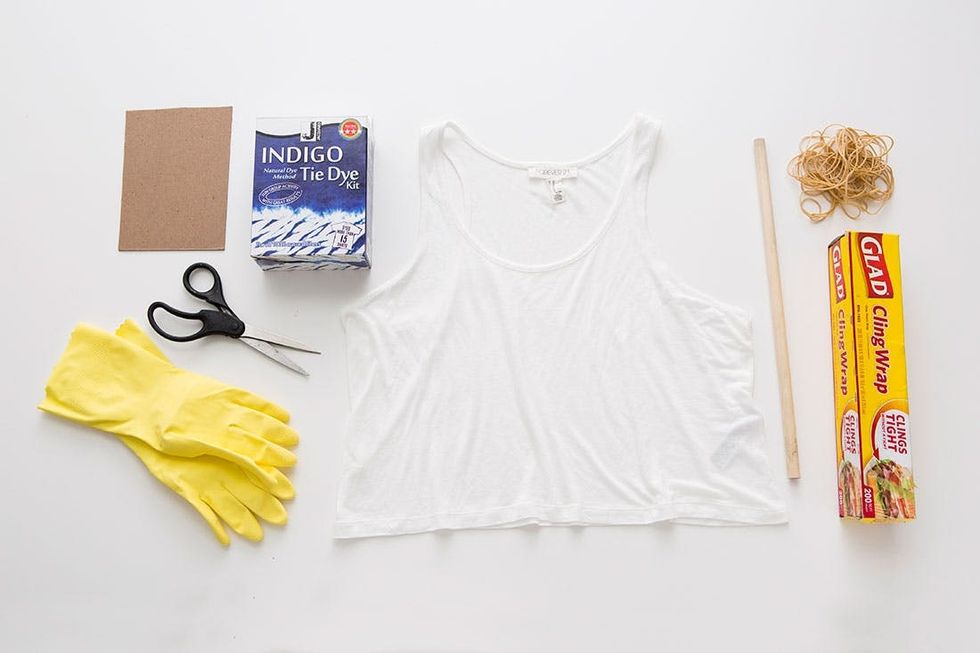
As with many fashion fads, tie dye is back! Not the multi-colored tie dye your hippy dad likes to rock or the kind you might see at a Phish concert. We’re talking about indigo-dyed garments (traditionally called Shibori in Japan). This DIY is super easy, fun and the pattern possibilities are endless. Best of all, you can’t mess up. No matter what you do, your newly dyed item will have a look of its own. All you need is this Indigo Tie Dye Kit ($12) and a few white clothing items!


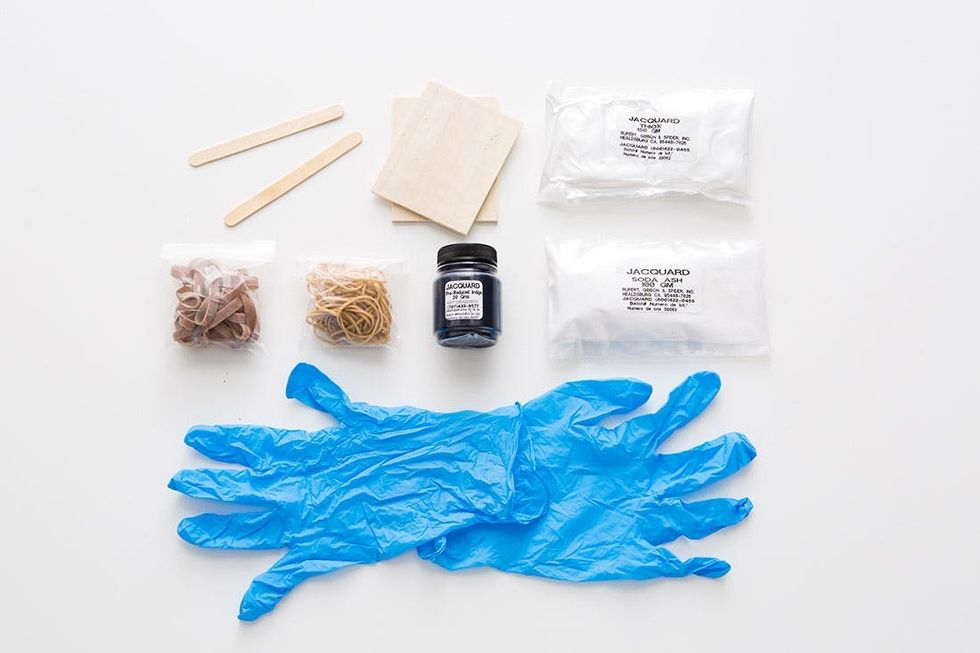
– Jacquard’s Indigo Tie Dye Kit


– pre-reduced indigo

– reducing agent (thiox + soda ash)

– gloves

– rubber bands

– 2 wood blocks

– 2 popsicle sticks

Instructions:
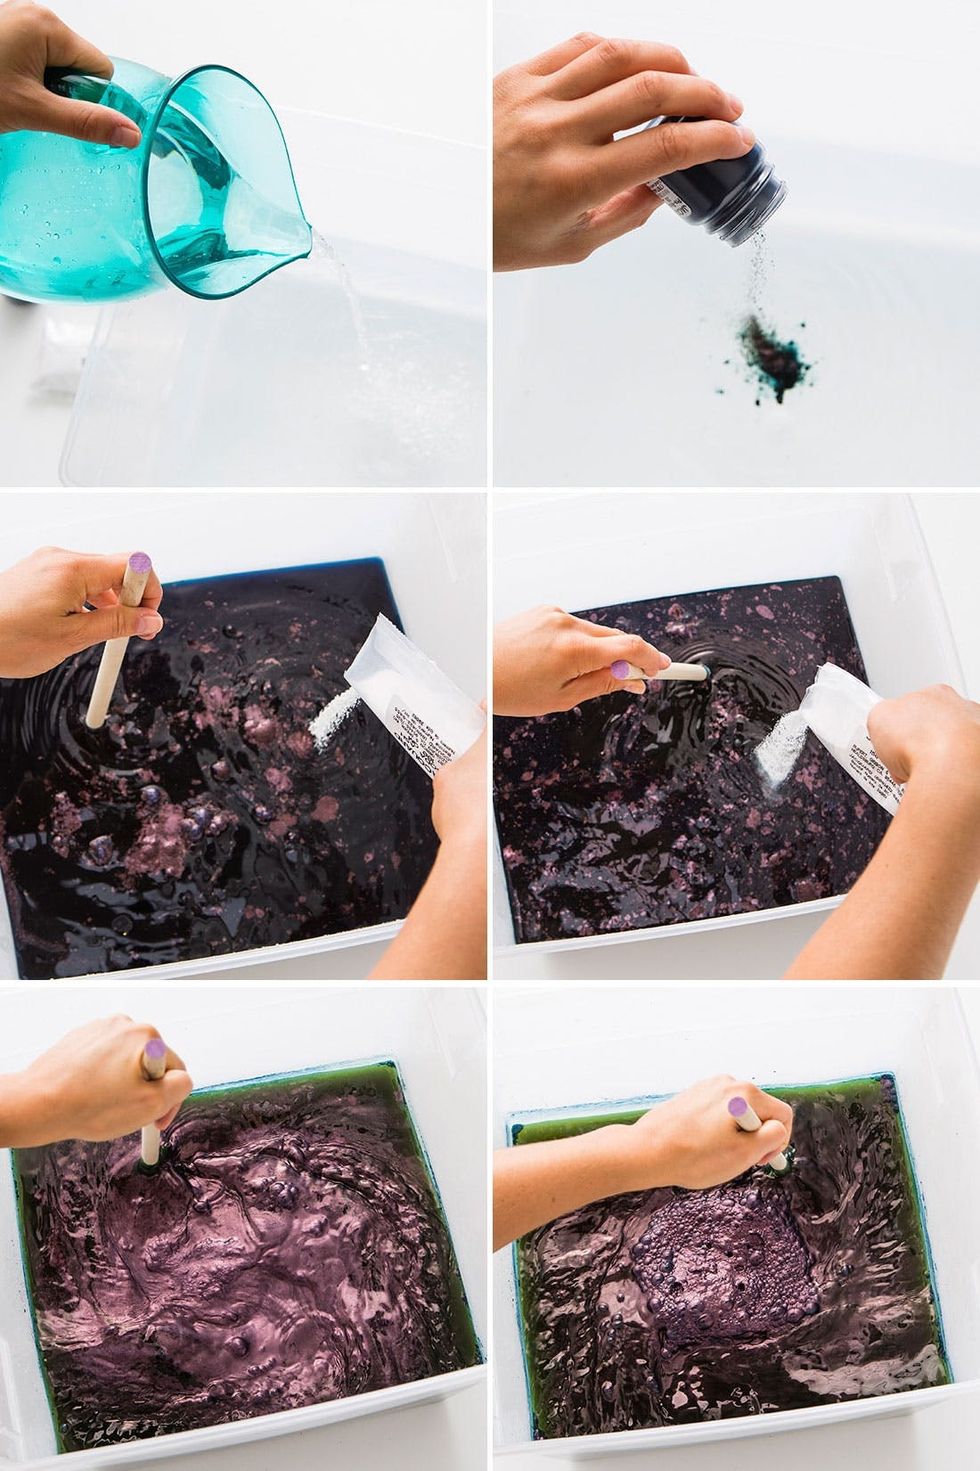
1. Fill a five gallon tub with four gallons of warm water. Pour the indigo dye into the water while stirring. Add the thiox and soda ash and continue stirring. Let the liquid settle and then stir in the opposite direction. Allow the mixture sit for one hour.

2. Prepare your items by folding and adding rubber bands (see techniques below).

3. Submerge your items in cool water and wring them out.

4. Remove the top layer of film from the vat of dye. Save the film — you will put it back in the vat after you finish dying if you want to save your dye to use again in the next few days.

5. One at a time, add your items to the dye, gently squeezing them while they are submerged allowing the dye to penetrate the fabric. At this point the color will be bright green.

6. Squeeze out any excess dye and set your garment aside for 20 minutes to oxidize.

7. Rinse your garment, remove the rubber bands and rinse again. Put your finished items in a washing machine with gentle detergent.

Find yourself a five gallon tub and fill it with four gallons of warm water. Slowly pour the Jacquard’s indigo dye into the water. Start stirring and gradually add the thiox followed by the soda ash. Give it a good whirl in one direction and then stir it in the opposite direction. When it’s thoroughly mixed, let it sit with the lid on for an hour.
While you’re waiting you can prepare your items. We dyed a tank top, a skirt, a napkin, a scarf and a tote bag. Each one was a different fabric and took the dye differently, yet they all turned out really well! There are tons of techniques to create patterns, but really it’s impossible to mess up. No matter what you do, your shirt or napkin or pillowcase will look amazing! Here are four techniques we used to dye our pieces.

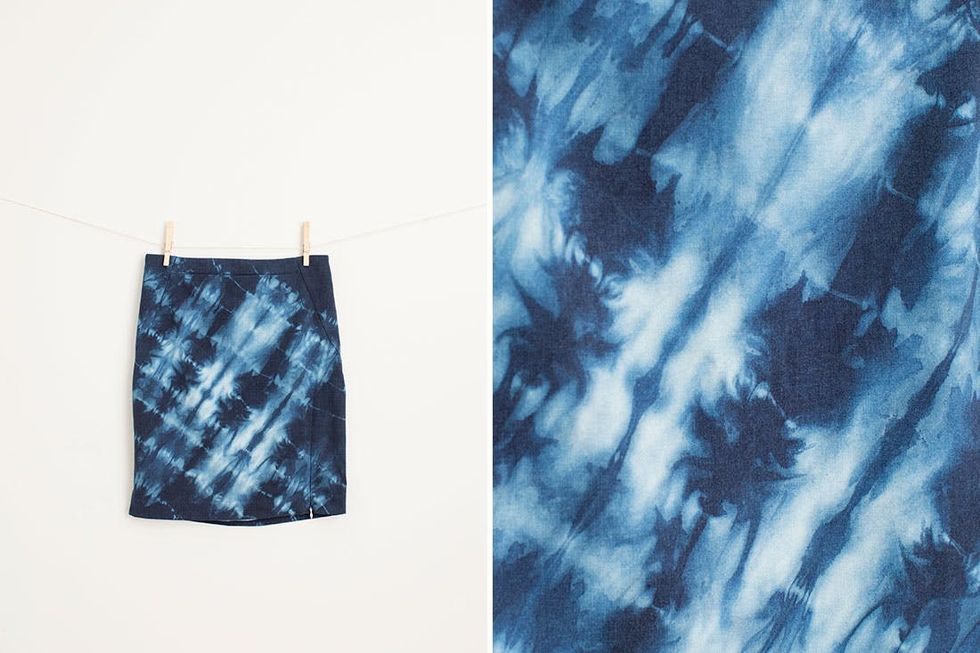
How hot is that skirt? Here’s how we did it.

Accordion Fold
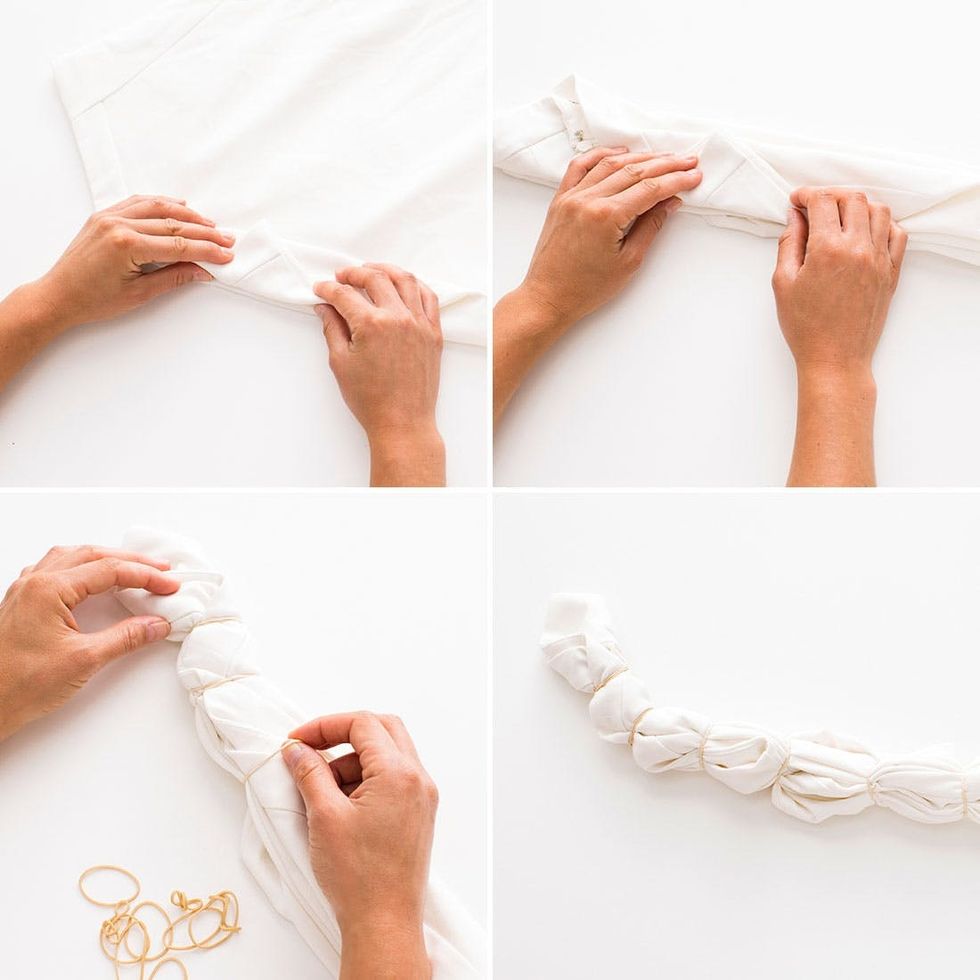
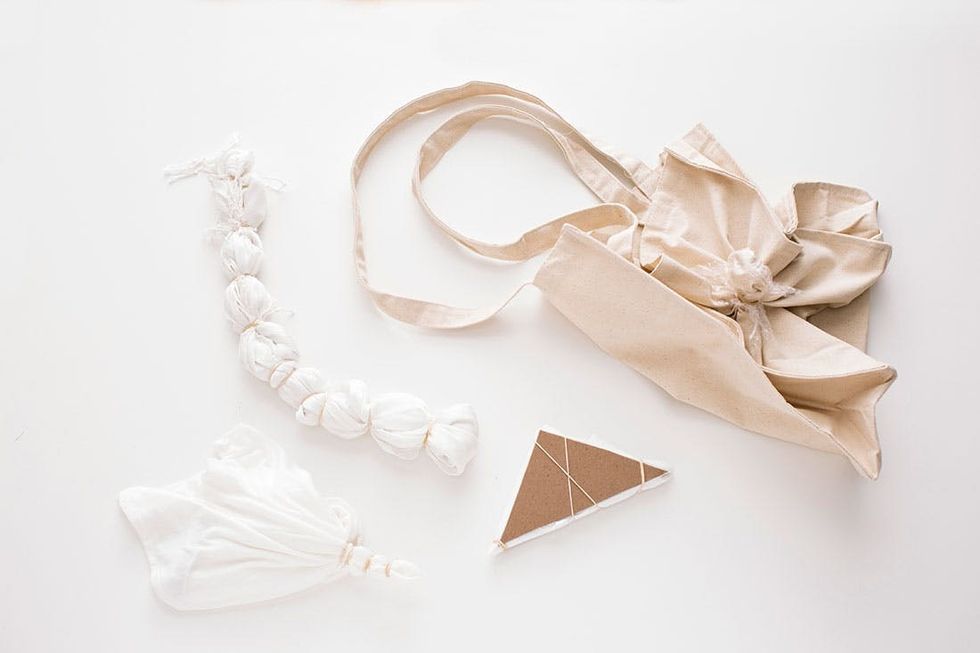
For this design make a diagonal accordion fold and then place rubber bands along the length of the folded skirt about two inches apart. Now, onto scarf prep!
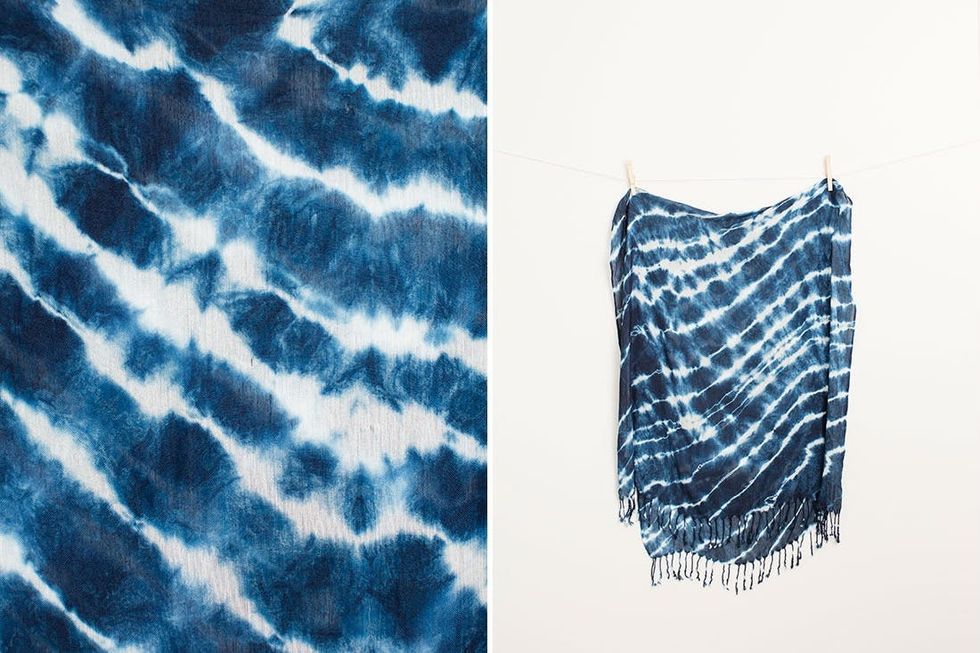
We love how the bright white comes through in the scarf.
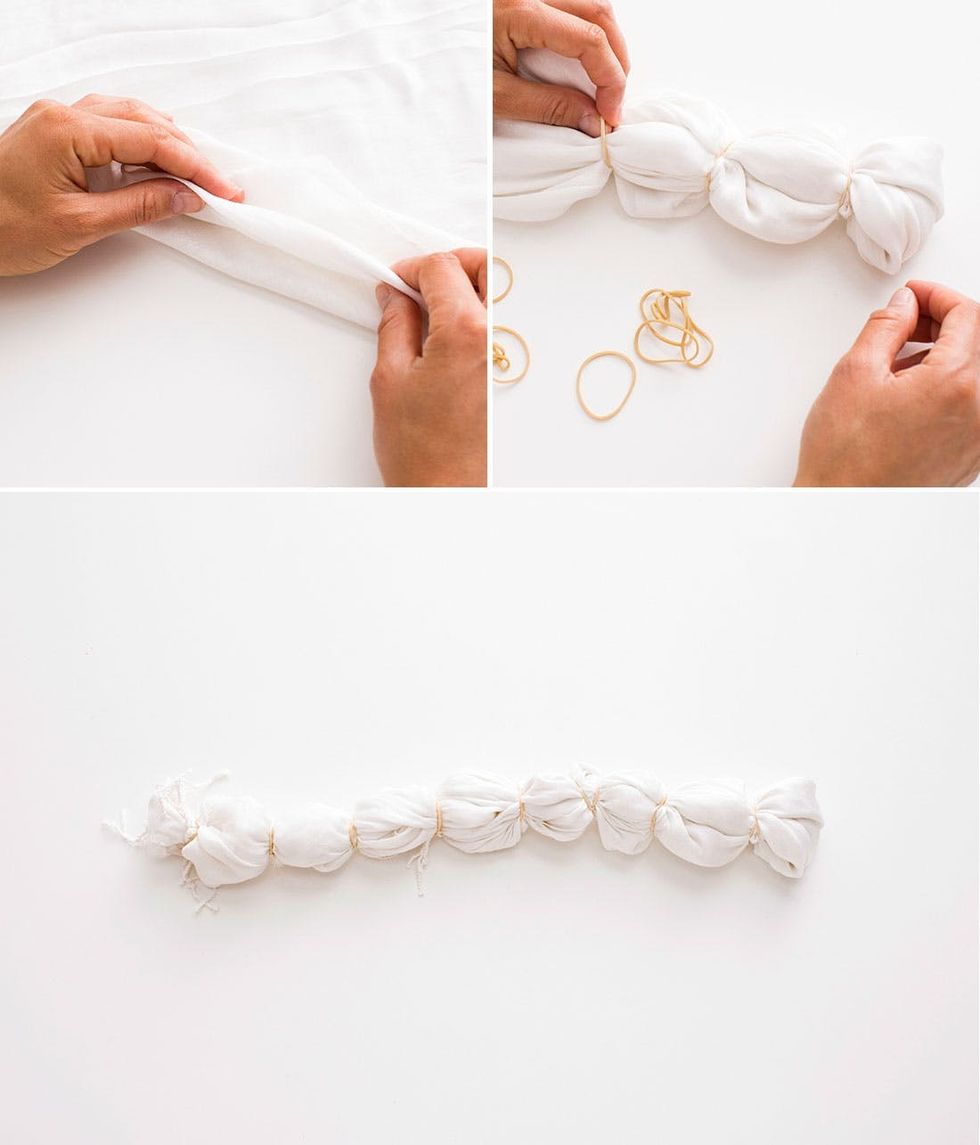
We used the same technique for the scarf except that we folded the scarf in half first to make it a little bit easier to handle. Since the fabric was silky, the folds weren’t perfect, but that’s okay! It created a really beautiful pattern. Who needs symmetry anyways. Now, onto the next technique.
Kapow!

Single Circle
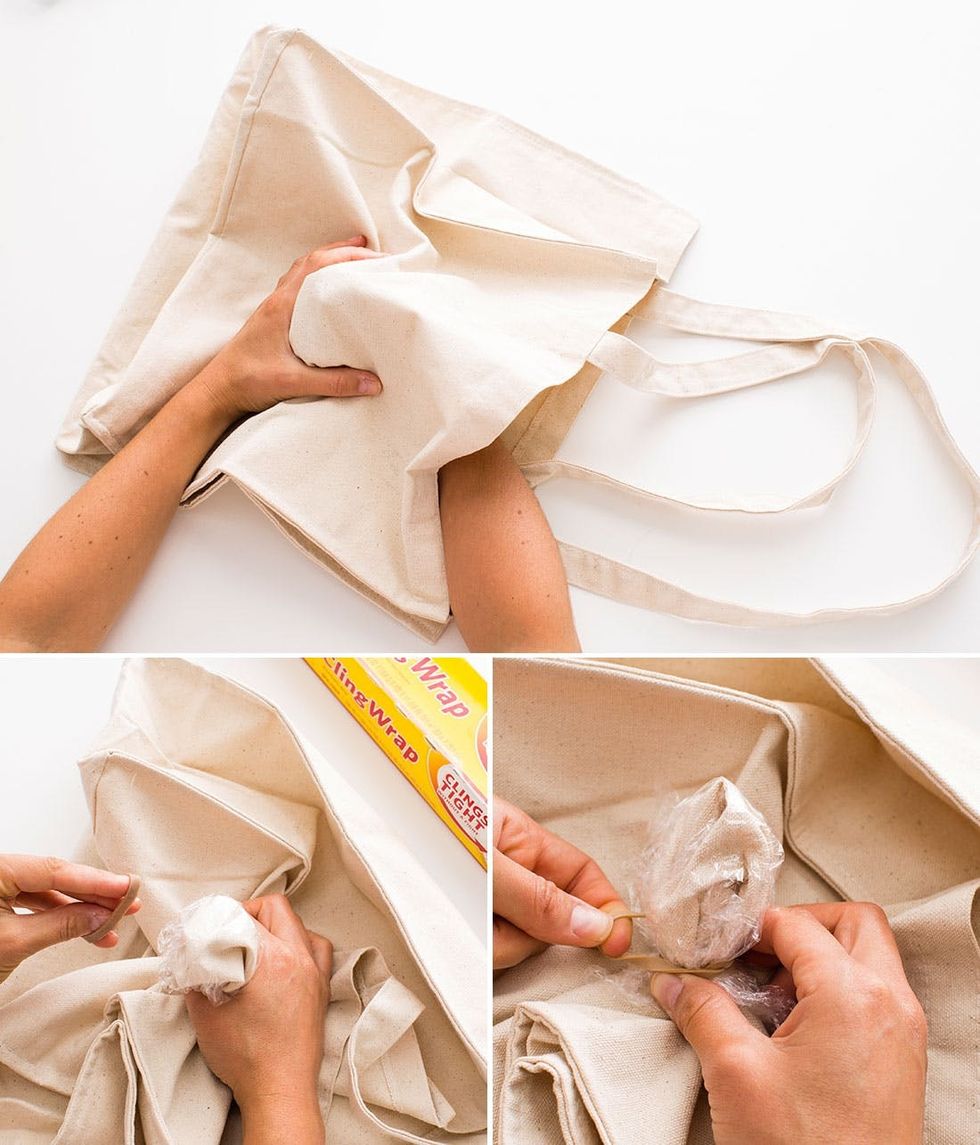
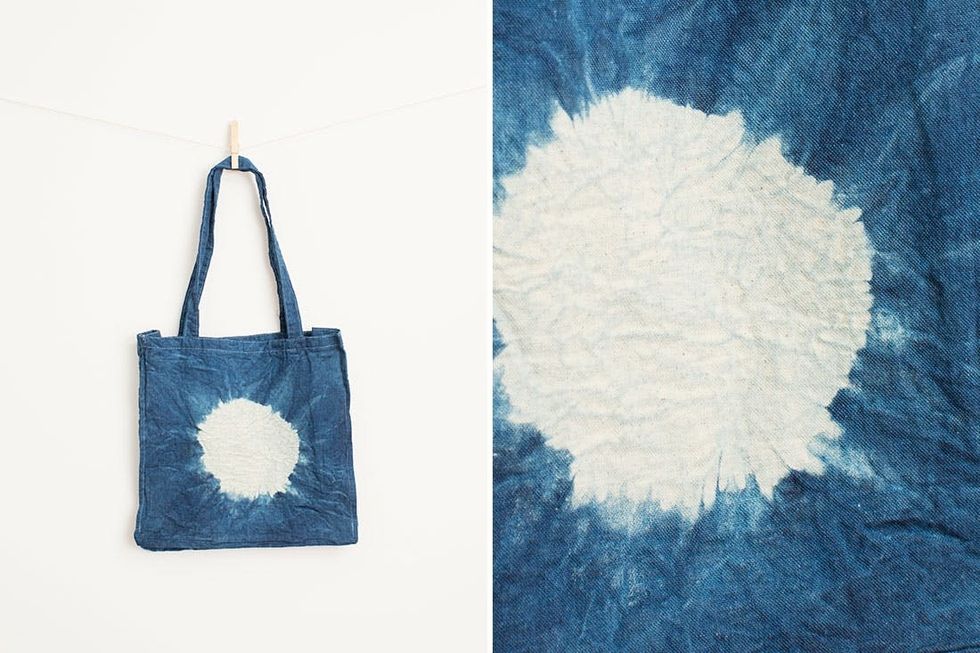
Next up we folded a tote bag. To make a single splotch, cover a fist-worth of fabric with cling wrap and tightly wind a rubber band around the knob of fabric.
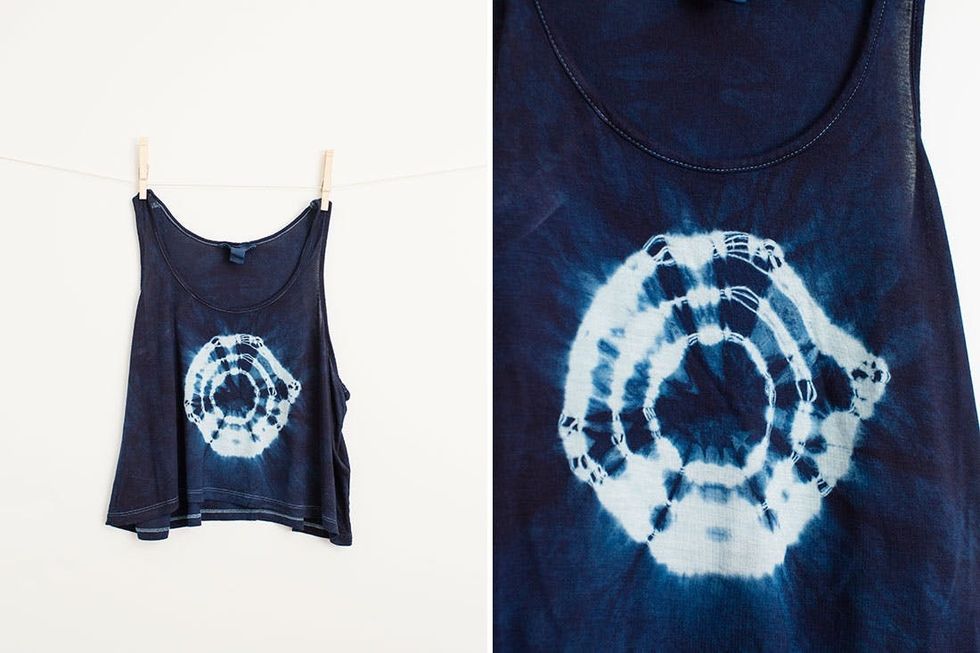
You probably recognize this design, as it is super popular with tie dye fashion.

Concentric Circles
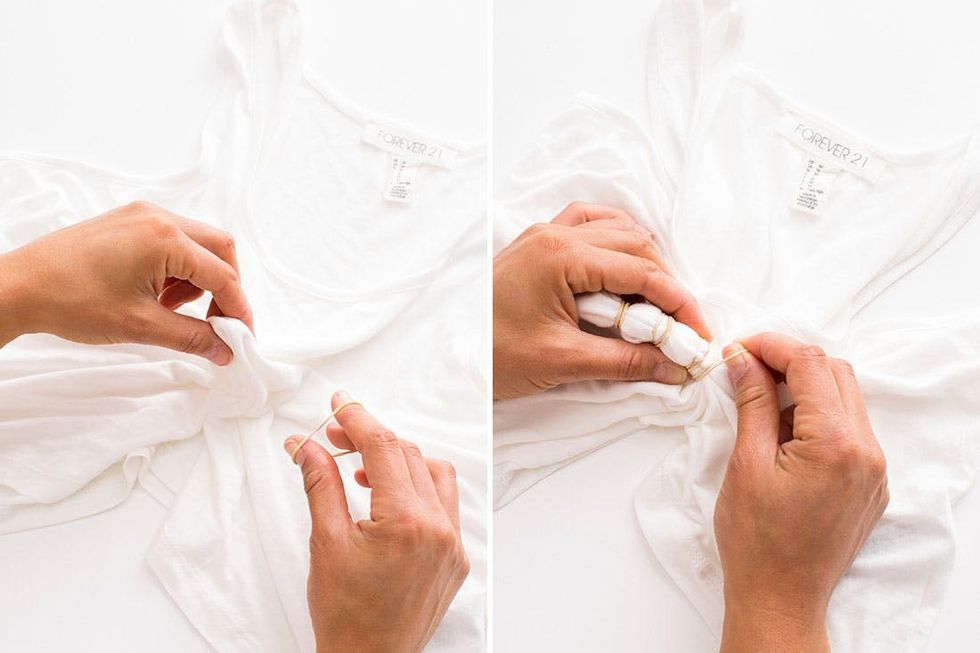
Moving on to the tank top. We made concentric circles for this one. You can also use this technique to create multiple circles all over your garment. Grab a bit of fabric at a point and pull it up. Wrap it with a rubber band about an inch from the tip. Keep adding rubber bands moving down the fabric as you go. The further apart you place your rubber bands, the wider your circles will be.
That’s right — we got a little geometry up in here!

Triangles
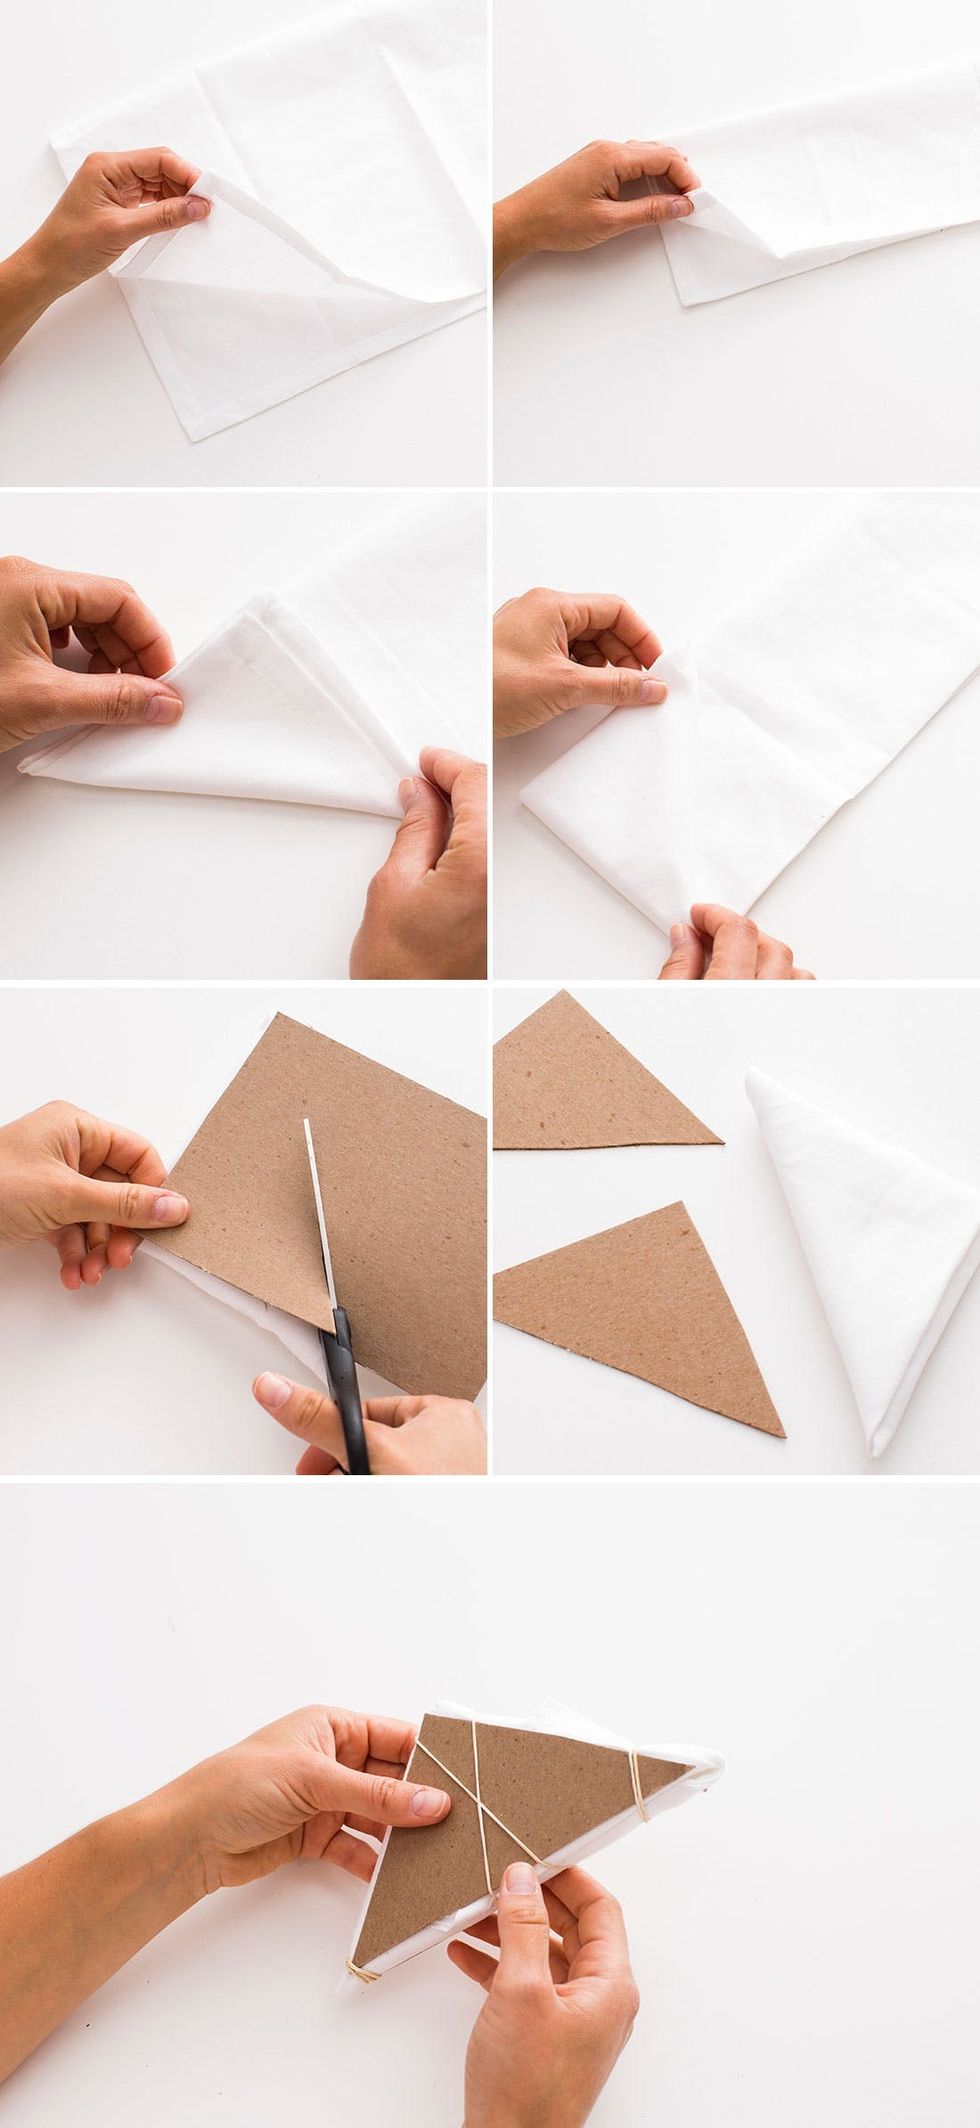
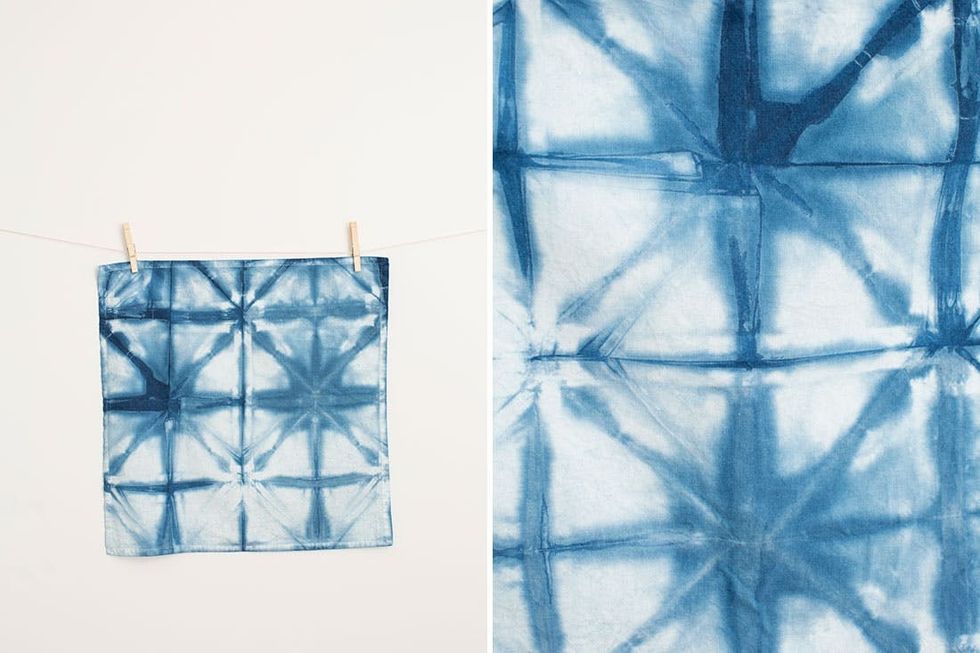
Finally, we dyed a napkin with a triangular pattern. Fold your napkin in half lengthwise and then do that a second time. Now fold the corner on the diagonal creating a triangle. Fold that triangle over itself moving up the napkin until you reach the end. Cut two triangles out of cardboard. These should be the same size as the folded napkin. Place one on each side and add rubber bands to keep the cardboard and folds in place.
Now it’s time to dye!

Once your items are ready, saturate them in clean water. Wring them out and then they are ready to dye!
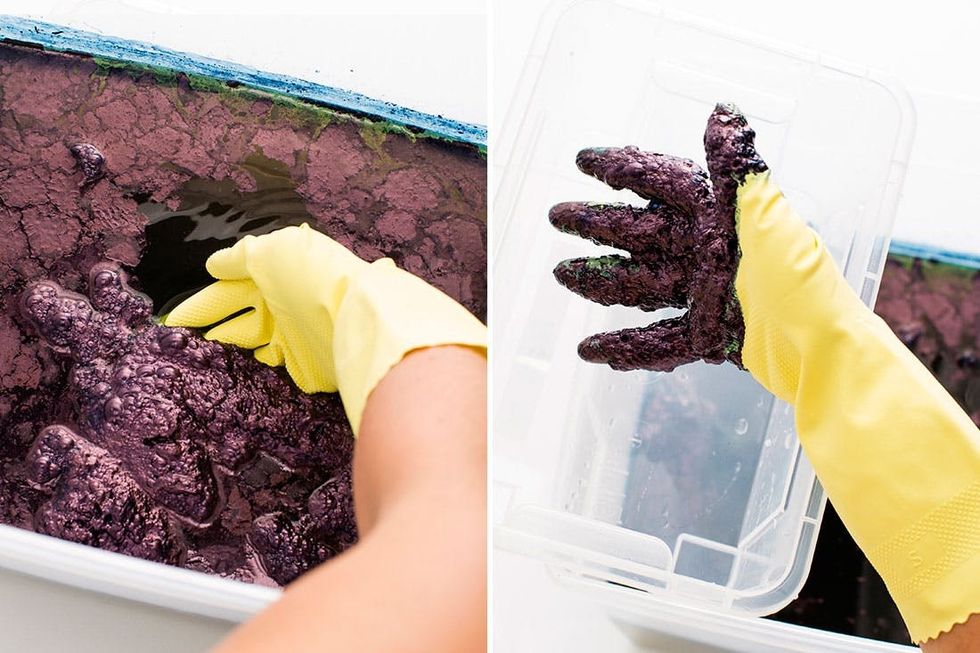
Open the lid on your dye and you will see a top layer of film. Remove the film setting it into a separate receptacle. You’ll actually want to save this if you plan on dying over multiple days.
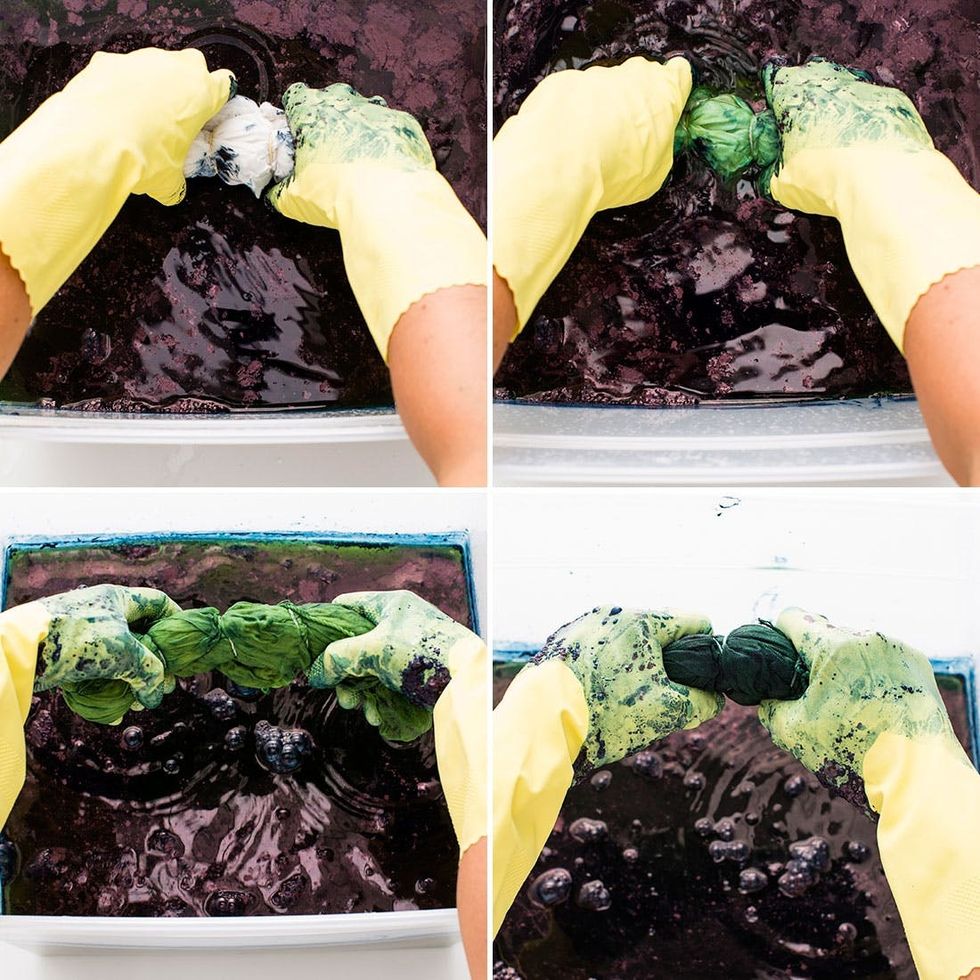
Take your first item and submerge it in the dye. Gently knead it like a cat so that it soaks up the dye. Don’t let it sink to the bottom of the vat because there is sediment down there. You’ll notice that your item looks fluorescent green. That’s not indigo?! No, it’s not, but that’s okay. When the item is left out in the air, it will oxidize and turn blue. So cool!
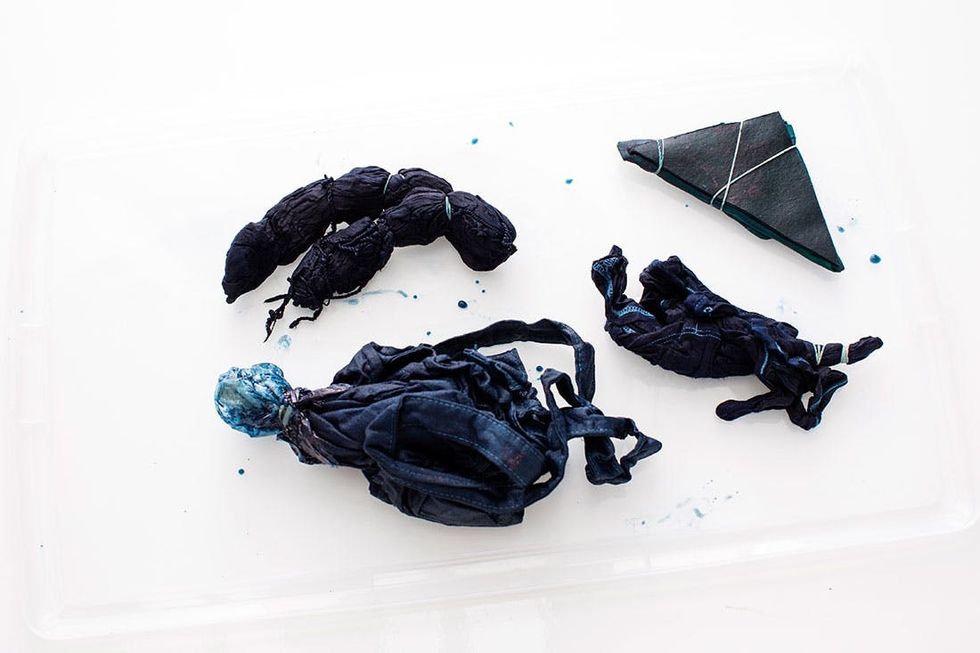
Let your items sit for 20 minutes and then if you want to make them darker, you can dip them in the dye again.
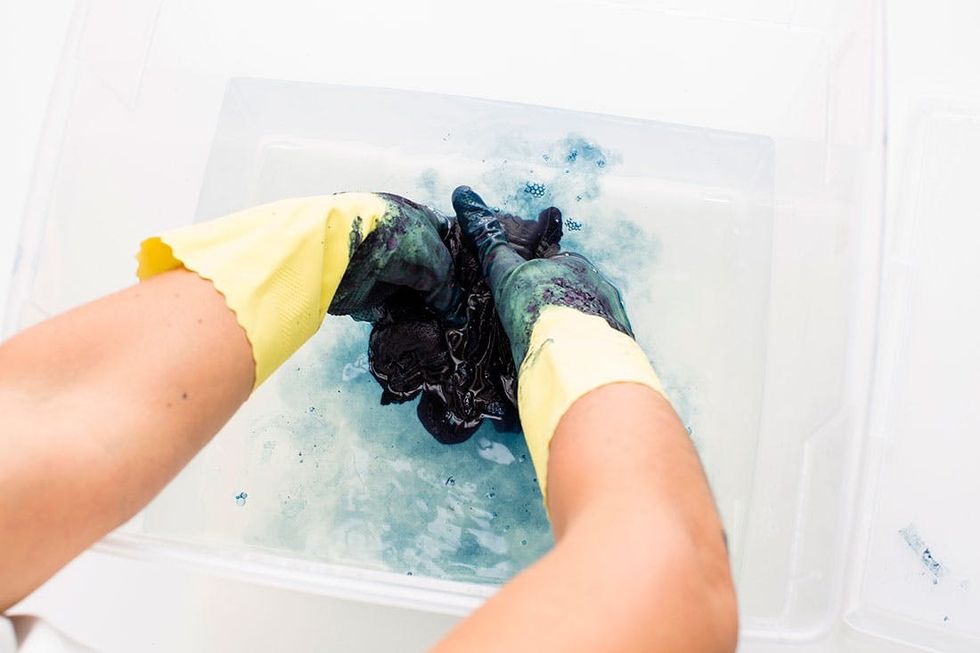
Once you achieve the color you want, rinse your piece in cold water. Take the rubber bands off (it’s easiest to cut them, but don’t cut the fabric!) and keep rinsing. Then put your items in the washing machine with mild detergent. Otherwise you’ll get blue on your skin and look like Tobias from Arrested Development when he was trying out for the Blue Man Group.

When you are done, you can put the top layer of film that you saved back into the vat of dye. Stir it and then cover it with the lid. The dye will keep for a few days. When you are ready to dispose of the dye, we recommend pouring it in your toilet. This is the most environmentally safe way to get rid of dye.

Now, time to wear the rest of these indigo items! Thanks to our gorgeous designer Krystle for modeling :)

Even though the skirt and tank were different fabrics, they both took the dye beautifully.

Such a fun bag!
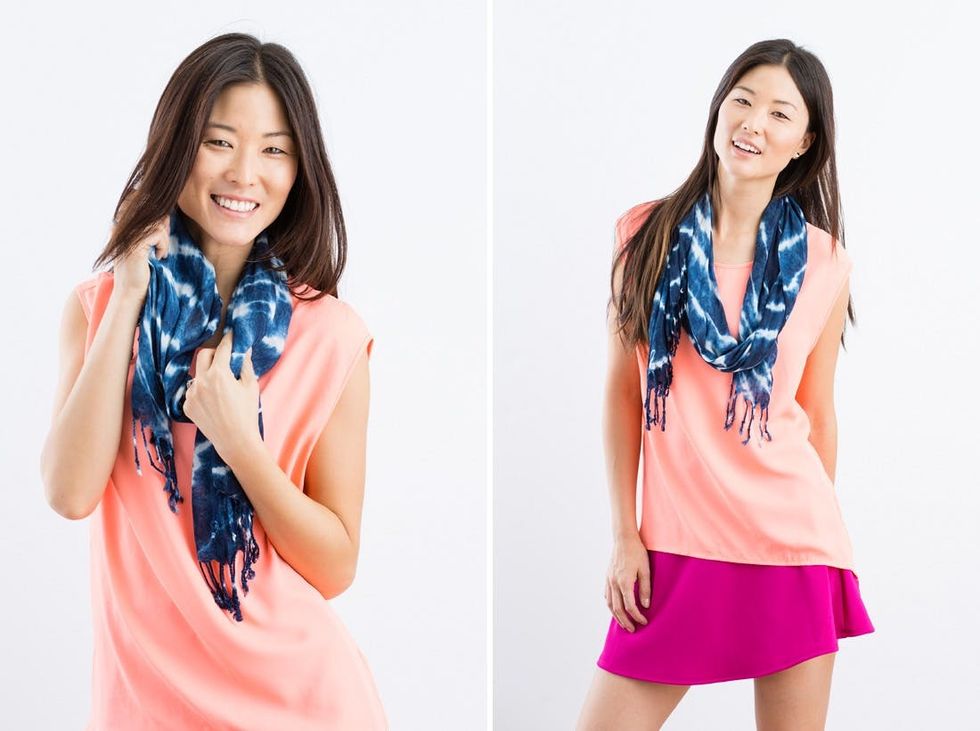
Love the combo of color blocks and indigo!

Neighbors are funny. I'll occasionally have a quick chit-chat with mine as we cross paths by our mailboxes, and our conversations always seem to revolve around the same three topics: the weather, upcoming vacations, and home upgrades. My latest landscaping project got a few nods of approval — even from my least neighborly neighbors. The tree encroaching on their solar panel? Not so much. But hey, they notice, and there’s something undeniably satisfying about earning that neighborly thumbs up.

Here are 25 budget-friendly home upgrades that will impress your neighbors!

Etsy

Update Your House Numbers

This is such a simple fix that delivers a big impact. Update your house numbers to something a bit more modern, like these Etsy House Numbers, and you'll feel an instant refresh to your exterior.

Shutterstock

Give Some Landscaping Love

You can start small here, add a tree, a shrub, some grasses, but adding greenery that matures over time will enhancing your yard’s overall aesthetic and the value of your home. Take cues from your lifestyle too. Sod might be the ideal choice for running, playing, and family fun. Live in a dry climate? Opt for drought-tolerant plants and decorative rocks to create a low-maintenance, water-efficient landscape.

Shutterstock

Paint Your Door

A fresh coat of bold or classic color on your front door can instantly enhance its curb appeal, and surprise your neighbors in a good way.

Shutterstock

Add Outdoor String Lights

These are pretty affordable and so charming in trees and on fences, creating a cozy vibe for your outdoor space.

Wayfair

Install Window Boxes

This has been on my home bucket list since traveling around Charleston, S.C. I love a good flower box display, whether it's colorful perennials or varying shades of greenery. Check out these affordable Wayfair Planter Boxes.

West Elm

Replace or Paint Your Mailbox

A rusty old mailbox is not giving guests the best first impression. A sleek new mailbox, like this West Elm Mailbox, or a fresh coat of paint can make a big difference.

Shutterstock

Update Light Fixtures

Swap out dated porch lights and install solar pathway lights for a fresh look and more inviting space.

Arian Fernandez

Install Shutters

There's something so classic and European about shutters. Affordable, decorative ones can add charm and dimension to your windows.

Shutterstock

Pressure Wash Your Exterior

Have you spotted those IG videos of people pressure washing their homes? So mesmerizing! Wash off those cobwebs and layers of grime with an Electric Pressure Washer. A clean driveway, siding, or patio can make your home look like new.

Solo Stove

Add a Fire Pit

Build a simple and stylish fire pit with pavers or bricks or shop for one like this modern wood-burning fire pit from All Modern or this option from Solo Stove for a cozy gathering spot.

Shutterstock

Build a Garden Path

Use gravel, stepping stones, or wood chips to create an elegant walkway to your home.

Studio McGee

Hang A Wreath

It doesn't need to be December for you to hang a natural wreath on your door. A seasonal or year-round wreath, like this one from Studio McGee, adds warmth to your home’s entryway.

Eartheasy

DIY Raised Garden Beds

Build a raised garden bed for under $50 with our guide or shop for these lovely cedar ones on Eartheasy. Come spring you'll have plenty of space to plant vegetables and herbs and flowers.

Wayfair

Add A Bird Bath

A bird bath, like this Wayfair Pedestal Birdbath from Kelly Clarkson Home, is a great way to support your local wildlife and pretty up your front yard.

Shutterstock

Paint or Stain Outdoor Furniture

Outdoor furniture gets weathered throughout the year if not protected. Before spring comes, spruce up your outdoor furniture with paint, or a sand and wood stain to give your front yard a polished look.

Shutterstock

Paint or Stain Your Fence

Refreshing an old fence with a new coat of paint or stain will absolutely get neighbors talking.

Amazon

Upgrade Your Door Hardware

Is your door handle looking a bit dated or worn? Replace old doorknobs, locks, or handles with more stylish and modern options, like this Entry Door Handle.

Shutterstock

Add Planters To Your Porch

Planters welcome your guests and frame your porch in an inviting way. Find plants you love and make a great first impression with beautiful planters.

Evelyn Paris

Paint or Tile Your Stair Risers

Paint your stair risers in a fun contrasting or complementary color to your home, or if you want to invest a little more time and money add a decorative tile. I did this with a tile inspired by my trip to Portugal and get compliments all the time! You can also find peel-and-stick floor tile for outside porches.

Wayfair

Add Front Porch Seating

Classic Adirondacks, modern rocking chairs like these Wayfair Rocking Chairs, and swing chairs can make your yard more inviting and useful. I had a total mom win when I saw my daughter reading outside in our new Adirondack chairs.

Shutterstock

Add a Trellis

This doesn't have to be major, but a small trellis around your door can make a big impact come spring when the flowers bloom.

Shutterstock

Wash Your Windows

This is a low-cost way to make your home literally shine.

Wayfair

Hide Trash Bins

Hide any eyesores like trash bins and HVAC units with a privacy screen with a planter for flowers and vines.

Shutterstock

Add New Mulch

Clear any weeds and refresh your mulch to instantly tidy up garden beds.

Etsy

Decorate For the Seasons

Making your entryway festive for the seasons can bring joy and cheer to your neighborhood all year long. This Etsy Doormat is so cute for Valentine's Day!

Check out our online newsletter for more home decor inspo!

Brit + Co may at times use affiliate links to promote products sold by others, but always offers genuine editorial recommendations.

My best friend and I recently had a 3-hour conversation about navigating love in our 30s, coming to the conclusion that our prior breakups helped us become clearer about what we want in love. After we said our good-byes, I started thinking about questions worth asking yourself when you're single.

Unlike some people who tell you not to worry about love when you're not coupled up, I think it actually does help to have an idea about the kind of person and relationship that'll fit in your life when the time comes. I wish it wish it were this easy, but the perfect situation isn't going to fall into your lap — because it doesn't exist. Even now, I'm still learning about myself and my fiancé as we experience life together.

So are you single and trying to understand what you actually want out of your love life? Here are some questions you should ask yourself!

Here are the questions to ask yourself while you're in your single era!

Ivan Samkov

1. Start with questions that focus on you

Either you agree with clichés or you don't. As annoying as they can be, hearing someone tell you to get to know yourself while you're single shouldn't be. It only gets sticky when people tell you that you'll never find love while on your self-care journey. We can agree to disagree with that.
So, what kind of questions should you be asking yourself to get to know your inner workings better?
  • Who do I think I am?
  • What are my favorite qualities about myself?
  • Do I have any habits I want to change?
  • Would I date myself if I were a different person?
  • How do I pour love into myself?

George Milton

2. More questions to ask yourself about who you are

Other questions you can ask yourself can have something to do with your morals or boundaries. It's a way for you to understand areas of your life that you may not always think about everyday.

  • What do I value in life?
  • What kind of boundaries have I set (or need to put in place)?
  • Do I spend a lot of time focused on other people?
  • Do I have religious beliefs?

Vlada Karpovich

3. Think about if you want to be single or in a serious relationship

Once you have a better understanding of who you are, think about the kind of romantic love you'd like to have in your life. There's a chance you're not even interested in a serious monogamous relationship right now and that's okay. The point is to get clear about what you do want.

Start asking:

  • Am I okay with being single or do I feel pressured to settle down?
  • Do I care more about dating several people or choosing one person to romantically connect with?
  • Is there a reason I wouldn't want a long-term relationship?
  • Is it hard to be vulnerable whether I'm looking for something short-term or long-term?

Yan Krukau

4. Revisit past flings and relationships

Though tempting, this isn't a confirmation that you should call the ex you've been thinking about. Rather, take the time to revisit what you think did or didn't work.

  • What brought me joy about prior flings or relationships?
  • Was there mutual respect between myself and former romantic partners?
  • Did I or former partners feel possessive of each other?
  • Did I ever feel afraid for my safety in prior relationships?

Gustavo Fring

5. Allow yourself to be curious about the kind of partner you're attracted to

I'm not asking you to 'listen and judge' yourself for who you're typically attracted to. We all have our reasons why certain people make our hearts race even if said people aren't the greatest for us in the long run. This is the time to be curious about who you're drawn to and why.

  • Am I drawn to people's physical appearance first or their personality?
  • What kind of qualities am I attracted to overall?
  • Have I ever ignored red flags because I thought someone was attractive?

Anna Pou

6. Think about the kind of long-term relationship you'd like to have

Ready for something serious? There's still some questions you should ask yourself before jumping into something new.

  • Am I capable of trusting someone new?
  • How do I want to feel in a new romantic relationship?
  • What are my goals if I decide to pursue a long-term relationship?
  • How would I like to handle potential disagreements in my new relationships?
  • What are my dealbreakers?

These questions may seem like a lot, but it's a way to help you understand how you want your love like to look. Also, there's a possibility you could encounter scenarios that may not fit under these questions because life can be full of surprises. All that matters is you're able to have a better understanding of who you are and what you want in 2025.

Subscribe to our newsletter for more Valentine's Day-inspired stories!

For as many amazing finds Costco has (looking at you, almond croissants and heart-shaped ravioli), there are still quite a few items worth skipping. Whether it’s due to texture, taste, or value, Costco shoppers are quick to clock the worst items between the aisles.

The latest discovery is an unassuming frozen meal that looks great from the outside, but the inside? That’s a whole different story.

Scroll on to discover the Costco item shoppers are calling “awful” and even “the single worst thing” they’ve bought there.

Reddit

Meet the Snapdragon Chicken Pad Thai, a microwavable meal that includes chicken, rice noodles, bell peppers, and bean sprouts in a “tangy” stir fry sauce. The item was surfaced to the Costco community by a Reddit user that definitely had a bone to pick with it.

“This was not a good choice,” they wrote. “The sauce was absolutely dry and the mix of undercooked noodles was not a pleasant experience. Even added a bit of water to the tray, after the general cooking time, to bring some moisture to it. Didn’t work.” Oof.

Snapdragon Food

Now, one shopper with a single negative review is one thing, but many more fellow Costco patrons chimed in re: the disappointing nature of the Pad Thai on the same Reddit thread.

“I'm surprised Costco still carries this,” one person wrote. “I thought it was awful.”

“It was so awful,” another said. “I couldn't make myself eat it.”

“Might be the single worst thing we’ve bought from Costco,” one more user commented.

Nadin Sh / PEXELS

A lot of people also noted that the noodles in the dish were dry, the chicken was not of good quality, and that the overall flavor was lacking – which, according to my hunch as a food lover, is a simple lesson that authentic international dishes shouldn’t always be replicated in a quick and convenient, “heat and eat” format.

So, all this to say: if you’re craving Pad Thai, it’s best to skip this Costco pick and order takeout from your local Thai joint. It's always better fresh!

Subscribe to our newsletter for more Costco finds!