How to Make a Triangular Wall Storage System
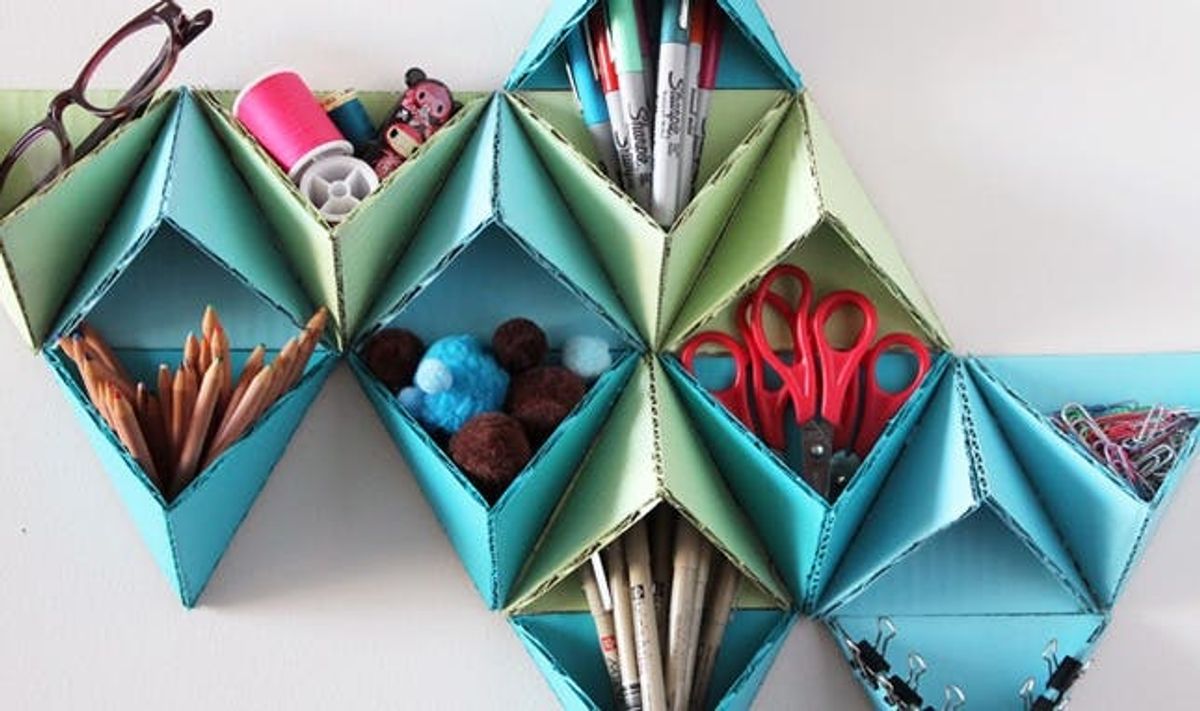
In rounding up awesome geometric objects for the home, we came across this handy little kit for making your own geometric wall caddy. Naturally, we had to figure out to make it ourselves, and using materials we already had. The result? A playful collection of wall triangles perfect for storing pens, pencils, pom poms, and more. Best of all, you can make this for under $10.

Materials:
– cardboard

– spray paint

Tools:
– ruler

– pencil

– scissors or xacto knife

– hot glue gun

For our color palette, we went with cool tones – sea foam green, sky blue, and a bright cerulean.

Print out our triangle template and cut. Trace all three pieces onto cardboard for however many little triangles you want to make. To create the design above, we used 15 triangles (with about 8 of them being functional for storage). Use an xacto knife or scissors to cut out all your pieces.

Now you should have a pile that looks like this.

Use hot glue to glue edges together. The larger triangle is the back base and the two smaller ones go in the front as side panels. You can be sparing with the glue – you don’t want too many globs to peek out.

Here is what our first finished triangle looks like.

Now to paint them, lay them out on a piece of cardboard or a drop cloth.

Spray paint them in whatever colors you like – we recommend 2 coats though some lighter colors may call for 3. If you’re feeling fancy, you can spray paint with primer before adding color, and seal the whole thing off with spray shellac.

Let dry for at least an hour before mounting to your wall. They’ll be dry to the touch after 20 minutes, but you don’t want to end up with spray paint on your wall.

Before heading to the wall with your mounting tape, plan out a design. We played with 4 different designs on the floor before settling on one.

Now, use mounting tape to attach to the wall in your chosen design.

It looks pretty awesome just as a piece of wall art, don’t you think?

Fill with pens, pencils – whatever you like. This could also be great for organizing accessories or craft supplies like buttons, pom poms, and the like.

How do you keep things organized? Any homespun caddy or organizer projects we should know about? Talk to us in the comments below.

Whenever our kitchens are a mess — it tends to feel like a metaphor for our life also being somewhat of a mess. You know the scene: When there are baking dishes and leftovers all over the place, mismatched Tupperware pieces spilling out of your cabinets, restocked pantry goods haphazardly stuffed into the wrong spots... It can be hard to deal when our kitchens are out of sorts.

If you're looking to declutter your kitchen, then you've come to the right place because we rounded up some of the coolest kitchen cabinet organizers and organization inspiration for your own kitchen in 2023. These babies save space without sacrificing style, which will make whipping up those one pot spring dinners way more fun. Keep reading for everything you need to know about how to organize kitchen cabinets.

How To Organize Kitchen Cabinets

Photo by RDNE Stock project

The most important thing to focus on when organizing your kitchen cabinets is maximizing space. That just means making the most of the space that you have, because no matter how big your cabinets are, if they're filled to the brim with items that don't have a dedicated spot, it's going to feel cluttered.

Focus on keeping similar items together, using up vertical space by stacking where you're able (like with bowls or glasses) and making sure that every object has a dedicated space.

Kitchen Cabinet Organization Ideas

Brit + Co

Use your cabinets to hold more than just kitchenware — display books and plants to bring some personality into your kitchen. You don't have to save all the fun for your bedroom and living room!

Image via Beazy/Unsplash.

If you live in a small apartment, or just don't have cabinets, you can still take part in the fun. Use the space above your sink or your countertop to add your own shelves. This is a great option because when you're doing it yourself, you can customize the storage to your needs.

PMQ For Two

If you don't want to stack your plates (or you don't have the room for all the designs to have their own stacks), set them upright instead with a DIY plate rack. (via PMQ For Two)

Brit + Co

Okay, so this one isn't technically cabinet organization, but it will definitely save you room in your cabinets. DIY this wine rack that will move your wine bottles from your cabinets onto the wall and add color to your room at the same time.

The Home Edit's organization tips are totally inspiring thanks to their efficiency and their color. Grabbing bins from somewhere like The Container Store or Target can help you contain your products so they don't end up spread across your shelf, and they also make it easier to stack your items since they won't fall over.

Don't underestimate the power of labels. When you buy your bins, tubs, and other organizers, write what you intend to store inside on all the containers and make sure that the corresponding product is always inside. That way, you'll have one bin of flour instead of multiple half-empty bags. Plus, it just looks prettier!

Image via roam in color/Unsplash.

For a quick update on the system you already have, stack your plates so that like plates are together, with the biggest plates are on the bottom — this will ensure they sit together in a way that takes up the least amount of room.

Make sure all the rims of your glasses are touching when storing them in your cabinets, and when you're organizing mugs, face the handles toward each other so there's less empty space and more room for new mugs. Because let's be honest, we can always buy new mugs.

A Beautiful Mess

Don't forget to use up the space on top of your cabinets too! Grab some baskets to organize new bottles of olive oil, bags of coffee, or cleaning supplies that you get from the store. (via A Beautiful Mess)

Kitchen Cabinet Organizers

If you love to stay hydrated (ie: you have nine water bottles in your cabinet), then you should grab a product like this YouCopia UpSpace Bottle Organizer ($25+). It'll keep all your water bottle snug together so that you have more room for all your mugs. Speaking of...

The great thing about these Better Houseware Undershelf Cup & Mug Hooks ($10 for two) is that since they hook around the top of a shelf, they don't take up any room at the base.

One way to make sure you save room is to use up vertical space instead of horizontal space. That's why we love the Chrome Roll-Out Bakeware Organizer ($66), which stacks all your muffin tins and cookie sheets on their end. Trust us: this will save you tons of room.

Your fruit deserves a comfy spot to hang out in, so grab a Macrame Fruit Hammock ($30) that will keep fruit off the counter. Cute!

The great thing about a container like the Everything Organ Cabinet Depth Pantry Bin ($101+) is that it's clear because you know what you have at all times. You won't have to pull out the bins to see what's inside!

Use an Expandable Countertop Organizer ($38) in your cabinets — or use it on your counter to clear out your cabinets). We love that this pick's expandable because that means you can move it around to different areas, no matter how big the area is.

A pot organizer like this one from MUDEELA ($22) will keep all your pots and pans together, and you won't have to put up with the noise of when they're stacked on top of each other.

You can't forget about the spices! A rack like this Spice Rack($25) will keep all your spices together and make accessing them a whole lot easier.

Some mDesign Metal Pull-Out Baskets ($21) will create organization within your cabinet the way that cubes do. It's like a two-in-one storage space!

Check out our email newsletter for more kitchen cabinet organization ideas, and more cleaning tips and tricks.

Brit + Co may at times use affiliate links to promote products sold by others, but always offers genuine editorial recommendations.

Target is full of hidden gems, but around this time of year, you don’t have to look too hard to find the cutest Christmas decorations. They have everything from holiday tableware to Christmas lights, and I’m especially stoked about their adorable ornament selection. If you need to up your Christmas decor game, you came to the right place. Scroll on for the best Target Christmas decorations of 2024 that provide an instant happiness boost.

Our fave Target Christmas decorations you can snag this season:

Target

Wondershop LED Neon-Style Waving Gingerbread Man Light

This jolly lil' guy ($35) is perfect for setting up in your entry way for a holly-jolly welcome every time you come home.

Target

Threshold x Studio McGee Mixed Plaid Woven Stocking

This super-soft $15 linen stocking defies designs of years past with a cozy colorway and some contrasting patterns, so it'll undoubtedly be a stylish upgrade for your mantle.

Target

Wondershop 3-Piece Metal Nativity Scene

The simplicity of this $15 gold nativity scene make it such a seamless match with all of your existing Christmas decorations.

Target

Wondershop Battery-Operated Lit Ceramic Christmas Tree

This vintage-inspired Christmas tree light ($15) will look so cozy when you add it to your Christmas set-up. Plus, the bulbs add unparalleled levels of cheer and color for the season!

Target

Stanley Water Bottle Keychain & Ornament

Stanley lovers, rise up! This toy-sized ornament will let everyone know your affection for the beloved tumbler. The lid actually screws off so you could stow away little candies, a tube of lip gloss, or even slide in a sly $20 bill to make for a nice stocking stuffer. This $10 piece also doubles as a keychain, so you can use it year-round!

Target

Threshold Plaid Tablecloth

Plaid is timeless for the holiday season, so if you've got some potlucks and dinner parties planned to celebrate with loved ones and friends, this chic $20 tablecloth will instantly elevate your hosting game!

Target

Featherly Friends Christmas Bird Figurine

I can't get enough of this series of cute little bird figurines Target tends to debut around the holidays! This one is 'fitted up with earmuffs, a jacket, and scarf, all while holding out a perfectly-wrapped gift to usher in the giving spirit of Christmas.

Subscribe to our newsletter to shop more Christmas + holiday decor!

Brit + Co may at times use affiliate links to promote products sold by others, but always offers genuine editorial recommendations.

It’s a happy day when we get to put away our sweaters and jackets and pull out our sundresses and sandals for warmer weather, which (we swear) is just around the corner. Organizing your closet can seem like a daunting task, but creating a simple system for success can make it manageable and even enjoyable. When you start each morning by opening your closet and see the picture perfect image of organization, you know you’re going to have a good day. Not only does it look good, but it makes getting ready so, so much easier. We talked to THE queen of organization, Jill Pollack, who runs a whole business helping women get organized. Here’s what she told us.

Hack 1: Keep your staples front and center

Photo by Liza Summer

“People always ask me, ‘what’s your system?’ But it’s different for everyone,” Pollack says. “Do you think a skirt is casual? Do you wear more color or neutrals? For many people, their work and going out attire overlap.” Pollack recommends that instead of sectioning your closet into work clothes, going-out clothes and the like, think in simple terms and keep your staple items in front so they are easy to find. “Black tie clothes are for a rare occasion, so stick them in the back of your closet or a whole other closet all together.”

Hack 2: Don't be overly sentimental

Photo by Kassandre Pedro

You must learn to let go of those items you are never going to wear, like the jeans you keep thinking you’ll fit into someday or the t-shirt that you wouldn’t be caught dead in but reminds you of freshman year of college. “If you haven’t worn it in over a year and your weight and lifestyle have stayed pretty much the same, pass on it,” Pollack says. Other items Pollack says you need to chuck — anything irrevocably stained, not worth repairing, clothes you’ve tried on at least three times this year and rejected and items that make you feel unattractive.

Hack 3: Store seasonal items cleanly and neatly

Shutterstock

Pollack says the best way to keep your clothes in good shape when you are going to go months without wearing them is by first making sure they are clean, neatly folding them and sticking them in a cedar chest.

Hack 4: Create a system for shoes based on your closet size

Photo by Anastasia Shuraeva

Unless you have a shoe organization system set in place, your shoes are going to end up in a big heap on your closet floor. “If you have room for shelves, I like putting shoes there, at eye level,” Pollack says. “If you have a lot of closet floor space, I like double and triple shoe racks. But a hanging shoe rack works too.”

Shop Closet Organization Items

Amazon Basics Non-Slip Suit Clothes Hangers

Follow us on Pinterest for more design inspo!

This post has been updated.

Main image by Anastasia Shuraeva

When it comes to prepping Thanksgiving dinner, we'll take any make-ahead ideas we can get. That's why we are *obsessed* with this insanely yummy mashed potato recipe from Half Baked Harvest. Easy to make, delicious to eat, and even better to check off your to-do-list, these mashed potatoes are rich and full of garlicky goodness. We'll let Tieghan Gerard take it from here!

Make Ahead Roasted Garlic Mashed Potatoes, the best holiday mashed potatoes. Made simply with sweet roasted garlic, fresh herbs, and salted butter. Each bite is perfectly smooth, creamy, and so delicious. The secret? Cooking the potatoes together with the milk and cream, then adding in roasted garlic cloves for a delicious garlic flavor that isn't overpowering. This method makes for the creamiest and most flavorful mashed potatoes. They're perfect for making ahead of time for easy entertaining!

What's the secret to these potatoes?

Half Baked Harvest

Two things… first, the roasted garlic. Roasting the garlic adds just the right amount of garlic flavor that's delicious but not over powering.

Second, cook the potatoes together with the milk and herbs. This means no boiling the potatoes, no extra steps, nothing fancy. It turns out that creating almost perfect mashed potatoes is actually really easy.

The Steps — Roast The Garlic

Half Baked Harvest

Start with the garlic since it takes time to roast in the oven. If you've never done it before it really adds a layer of deliciousness to your recipes.

Simply slice the top portion of the garlic head off to reveal the cloves. Then place the garlic on a small piece of foil, drizzle with olive oil, and wrap the garlic up. Roast for about forty minutes, until the garlic is deeply golden and soft.

Then simply squeeze the cloves out of the garlic skin.

Meanwhile, Make The Potatoes 

Half Baked Harvest

Combine the potatoes with the milk and cream in a large pot on the stove. Add the herbs, then cook until the potatoes are tender. This will take about twenty-five minutes or so. Once the potatoes are cooked, drain them, BUT, be sure to save the cream – you'll need it!

Now, the potato ricer…it's key to making ultra-smooth mashed potatoes. Do you have to have a potato ricer? No, a good ole masher works too. But if you want the smoothest mashed potatoes, a ricer works really well.

Half Baked Harvest

Take the mashed potatoes and those roasted garlic cloves and put them right back into the pot. Then add back the cream and also add some butter. Cook until the butter is melted…and that's it…the most perfectly flavored creamy mashed potatoes!

Honest these are the BEST – classic, but with amazing flavor and texture.

The added bonus is just how easy these are to make…and that you can make them ahead of time. Steps for warming in the oven, slow cooker, or on the stove are listed in the directions!

Make Ahead Roasted Garlic Mashed Potatoes

Half Baked Harvest

Ingredients:

Directions:

  1. Preheat the oven to 400° F.
  2. Slice off the top portion of the garlic head to expose some of the cloves. Place the garlic on a piece of foil. Drizzle with olive oil, wrap it up, and bake for 40-55 minutes, until deeply golden and very soft.
  3. Let the garlic cool, then squeeze out the cloves.
  4. Meanwhile, In a large dutch oven, combine the potatoes, heavy cream, milk, sage, and thyme. Bring to a gentle boil over medium heat and cook 20-25 minutes, until the potatoes are fork-tender.
  5. Drain the potatoes, reserving all of the cream. Discard the thyme and sage. Press the potatoes and roasted garlic cloves through a potato ricer. Then add them back to the warm pot. Alternately, you can add the potatoes back to the pot and mash with a potato masher.
  6. Over low heat, add 1 1/2 cups of the reserved cream and the butter. Continue to add more of the cream until your desired consistency is reached. Season the potatoes with salt and pepper.
  7. If desired, brown a little butter with sage or thyme and swirl into the potatoes before serving. Serve warm and creamy.

To Make Ahead:

  • In the Oven: Prepare the mashed potatoes as directed through step 6. Spoon the potatoes into a large baking dish. Cover and refrigerate for up to 3 days. To reheat in the oven, preheat the oven to 325° F. Pour 1/2 cup milk or cream over the potatoes and add 2 tablespoons butter, do not stir. Cover the potatoes tightly with foil and transfer to the oven. Cook for 20-25 minutes, or until the potatoes are warmed through. Stir before serving.
  • Slow Cooker: Prepare the mashed potatoes as directed through step 6. Spoon the potatoes into the slower cooker, cover, and keep on low for up to 4 hours. About 30 minutes before serving, turn the heat to low or high, add 1/2 cup heavy cream and 2 tablespoons butter, do not stir. Cover and let the cream warm and the butter melt. Stir before serving.
  • On the Stove: Prepare the mashed potatoes as directed through step 6. Add 1/2 cup cream and 2 tablespoons butter. Place the potatoes over low heat, gently stirring until warmed throughout.

Want more mashed potato recipes? Be sure to sign up for our email newsletter!

This post has been updated.

If there's one thing that unites all teen TV shows, it's consistently casting people who are way too old to play high schoolers. Riverdale, One Tree Hill, and even Stranger Things have all fallen victim to this trend, boasting a lineup of beefy, chiseled actors who are supposed to be 15 years old. And Outer Banks is no exception.

OBX season 4 part 2 drops on Netflix November 7, and if you're like me, you're going down every rabbit hole to find out as much as possible about your favorite Pogues, which is why I scoured the internet to figure out the actors' ages — and how they compare to their character ages (including the cast member that's almost TWICE their character's age). Keep reading for the full scoop!

The 'Outer Banks' Cast Ages Vs. Their Characters

Jackson Lee Davis/Netflix

Madelyn Cline as Sarah Cameron

Sarah Cameron is 19 years old in Outer Banks season 4, while Madelyn Cline turns 27 on December 21.

Jackson Lee Davis/Netflix

Rudy Pankow as JJ Maybank (or is it JJ Groff now?)

JJ Maybank is around 19 years old when Wes Genrette asks the Pogues to find Blackbeard's treasure. Actor Rudy Pankow is 26.

Jackson Lee Davis/Netflix

Chase Stokes as John B. Routledge

While fearless leader John B. Routledge is also around 19, Chase Stokes is actually 32 years old. That makes him 13 years older than John B.!

Jackson Lee Davis/Netflix

Madison Bailey as Kiara Carrera

In Outer Banks season 4 Kie Carrera's 19 years old. In real life, Madison Bailey is 25.

Jackson Lee Davis/Netflix

Carlacia Grant as Cleo Anderson

Cleo Anderson seems to be around the same age as the rest of the Pogues, which would make her 19. Actress Carlacia Grant is 33 years old.

Jackson Lee Davis/Netflix

Jonathan Daviss as Pope Heyward

Pope Heyward is in the same grade as JJ, Kie, and John B., which would mean he's also 19 during Outer Banks season 4. Jonathan Daviss turned 24 in February.

Jackson Lee Davis/Netflix

Drew Starkey as Rafe Cameron

Rafe Cameron started the series at 19, which would make him 22 now. Drew Starkey just turned 31 on November 4. (Happy late birthday Drew!)

Jackson Lee Davis/Netflix

Austin North as Topper Thornton

Topper Thornton is probably 19 years old in OBX 4, while Austin North is 28 in real life.

Check out How Old The Bridgerton Cast Is for more shocking celeb revelations ;).