 Recommended for you


 If you've ever watched those intricate and mesmerizing cake frosting videos on Instagram and thought to yourself, "Man, I wish I could do that," you finally can. Mandy Merriman, the brilliant sweet-tooth behind Baking with Blondie, has a new cookbook in which she breaks down how to bake and decorate cakes with the confidence of a pro. Cake Confidence ($17) features recipes for decadent, show-stopping cakes with easy-to-follow step-by-step instructions that even the most beginning baker can master. Start swiping to follow Merriman's tutorial for decorating a layer cake so you can bring your own certain hand to your next bake.
 On the top of a turntable fitted with a non-slip mat, place a small layer of tape on a cardboard round the next size up from the size of cake you’re decorating. So a 6-inch taped to an 8-inch, or an 8-inch taped to a 10-inch, and so on.
Place a cardboard cake round the same size as your cake in the center of the larger cardboard round and press firmly to stick.
On the top of a turntable fitted with a non-slip mat, place a small layer of tape on a cardboard round the next size up from the size of cake you’re decorating. So a 6-inch taped to an 8-inch, or an 8-inch taped to a 10-inch, and so on.
Place a cardboard cake round the same size as your cake in the center of the larger cardboard round and press firmly to stick. Add on a touch of buttercream in the center of the smaller cardboard cake round to act as glue for the bottom cake round.
Using an offset icing spatula, spread out the buttercream in a nice even layer. (Don’t spread it too thin, though; just a little bit.)
Add on a touch of buttercream in the center of the smaller cardboard cake round to act as glue for the bottom cake round.
Using an offset icing spatula, spread out the buttercream in a nice even layer. (Don’t spread it too thin, though; just a little bit.) Place the first cake round in the center of the small cardboard round. Make sure there’s even spacing from all the edges.
Pipe on an even layer of buttercream.
Place the first cake round in the center of the small cardboard round. Make sure there’s even spacing from all the edges.
Pipe on an even layer of buttercream.  Spread the buttercream evenly with the offset icing spatula.
Place the next cake layer on top. Look at the cake at eye level to make sure it’s straight.
Spread the buttercream evenly with the offset icing spatula.
Place the next cake layer on top. Look at the cake at eye level to make sure it’s straight. If you are planning on adding a filling, spread a thin layer of buttercream on the cake round.
Next, pipe a dam around the outside rim of the cake layer. This will keep the soft filling inside without leaking.
If you are planning on adding a filling, spread a thin layer of buttercream on the cake round.
Next, pipe a dam around the outside rim of the cake layer. This will keep the soft filling inside without leaking. Add about 1/2 cup of filling to your cake. Be sure to have a strong dam around it, and go easy.
Add the top cake layer. Look at it again at eye level to make sure everything is straight.
Add about 1/2 cup of filling to your cake. Be sure to have a strong dam around it, and go easy.
Add the top cake layer. Look at it again at eye level to make sure everything is straight. Fill in the middle layer areas with more buttercream.
Add a layer of buttercream to the top of the cake using an offset icing spatula.
Fill in the middle layer areas with more buttercream.
Add a layer of buttercream to the top of the cake using an offset icing spatula. Add a thin layer of buttercream to the sides, starting from the bottom, using a cake knife.
Crumb coat the entire cake with the cake knife.
Add a thin layer of buttercream to the sides, starting from the bottom, using a cake knife.
Crumb coat the entire cake with the cake knife.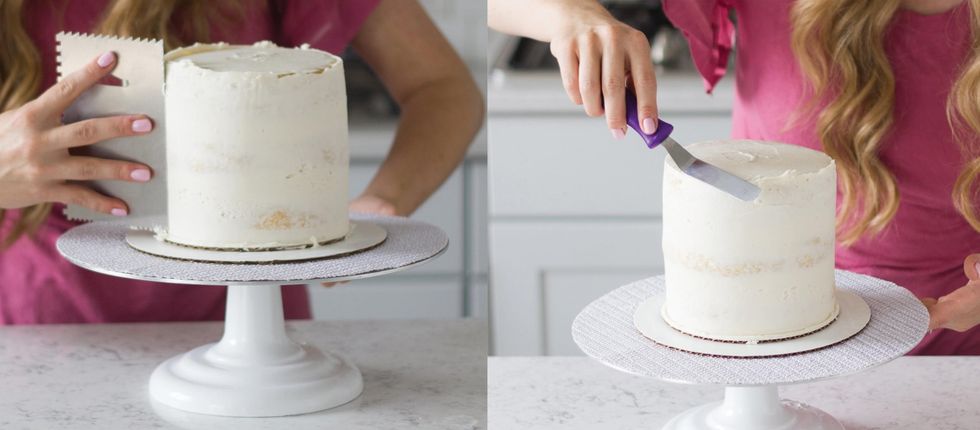 Smooth the crumb coat with a cake scraper, angling it at about 45 degrees from the cake.
Pull in the edges of the rim of the cake to the middle with an offset icing spatula. Freeze for 5 minutes.
Smooth the crumb coat with a cake scraper, angling it at about 45 degrees from the cake.
Pull in the edges of the rim of the cake to the middle with an offset icing spatula. Freeze for 5 minutes. Place a cardboard round on top of the chilled cake, and make sure it’s straight.
Place one hand on top and apply buttercream to the top half of the cake to hold the cardboard in place.
Place a cardboard round on top of the chilled cake, and make sure it’s straight.
Place one hand on top and apply buttercream to the top half of the cake to hold the cardboard in place.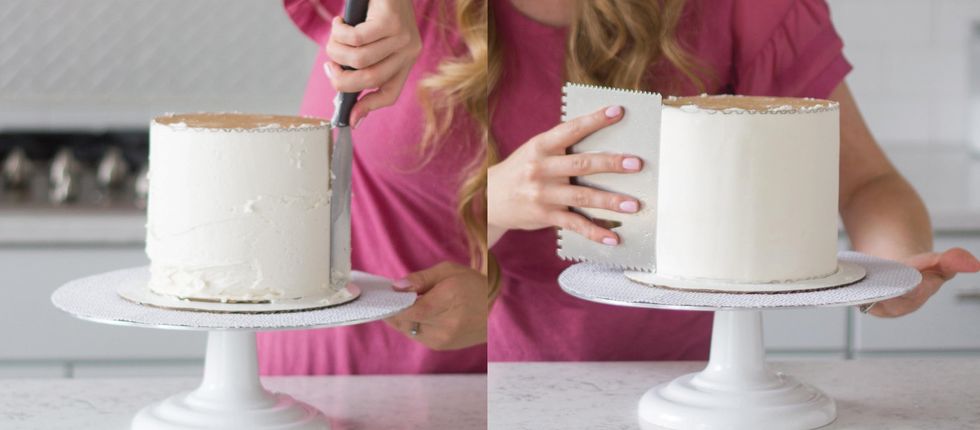 Coat the entire cake in buttercream using a cake knife.
Gently press a cake scraper slightly against the top and bottom cake board to smooth out the sides of the cake. Fill in any holes and repeat.
Coat the entire cake in buttercream using a cake knife.
Gently press a cake scraper slightly against the top and bottom cake board to smooth out the sides of the cake. Fill in any holes and repeat. Freeze for 10–20 minutes. Use a sharp knife to gently slice off the cardboard cake round.
Completely remove the cardboard round and discard.
Freeze for 10–20 minutes. Use a sharp knife to gently slice off the cardboard cake round.
Completely remove the cardboard round and discard.  Using an offset icing spatula, fill in any spaces on the top of the cake with more buttercream.
Pull in the edges carefully with the offset icing spatula, cleaning the knife each time. Freeze for 5 minutes to set.
Using an offset icing spatula, fill in any spaces on the top of the cake with more buttercream.
Pull in the edges carefully with the offset icing spatula, cleaning the knife each time. Freeze for 5 minutes to set.  For the ganache, melt candy melts or chocolate with heavy cream in the microwave in 30-second increments.
Stir to combine. Make sure there are no lumps! It shouldn't be too thick or thin.
For the ganache, melt candy melts or chocolate with heavy cream in the microwave in 30-second increments.
Stir to combine. Make sure there are no lumps! It shouldn't be too thick or thin. Pour into your squeeze bottle and twist the lid on tight.
Gently squeeze a bit of ganache down the side of the cake from the top edge. Stop when the ganache is about an inch down from the top.
Pour into your squeeze bottle and twist the lid on tight.
Gently squeeze a bit of ganache down the side of the cake from the top edge. Stop when the ganache is about an inch down from the top. Still squeezing, move the squeeze bottle over a bit for the next drip.
The more you squeeze, the deeper the drip.
Still squeezing, move the squeeze bottle over a bit for the next drip.
The more you squeeze, the deeper the drip. Add more ganache on top.
Using an offset icing spatula, spread the center pool of ganache to the edges. Then add a swirl on top. Let set for 5 minutes in the freezer.
Add more ganache on top.
Using an offset icing spatula, spread the center pool of ganache to the edges. Then add a swirl on top. Let set for 5 minutes in the freezer. Using a Wilton 1M piping tip, pipe on a swirl, going around three times, press down slightly, then lift up.
Repeat so there are 8 swirls on top of the cake. I do swirls at 12, 3, 6, and 9 o’clock.
Using a Wilton 1M piping tip, pipe on a swirl, going around three times, press down slightly, then lift up.
Repeat so there are 8 swirls on top of the cake. I do swirls at 12, 3, 6, and 9 o’clock. Finish the final swirls by adding one between each of the previous ones.
Place on final decorations. Chill the cake to set.
Finish the final swirls by adding one between each of the previous ones.
Place on final decorations. Chill the cake to set. Slide a cake lifter between the small cardboard round and the large one (cutting through the tape).
Lift cake under the small cardboard round with the cake lifter.
Slide a cake lifter between the small cardboard round and the large one (cutting through the tape).
Lift cake under the small cardboard round with the cake lifter.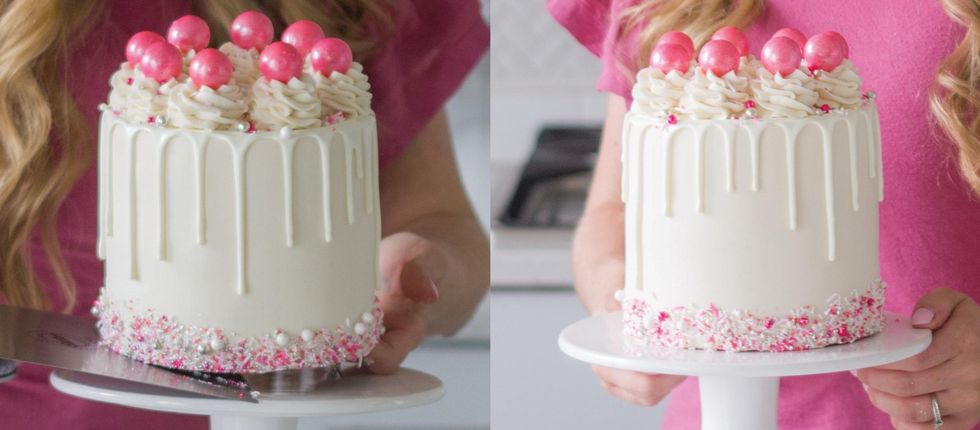 Carefully place the cake on the cake stand and slowly slide out the cake lifter.
You’re all finished!
Carefully place the cake on the cake stand and slowly slide out the cake lifter.
You’re all finished! Cookbookmarked! is our new series where we review the latest cookbooks from the foodie influencers you follow. Check back often to find out which new releases are worth your hard-earned cash and the recipes you should try first from each.
Cookbookmarked! is our new series where we review the latest cookbooks from the foodie influencers you follow. Check back often to find out which new releases are worth your hard-earned cash and the recipes you should try first from each.
RELATED: This Sugar-tastic Cake Decorating Class Will Turn Your Dessert Game *Way* Up
Cookbookmarked! is our new series where we review the latest cookbooks from the foodie influencers you follow. Check back often to find out which new releases are worth your hard-earned cash and the recipes you should try first from each.
Cookbookmarked! is our new series where we review the latest cookbooks from the foodie influencers you follow. Check back often to find out which new releases are worth your hard-earned cash and the recipes you should try first from each.
RELATED: This Sugar-tastic Cake Decorating Class Will Turn Your Dessert Game *Way* Up
(Photos and tutorial by Mandy Merriman / Cedar Fort Publishing and Media)