This trendy DIY will have all of your friends “oohing” and “ahhing.”
How to Make Geometric Animal String Wall Art
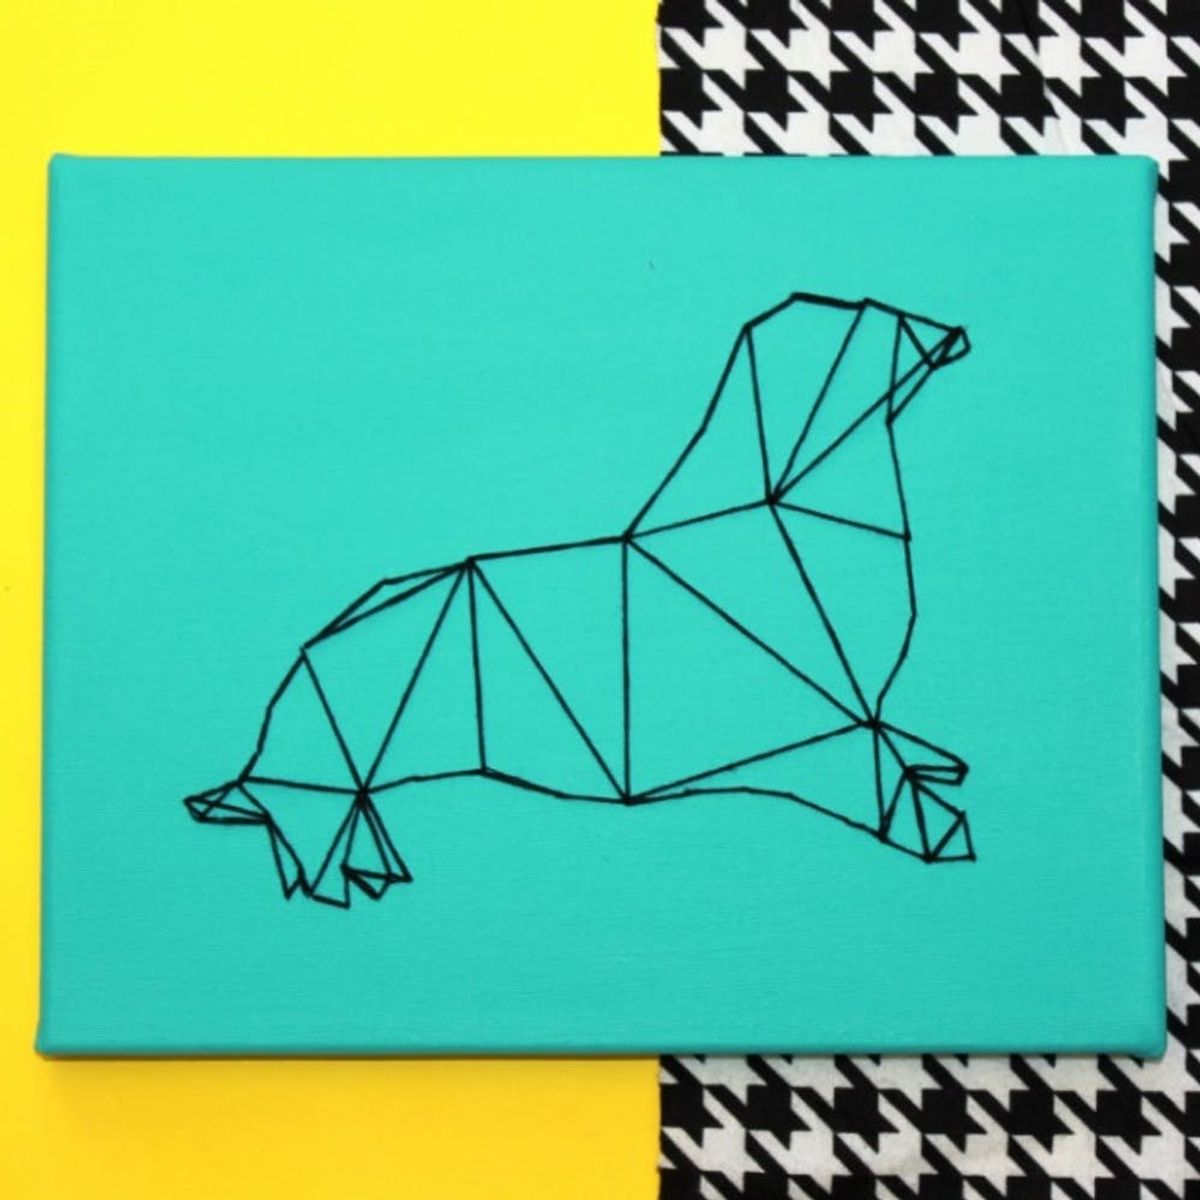
Transform your mantel into a geo-modern display with this ultra-awesome DIY Geometric Animal String Art as its centerpiece. If you have a trendy vibe going on in your home, go for the deer or fox motif. If you like to push the trend boundaries (we all like to do that sometimes, right?), then try an unexpected animal like a seal, narwal or even a duck-billed platypus. Why the heck not?! With the holidays on the way, you could even make one with a festive reindeer :)
Materials:
– 8 x 11-inch canvas
– craft paint
– embroidery thread
– printed out silhouette of an animal**
Tools:
– ruler
– pencil
– paper
– needle
– paint brush
– tape
(**Note: Size your silhouette so it’s smaller than the wooden frame on the canvas. If you don’t, it’ll be hard to pull your needle through the canvas. Your needle will get stuck on the wood.)
Instructions:
1. Paint your canvas in your favorite color. Once dry, check it out to see if you need a second coat. If so, repeat step one.
2. While your paint is drying, place a piece of thin computer paper on top of your silhouette of an animal and tape it to the paper with your silhouette on it. You want to be able to see your silhouette under the computer paper. If you don’t, shine a bright light on top so you can see the silhouette.
3. Draw dots around the edge of your silhouette on your blank sheet of paper. Mark them where the shape of the animal curves or changes direction.
4. Use a ruler to help you connect the dots. This way you can see what the animal outline will look like with the straight lines of the embroidery thread.
5. Place the outline of your animal on your canvas and tape it so it’s in the center away from the wooden frames.
6. Take your sharp needle and punch a hole in each of the dots. Then remove the paper.
7. Thread your needle and start connecting the dots with the string. Sew around the animal shape once skipping every other hole, then go back around filling in the blank spaces.
8. Use the outline of your animal to sketch out where you should put triangles inside of your animal. You can use it as a guide — once you’re sewing, you may see other triangles you like better.
9. Thread your needle with embroidery thread and create intersecting and adjacent triangles. The smaller areas of your design, like the face and feet, will have smaller triangles. The body will have larger triangles.
Paint your canvas in your favorite color. Once dry, check it out to see if you need a second coat. If so, repeat step one.
While your paint is drying, place a piece of thin computer paper on top of your silhouette of an animal and tape it to the paper with your silhouette on it. You want to be able to see your silhouette under the computer paper. If you don’t, shine a bright light on top so you can see the silhouette.
Draw dots around the edge of your silhouette on your blank sheet of paper. You want to draw your dots where the shape of the animal curves or changes direction.
Use a ruler to help you connect the dots. This way you can see what the animal outline will look like with the straight lines of the embroidery thread.
Place the outline of your animal on your canvas and tape it so it’s in the center away from the wooden frames.
Take your sharp needle and punch a hole in each of the dots. Then remove the paper.
Thread your needle and start connecting the dots with the string. Sew around the animal shape once skipping every other hole, then go back around filling in the blank spaces.
Use the outline of your animal to sketch out where you should put triangles inside your animal. You can use it as a guide — once you’re sewing, you may see other triangles that you like better.
Thread your needle with embroidery string and create intersecting and adjacent triangles. The smaller areas of your design, like the face and feet, will have smaller triangles. The body will have larger triangles.
What geometric animal are you going to make? Better yet, show us pictures using the hashtag #iamcreative. As always, leave questions and comments below.


