Hair up or down, this effortless addition to your ‘do is sure to make you shine… and it’s just as easy to make!
DIY a Chic Hair Chain in 15 Minutes
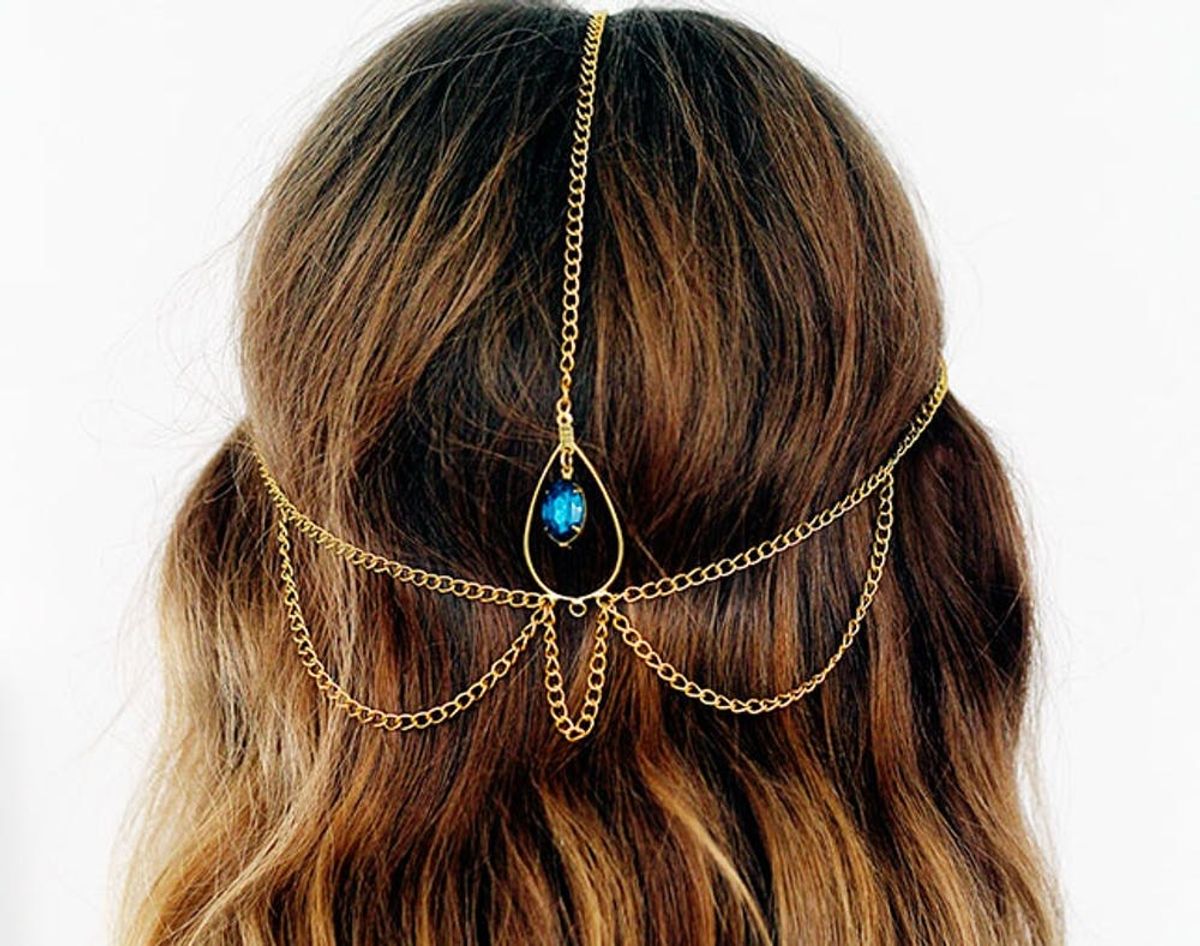
It’s getting to be the time of year that’s all about parties, glamour and adding a little sparkle to any (and every) outfit. One way to really stand out is to adorn your tresses with a hair chain — the perfect hair accessory to complete any fancy outfit for fall and beyond. Hair up or down, this effortless addition to your ‘do is sure to make you shine… and it’s just as easy to make! Basic jewelry supplies like chain and jump rings make up the bulk of the easy-to-make embellishment. And even though the statement gems may require a special shopping trip, once you’ve rounded up your supplies, you’re ready to bust out a goddess-level hair chain in just 15 minutes.
Materials:
– 21-in piece of jewelry chain
– 1 drop bead (more to taste)
– 1 rhinestone (more to taste)
– 1 pear-shaped earring finding
– 4 jump rings (more if your chain is soldered)
– 1-2 head pins (if your beads/rhinestones have vertical openings)
Tools:
– ruler
– 2 flat nosed jewelry pliers
Instructions:
1. Cut the chain into six pieces: three 10-in sections; two 4.5-in sections; and one 2-in section
2. Grab the 2-in section of chain and open up the last chain link with the flat-nosed pliers by twisting the links apart. Or, if your chain is soldered together and cannot be opened up, add a jump ring instead by using the same technique.
3. Hook the open chain (or jump ring) over the outer loops of the pear-shaped earring finding and close them back up using the pliers. Do this on both ends of the 2-in chain.
4. Using this same technique, attach one end of each of the three 10-in chains to the earring finding: one at the top loop and the other two on the outer loops at the bottom of the finding.
5. Lay the whole piece flat. Then attach one end of each of the 4.5-in chains to the outer loops of the earring finding. Make sure the longest chains are laid out straight, then attach the other end of your 4.5-in chain to them about 2-in down, making sure that each has the same amount of drape.
6. Open up a jump ring, and place the three free ends of all three 10-in chains onto it. Close the jump ring to secure.
7. Attach a drop bead to this same jump ring to create the front detail by threading it onto the jump ring. Or if your bead has a vertical opening, insert a headpin to turn it into a pendant, then add to the jump ring.
8. Use the same compatible technique to attach the rhinestone to the top loop of the pear-shaped earring finding to create the back detail.
Ready to get glam in just 15 minutes? Have your jump rings open and your pliers at the ready, then go! Start by adding the smallest chain to the outside loops of the pear-shaped earring finding, then add on the three largest chains at its top loop and two side loops. Add on those two 4.5-in chains on either bottom loop, then attach them to the longer chains about 2-in down or at whatever length creates the most ideal drape.
Up until this point, you may have been working without jump rings unless your chain was soldered, but you’ll need them now to attach all three longer chains together. Once that’s done, it’s time to add the flair: a drop bead for drama in the front, and a rhinestone for party in the back. Add whichever kind of statement beads speak to you — remember, this is always about making it your own! Then, slip it on — yep, you’re already done.
Whether you’re rocking perfectly undone waves or a polished updo, this hair chain amps up the drama just enough. With one drop bead, it’s head turning, but imagine if you added on multiple drop beads every 10-or-so links, or even continued the scalloped chain from back to front — that look would be jaw-dropping. And that’s the beauty of this beauty: it can be as simple or as ornate as you want. We’re all for an impressive entrance, but we like to make an even bigger exit, so we put the sparkler in back.
Gorgeous, right? What hair accessories are you making just for fall? Which style DIYs will you wear through the holidays? Tell us about your creations in the comments below.


