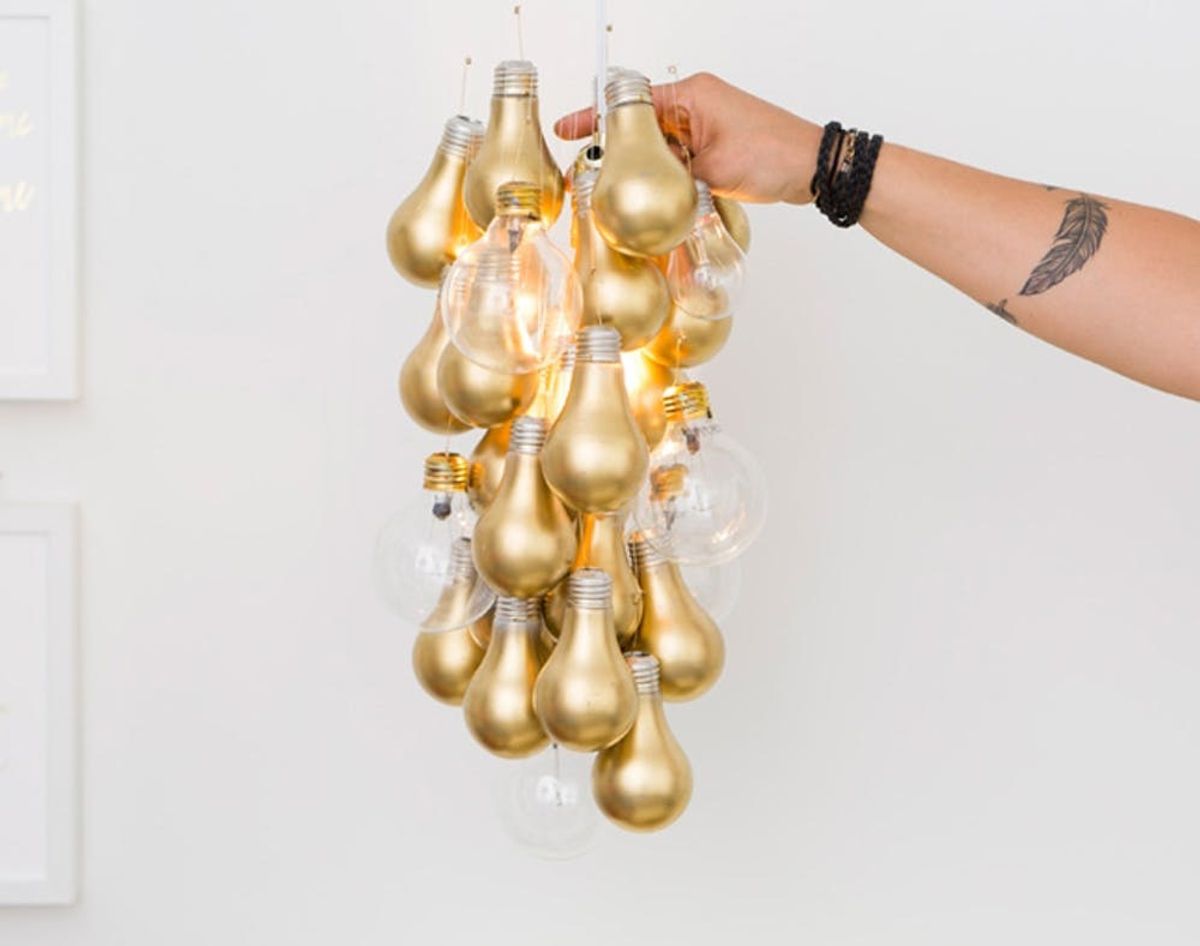
Next up in the world of gold, we’ll show you how to turn old light bulbs into a chic vintage-inspired mobile.
You Can Totally DIY This Gold-Dipped Light Bulb Chandelier

Next up in the world where all that glitters = gold, we’ll show you how to turn old light bulbs into a chic, vintage-inspired mobile. And, if you’re feeling really bold, you can even turn it into a chandelier by nestling a pendant light bulb kit right in the middle! Bright idea, huh?
Materials:
– gold spray paint
– E-6000 adhesive or hot glue
– 2-inch key ring
– ½-inch key ring
– fishing line
– assorted light bulbs
– gold ornament hooks
Tools:
– X-Acto knife
– jewelry pliers
– protective gloves
– safety glasses
Instructions:
NOTE: Shards of glass are involved in the light bulb prepping, so we strongly advise that you wear protective eyewear and protective gloves.
1. Holding the light bulbs by their metal screw base (not the glass bulb), carefully lift the piece of metal from the bottom of the light bulb with the X-Acto knife and pliers. We recommend doing this over a garbage can or something that can catch the broken glass.
2. Put your x-acto blade into the hole and gently rock it back and forth until the glass begins to crack. Remove broken glass pieces with pliers and shake flakes of glass out of the bulb into the trash.
3. Spray paint the light bulbs of your choice gold. We mixed in some clear, unpainted bulbs for variety.
4. Put a layer of E-6000 or hot glue around the inner lip of the bulb bottom and insert an ornament hook by wedging in the bent end and snapping it securely below the lip of the bulb bottom and bending the rest of the hook straight up. Add another layer of glue and let it dry (overnight for E-6000).
5. Use a round nose plier to make loops in the top of all the ornament hooks. Trim excess wire.
6. Tie about six 4 to 6-inch pieces of fishing line around the smaller key ring and hang.
7. Tie the bottoms of the six pieces of fishing line evenly around the larger key ring so that it hangs flat and level. You can melt the excess line down to secure the knot. Be careful not to melt it down too close to the knot or it will weaken and break.
8. Hang your longest, largest bulbs with the fishing line from the center top ring first.
9. Now arrange and layer the light bulbs around the larger ring, working your way up and layer onto the structure.
10. Use a chain or string to hang.
We love the vintage style light bulbs!
Holding the light bulbs by their metal screw base (not the glass bulb), carefully lift the piece of metal from the bottom of the light bulb with the X-Acto knife and pliers. We recommend doing this over a garbage can or something that can catch the broken glass.
Put your X-Acto blade into the hole and gently rock it back and forth until the glass begins to crack. Remove broken glass pieces with pliers and shake flakes of glass out of the bulb into the trash.
Spray paint the light bulbs of your choice gold. We mixed in some clear, unpainted bulbs for variety.
Put a layer of E-6000 or hot glue around the inner lip of the bulb bottom and insert an ornament hook by wedging in the bent end and snapping it securely below the lip of the bulb bottom and bending the rest of the hook straight up. Add another layer of glue and let it dry (overnight for E-6000).
Use a round nose plier to make loops in the top of all the ornament hooks. Trim excess wire.
Tie about six 4 to 6-inch pieces of fishing line around the smaller key ring and hang. Tie the bottoms of the six pieces of fishing line evenly around the larger key ring so that it hangs flat and level. You can melt the excess line down to secure the knot. Be careful not to melt it down too close to the knot or it will weaken and break.
Hang your longest, largest bulbs with the fishing line from the center top ring first.
Now arrange and layer the light bulbs around the larger ring, working your way up and layer onto the structure.
Use a chain or string to hang. Voila!
Bonus! You can easily turn this into a hanging lamp by adding a light bulb socket and cord! Ta-dah! It’s a beautiful chandelier!
Have you ever turned light bulbs into anything else? Or made your own chandelier? Tell us about it in the comments below.


