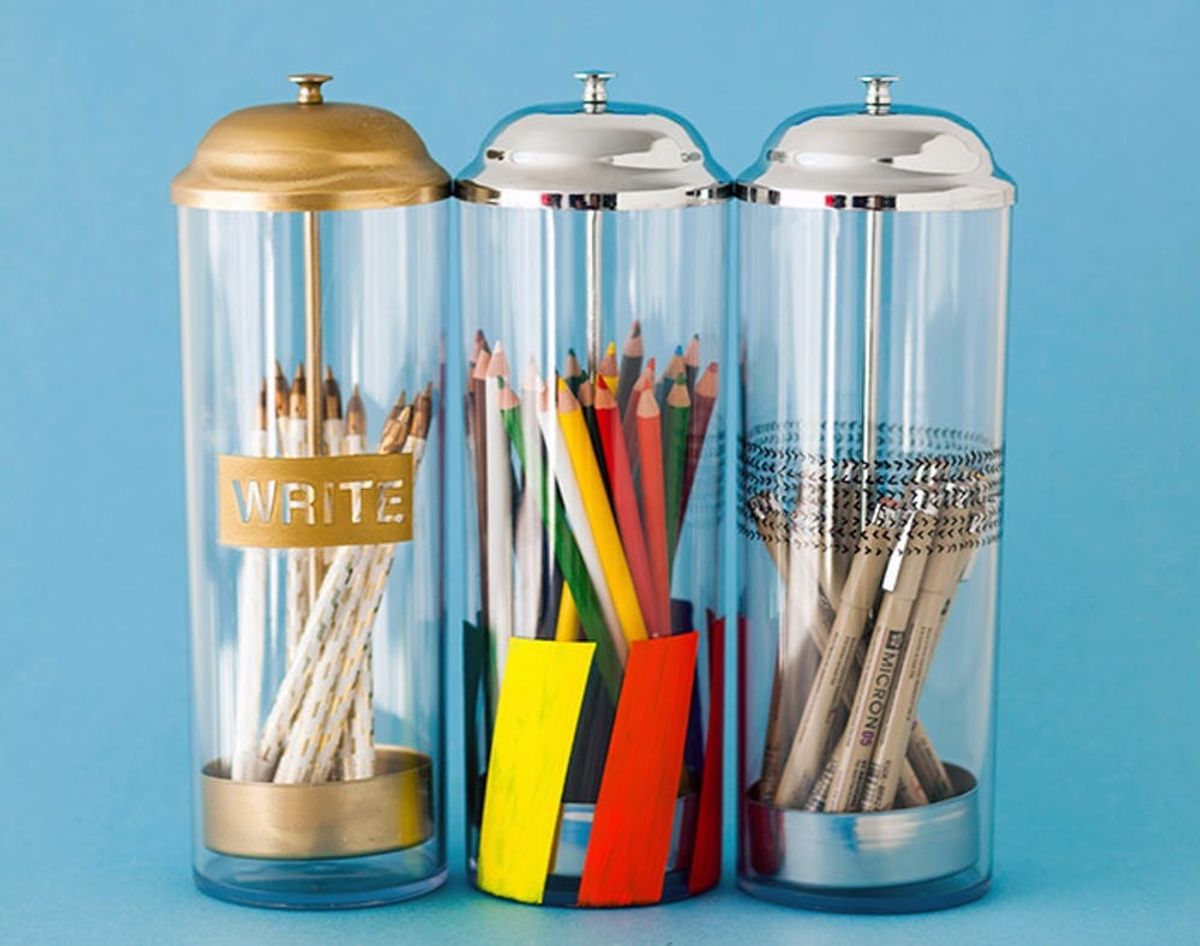
You might recognize these containers as straw holders you’d normally find in a diner that’s either retro or a little behind on the times! But we thought they’d be great as fun desk accessories instead. Of course we can’t just toss in a few pens and call it a day. Instead, we came up with three easy DIYs to make your pencil holder really stand out. And then we found the perfect pens to fit inside!
Pop-Up Pencil Holders 3 Ways

You might recognize these containers as straw holders normally found in retro diners. But we thought they’d be great as chic desk accessories instead. Of course we can’t just toss in a few pens and call it a day. Instead, we came up with three easy DIYs to make your pencil holder really stand out. And then we found the perfect pens to fit inside!
Which of these three would be the best fit for your workspace?
This holder is perfect for fine artists pens, or other felt tip markers. Plus, it’s the absolute easiest to make!
Materials:
– painter’s tape
– fine point paint pen
Instructions:
1. Tape off one stripe on the pencil holder. This will serve as your guide for the first row.
2. Using the paint pen, draw a row of arrows, Vs, or slashes.
3. Remove the painter’s tape.
4. Draw the next row of your pattern with the design facing the opposite direction.
5. Continue alternating the direction of the rows for seven to nine rows.
This is the simplest of the three DIYs. Don’t worry about each arrow being perfect, the pattern will hide any individual flaws.
You can almost imagine that one of the pens inside is what was used to make this little pattern.
We love the way this design mirrors the colored pencils we’ll be stashing inside. If the ROYGBIV look isn’t for you, you can choose any other color scheme imaginable.
Materials:
– pop-up straw dispenser
– measuring tape
– painter’s tape
– acrylic paint (red, orange, yellow, green, blue, purple)
– paint brush
– paint palette
– water dish
Instructions:
1. Tape off one stripe 1/3 of the way up from the bottom.
2. Measure around the circumference of the holder. Divide that measurement into the number of sections you’ll be painting. (We did seven, and mixed indigo paint from the blue and purple.)
3. Mark off sections on the bottom of the holder, and place a piece of painter’s tape at each section. Be sure to stay on the same side of your mark each time. You can also angle the tape, or you can have it go straight down to the first tape stripe.
4. Paint each section of the holder with a different color. We went in rainbow order.
5. Let the paint dry completely before removing the painter’s tape.
If you want to make it easier, only tape off six sections. Then you can skip a lot of the measuring and just divide the circle down the center, and section from there.
We used equal amounts of blue and purple paint to mix up an indigo hue to go between them.
We wanted a little bit of texture, so we let the paint strokes show through. If you want a smoother look, try using a foam brush and doing two thin coats.
So many freshly sharpened colored pencils just begging to be used!
You can make your holder say anything you want. We’re using it as a reminder to write by hand occasionally.
Materials:
– vinyl adhesive letters
– painters tape
– plastic bags or plastic wrap
– gold spray paint
Instructions:
1. Choose your word, and apply the letters to the middle of the plastic holder.
2. Tape plastic bags or plastic wrap on to the holder so that all of it, aside from a box around the word, is covered.
3. Spray the holder with gold spray paint. It might take two coats to fully cover.
4. Once the spray paint is completely dry, remove the tape and letter stickers.
If you want to get your letters perfectly spaced, use a ruler and a dry erase marker to mark off where each letter should go.
Make sure the only part of the holder showing is the part you want to be gold. The straw holders we ordered came wrapped in plastic bags, so they were the perfect size for covering the holder.
To make the pencil holder coordinate, we sprayed the interior metal piece gold to match. As always it’s better to spray lighter and have two coats for a more even finish.
Now if you’ll excuse us it’s time to keep up with our correspondence.
How do you have your pens displayed on your desk? Tell us in the comments!


