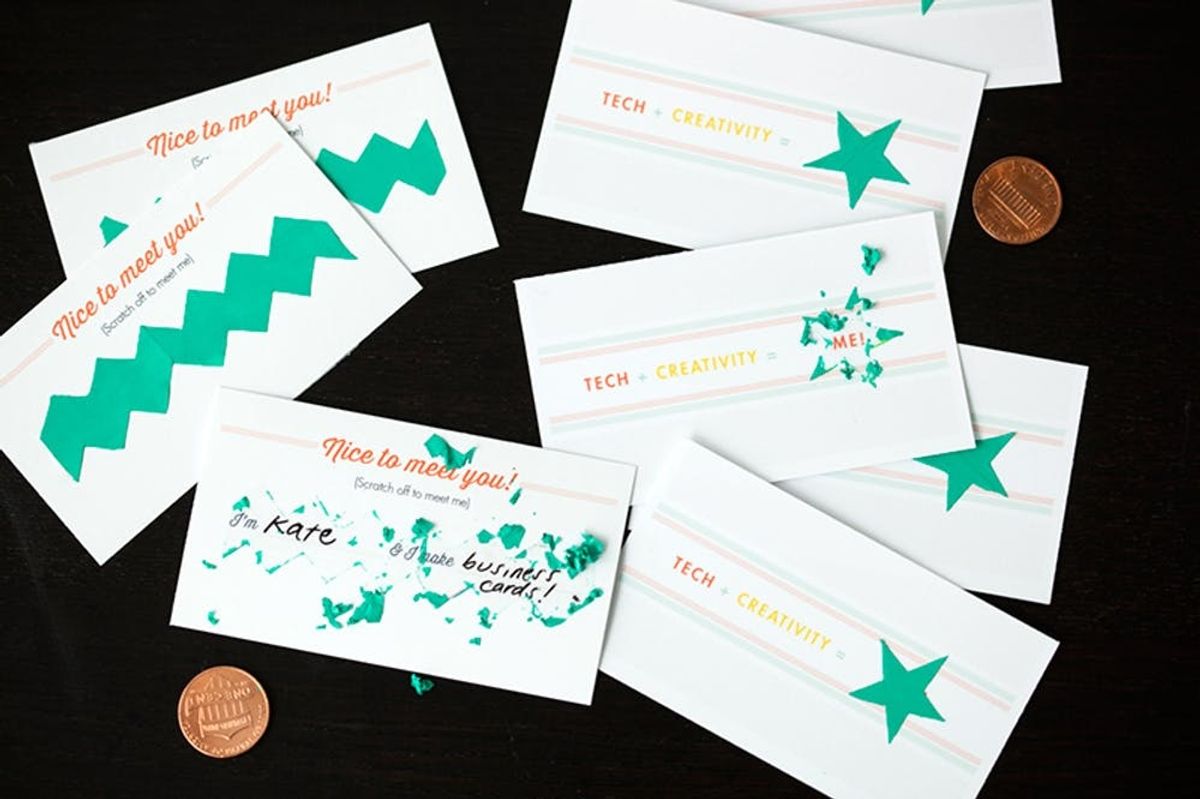
Since we posted our roundup of 25 stand-out DIY business cards, we’ve been feeling especially inspired by their mix of personality and professionalism. Paired with a shiny new coin, these cards are a fun and nearly fool-proof way to grab the attention of potential clients. So we thought we’d put a Brit + Co. spin on one of our all-time favorite concepts: the scratch-off business card. The twist? Creating unique shapes with paper punches for our scratch off canvas! By trading in the more common circle for cloud and pennant shapes, the scratch off surface becomes an eye-catching graphic within the design.
How to Make Scratch-Off Business Cards (+ Free Printables!)

Since we posted our roundup of 25 stand-out DIY business cards, we’ve been feeling especially inspired by their mix of personality and professionalism. Paired with a shiny new coin, these cards are a fun and nearly foolproof way to grab the attention of potential clients. So we thought we’d put a Brit + Co. spin on one of our all-time favorite concepts: the scratch-off business card. The twist? Creating unique shapes with paper punches for our scratch off canvas! By trading in the more common circle for cloud and pennant shapes, the scratch off surface becomes an eye-catching graphic within the design – super pro, right?
While we took the “any shape goes” approach for this project, realize that the more elaborate the shape, the more time consuming the project will be (and the more awesome your cards will look!) So we recommend reserving this technique for small batches meant for VIP pockets. To get things going, we’ve included a printable template of our maker business card design for our fellow creatives to download and use! They’d make a great hand out at Re:Make, no? You can print it now and follow along with the tutorial below or save it for another day. We also made two additional designs just because. Has that ever been a bad reason?
Materials:
– Business card templates (via Amazon)
– Acrylic paint
– Dish soap
– Clear packing tape
– Painters tape
– Wax paper
– Card stock or other thick paper
– Printable templates (download here)
Tools:
– Printer
– Small scissors
– Paper punches
– Paint brush
– Ruler
– Exacto knife
Instructions:
1. Measure your paper punches in order to seamlessly integrate them into your business card design. We used Photoshop to design our cards (you can download and print our maker business card design below).
2. Print design on business card templates, tear away each business card, and set aside for later.
3. Punch card stock with the paper punches of your choice and cut each out in a square to make stencils.
4. Lay clear packing tape over each stencil and with small scissors carefully trim each tape design. Lay each cut out gently on a piece of wax paper.
5. Make the scratch off paint by mixing two parts paint with one part dish soap. Mixing quickly will cause bubbles, so try mixing slowly.
6. Paint two coats on your cutouts and leave to dry overnight or till completely dry.
7. Carefully peel each cutout off of the wax paper – you may need to trace along the edges with an exacto knife to lift the painted tape from the wax paper.
8. Place each cut out on your business card and gently press to secure. Use an exacto knife to carefully cut away any rough edges.
9. Hand out with a coin and watch your clients scratch away!
First things first, prep to make your business card design template. What kind of business do you have? What aspect of yourself do you want to promote? We, of course, based our business card quartet around our passion for living creatively. Once we decided on a theme and sketched a design, we measured the paper punches we wanted to use on each card to make sure we allotted enough space for it in the actual template. After about a half hour tinkering in Photoshop, we finalized our designs and sent them to print on these awesome paper templates. Now that these bad boys are ready, set them aside so we can get to paper punching!
We used four different paper punch shapes for this project: the star and zig zag on our first two, the pennant on the next, and the cloud on the last. We’ll break it down card by card below.
Just make sure to lay down some wax paper first! This will act as a non-stick surface for our tape cut outs. Now on your mark, get set, let’s make some scratch off business cards!
First up, maker business cards! This duo makes a strong statement about our love for all things innovative and handmade. We love how the zig zag cuts through the middle of the top card like Charlie Brown’s tee shirt, and we used a star to cover the answer to our creative equation on the bottom card. Let’s tackle making these shapes first.
Grab a piece of thick paper or card stock, insert into the paper punch, and punch away! We made this star shape in the paper first, then cut around it leaving plenty of room around the edges for our tape to go.
Same thing with this zig zag punch, except we had to hack it a bit to get the result we wanted. In order to get a thick zig zag stencil versus a paper edge, punch four zig zags, cut each out with room to spare, line up two with their “teeth” facing each other, and tape together with painter’s tape. Do this step twice – we need two finished stencils of this shape in order to cover the space on the business card.
Your final stencils should look like this! The zig zags kind of look like hungry monsters, don’t you think?
Next, tape over each stencil with clear packing tape, then cut out each shape. Small scissors work best for this precise cutting. Go slowly on this step, it doesn’t take much for the tape to rip or for a scissors blade to accidentally chop off a star arm. Once the shape is fully cut out, lay it out on wax paper.
Now mix the scratch off paint! We’ve used this technique before making faux Polaroids, and it’s pretty simple: just take dish soap – literally any dish soap – and mix one part soap to two parts acrylic paint of any color! Mix gently to avoid creating soap bubbles, though that’ll just add more character to your business cards. Once the scratch off solution is mixed, paint your cutouts! Two coats will do, and let them sit overnight or till completely dry. Don’t try to speed the process with a hair dryer or other heating device – it will make it super hard to rip the tape from the wax paper.
Once your paint is dry, it’s time to peel off the tape! But not so fast, cowboy. Gentle is the operative word with this project – the tape is delicate and will be a bit harder to handle after it is painted. And since its coating is made to scratch off, no yanking, poking, or rough-housing is allowed while removing it! Make it easy on yourself by using an exacto knife to trace as much of the shape as you need to get it lifted, then slowly peel the cut out away. Now all you have to do is lay it down on the card and trim away any excess paint that’s gripping onto the shape.
Now do the same with the star. Make sure it’s totally covering the message before you lay it down. You wouldn’t want to ruin the scratch off surprise!
Check it out! Our maker business card set is finished. We love that you can tell that the star and zig zag stand out for a reason. Once you’re equipped with a coin, you’ll know exactly what to do!
Scratch away! As you can see, the answer to “Tech + Creativity” is “Me!” That’s right, it’s me, or you, or anyone else who creates awesome things that make every moment of the day more exciting. At this moment, scratch off business cards are making us smile :) And now you know why we couldn’t stop at making just one…
We’re all about this clean and modern pennant shape. It’s fairly large as scratch off areas go, so we knew it had to cover something pretty major. That’s what gave us the idea to make a scratch and save card that reveals a secret discount! This type of card would be perfect for anyone with a brick and mortar store or who has a physical presence at a market or pop-up event. Since you already know the steps from our fist card, you should be rarin’ to go!
Grab the pennant punch and punch your paper! This pennant shape is much more simple than the first two we tackled, so cutting it out should be a breeze. Even though it’s a pretty straightforward shape, it still has such a charming quality to it. Lay it down on wax paper and then your ready to paint.
We used a shimmering gold to cover our pennant, using two parts paint to one part dish soap. Mix your solution together and then paint away. Two coats should make it totally opaque. Leave it to dry completely, then carefully peel the tape from the wax paper. Now you’re almost there!
That’s one regal business card! The scraps of paint look so festive scratched from the card – be thrifty and reserve them for your next confetti concoction! Two down, one to go. Let’s finish making our final scratch of business card, shall we?
We couldn’t help but think of lively outdoor festivals when we saw this puffy cloud cut out. From neighborhood celebrations to seasonal craft fairs, we just love chatting with vendors and shopping in the great outdoors. Paired with an inviting sun and one friendly raindrop, this cloud gets the message across that inclement weather won’t stop the party! So what do you say, let’s finish this business card set in style.
You know what to do by now: Punch the cut out, cut it into a stencil, lay out clear packing tape over it, snip out your shape, and lay it gently on wax paper. Did you do that with your eyes closed?
We didn’t want our cloud to send out overcast vibes, so we painted it a cheery sky blue. Remember the amounts for the scratch off solution? It’s one part dish soap to two parts acrylic paint. Mix gently to avoid tons of soap bubbles, like you’re stirring a potion in a hot cauldron. Brush on two coats of paint and let it completely dry before you peel it off.
Come one, come all – rain or shine! Now we’re kind of wishing that this street fest was a real thing – but back in reality, we think all of these business cards deserve an encore.
These scratch off cards would be a great way to reveal a promotion or new position to your close friends or family. Plus the scratch off paint is so easy to make, you can apply it to nearly any kind of greeting card or special occasion invite.
We had so much fun scratching our business cards, it’s a good thing we made a handful more! Time to hand them out.
Remember to carry a couple of shiny coins with you when you’re out networking. Now hand ’em over to your most valuable potential clients and watch their eyes light up. How fun!
Be sure to download the printable template for our star and zig zag business cards! Let us know how they turn out in the comments below!


