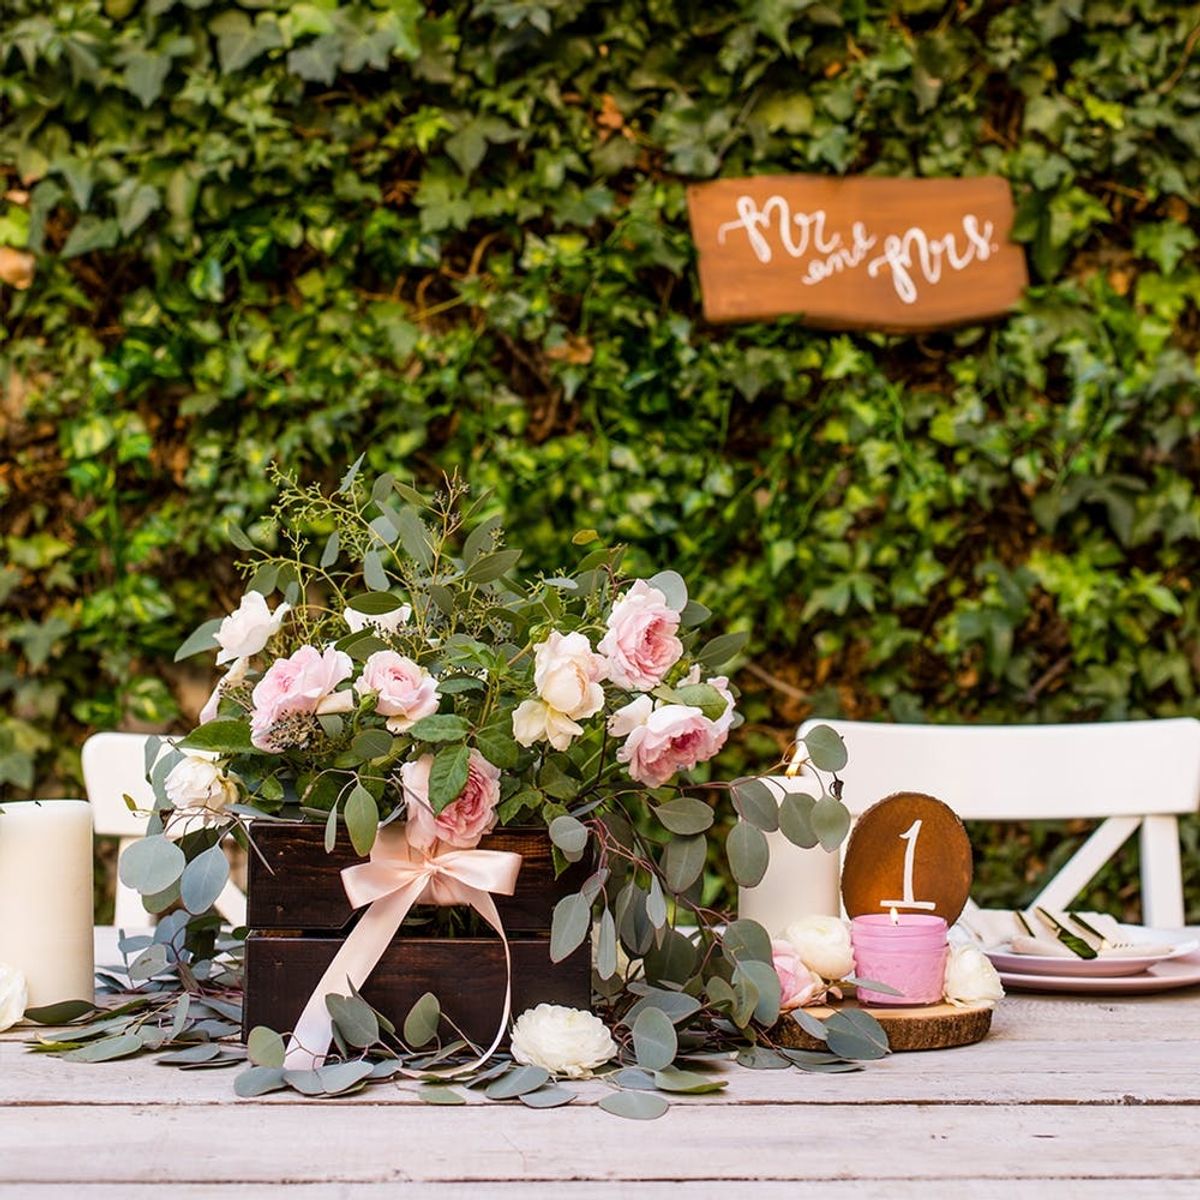
Setting the table never looked so good.
Three Easy DIY Projects for the Most Romantic Sweetheart Wedding Table

We hear those bells ringing with wedding season in full swing. From cake tasting to seat arrangements, there are so many decisions, big and small, that need to be made. However, as chaotic as the planning stages may seem, this is a day you’ll remember for the rest of your life, so be sure to take a little time to enjoy the more thoughtful stages of the process. A good place to start is at the head of the table! We’ve partnered with Minwax® to help you handcraft a dreamy and romantic sweetheart table with three easy DIY projects. While you may not have time to DIY your entire wedding, you can definitely take a weekend to put some extra love into these projects. After all, you will be at the head of the table, so make sure you shine.

Wooden Mr. and Mrs. Sign
Get ready for your happily ever after with this beautiful stained wood sign. Minwax® Wood Finishing Cloths make it super easy to apply a stain and clear protective finish in one quick step, while bringing the color of wood alive and really making a statement. When sourcing the wood, you can always upcycle an old wood piece by looking around your backyard or basement for wood boards you can spruce up and stain.

Materials and Tools:
- Minwax® Wood Finishing Cloths in Chestnut (Gloves are included)
- wood board / wood cutting board
- dropcloth
- 220 grit sandpaper
- clean rags
- white paint pen
- pencil
Instructions:

- Sand and clean your wood board. Be sure to wipe off any extra sanding dust.
- Use Minwax® Wood Finishing Cloths to wipe the stain and clear protective finish onto the board.
- Remove any excess with a clean rag and let dry for an hour. If you want a darker color, apply a second coat, following these same steps.
- Lightly write out your message with a pencil.
- Trace your message with the white paint pen.
- Proudly display your sign!
Prepare your wood by cleaning and sanding. Be sure to remove any excess dust. Wearing gloves, rub the pre-moistened stain cloth onto your wood surface. Wipe off any excess stain, let dry for an hour and voilà, you are done!

Since hand lettering can be very challenging, be sure to write out your message in pencil first. (If you REALLY want to up your game, check out our lettering online classes). Write over your message with a paint pen and erase any remaining pencil lines.


String up your sign and you’re ready to go. Look out, because here comes the bride! This project also makes a super thoughtful gift for any couple!
Cut Wood Table Number + Candle Holder
You can create cute little table numbers for your head table (and all tables if you have the time!) using a cut wood piece. It adds a very rustic feel to your nuptials.

Materials and Tools:
- Minwax® Wood Finishing Cloths in Chestnut (Gloves are included)
- 220 grit sandpaper
- drop cloth
- clean rags
- cut wooden disc
- paint
- paint brush
- white paint pen
- pencil
- small mason jar
- tea light candle
- hot glue gun and glue sticks

Instructions:
- Sand and clean your wood board. Be sure to wipe off any extra sanding dust.
- Use Minwax® Wood Finishing Cloths to wipe the stain and clear protective finish onto the board.
- Remove any excess with a clean rag and let dry for an hour. If you want a darker color, apply a second coat, following these same steps.
- Use the pencil to lightly write out the table number and trace over with the white paint pen. Let dry.
- Use a hot glue gun to glue the mason jar to the side of the wood disc.
- Remove the tea light candle from the metal container and place into the mason jar.
- Light your candle and you’re ready to go.

First, just like the sign, you’ll want to clean and sand your wood. Then, wipe the stain onto your wood disc with the Minwax® Wood Finishing Cloths. We used a combination of dabs and wipes for a clean, even look. Set aside to dry for an hour.

To bring added color to the candle holder, paint the inside of the small mason jar with a soft pink color. Once the wood disc is dry, write the table number onto the disc and glue the jar to the wood disc.

Drop in a candle and your table is almost set!

Once lit, it really makes your dreamy wedding table shine.
Wood Box Floral Arrangement
Not only is this a beautiful centerpiece for the table, but it also can serve an incredibly helpful function. The night will be a whirlwind, so why not place your important items that you don’t want to lose in here? It’s the perfect place to display your bouquet, store your cell phone, and stash your photo booth pictures for safe keeping.

Materials and Tools:
- Minwax® PolyShades® in Espresso (or desired color)
- natural bristle brush
- small raw pine wood crate
- 220 grit sandpaper
- mason jar and bottles
- satin ribbon
- rubber gloves
- stirring stick
- clean rags
- steel wool (grade 000 or finer)
- assorted flowers

Instructions:
- Stir the PolyShades® thoroughly, using a clean stirring stick. Gently repeat the stirring every 10 minutes to assure that the color remains evenly distributed throughout the polyurethane.
- Sand the wood smooth, using fine grade sandpaper (#220). Apply the one-step stain and polyurethane using a thin, even coat. Let dry according to label directions. Repeat application if you want a darker color.
- Once completely dry, wrap the handles with the ribbon to add an accent of color.
- Arrange your flowers into the bottles, place them into the box, and you’re ready to go.
Before you apply the PolyShades®, you’ll want to stir the can and then sand your entire box with 220 grit sandpaper, and wipe off any sanding dust.


Next, using a natural bristle brush, apply a very thin, even coat of Minwax® Polyshades® following the direction of the grain. Let this bad boy dry thoroughly for at least six hours. Then, rub the surface lightly with fine steel wool (grade 000 or finer) and remove all dust before applying your second thin coat. To deepen the color, apply a third coat.

Once the box is completely dry, wrap a satin ribbon around each of the handles and tie a bow. This softens the dark stain and can add a nice accent color to your flowers of choice.

Fill with mason jars full of flowers and you have your centerpiece!

Cheers to the bride and groom!

These details definitely add some love to your wedding table.
Looking for more wedding DIY inspiration? Check out our Pinterest page for ideas.
DIY Production + Styling: Lindsay Saito
Photography: Chris Andre


